Applications that we develop as cloud-native sometimes may have to deal with data related operations such as accessing, storing or sharing a data between applications.
As we know, our applications that we host on Kubernetes as containerized are ephemeral and stateless by nature. In other words, if we don’t use a persistent storage solution, any data that we store in a container will survive until the container is deleted.
In this article, we will see how we can create a persistent volume that can be accessed by many containers and also how to mount it to our containers. We will perform this operation by using fully managed Azure File shares service. We will also briefly mention that how we can make our persistent volume secure against potential security threats.
Prerequisites
We need to have following environment and tools.
- Azure Kubernetes Service
- Azure CLI
- Kubectl
Kubernetes Volumes
Kubernetes has a volume abstraction model that solves many problems such as data loss and has a structure that allows us to use different volume types. With this flexible structure, we can use different volume types within the pods simultaneously.
We can categorize volumes as Ephemeral and Persistent in Kubernetes. While the lifecycle of the ephemeral is bound to a pod, lifecycle of the persistent is not bound to any pod. In addition, when creating a Kubernetes volume, either it can be created statically by a cluster administrator or dynamically by the Kubernetes API.
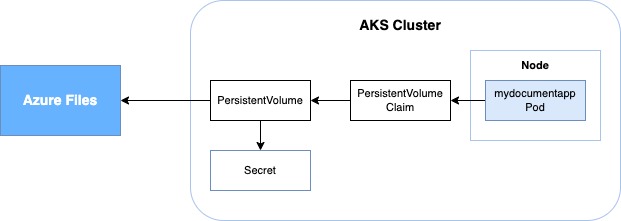
In the context of the article, we will look at how to mount statically created Azure File shares service to a pod by using PersistentVolume and PersistentVolumeClaim resources.
Let’s Create a Azure File Shares
Azure Files offers us a fully managed file share service that can be accessed over SMB or NFS protocols. Especially if we are in the cloud environment migration process, we can make this migration process easier by using Azure Files since it has ability to work on both on-prem and cloud environments and also it easily gets mounted to the applications over SMB protocol.
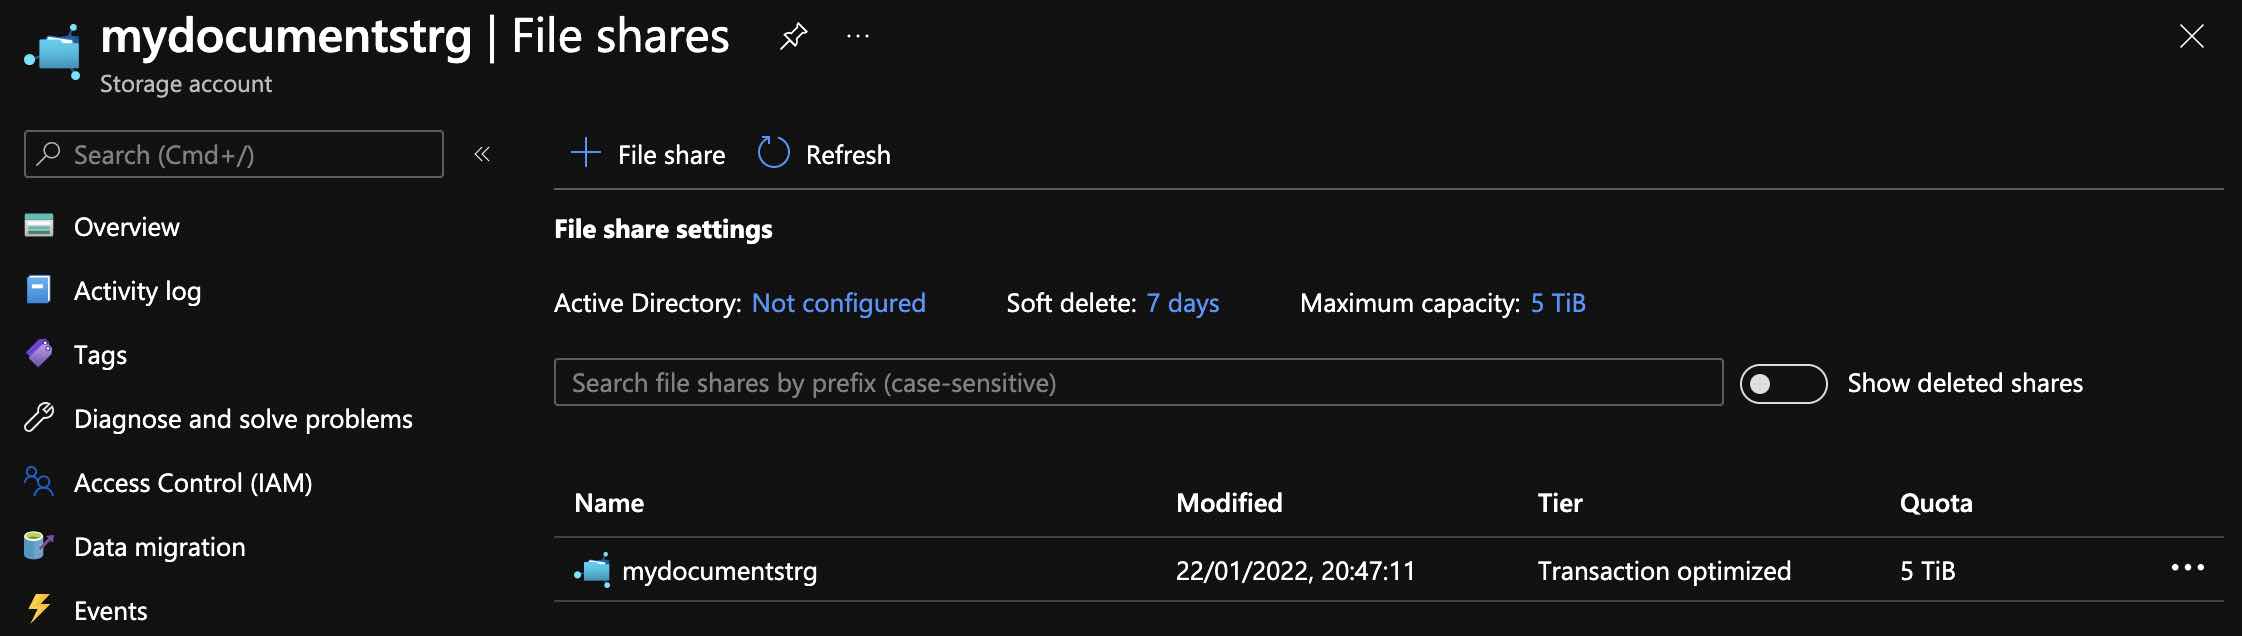
First we need to create a storage account, after that we will be able to create a File shares service. Let’s perform the operations via Azure CLI as follows.
az storage account create -n STORAGE_ACCOUNT_NAME -g RESOURCE_GROUP -l LOCATION --sku Standard_LRS
export AZURE_STORAGE_CONNECTION_STRING=$(az storage account show-connection-string -n STORAGE_ACCOUNT_NAME -g RESOURCE_GROUP -o tsv)

az storage share create -n STORAGE_ACCOUNT_NAME --connection-string $AZURE_STORAGE_CONNECTION_STRING
Microsoft Defender for Storage
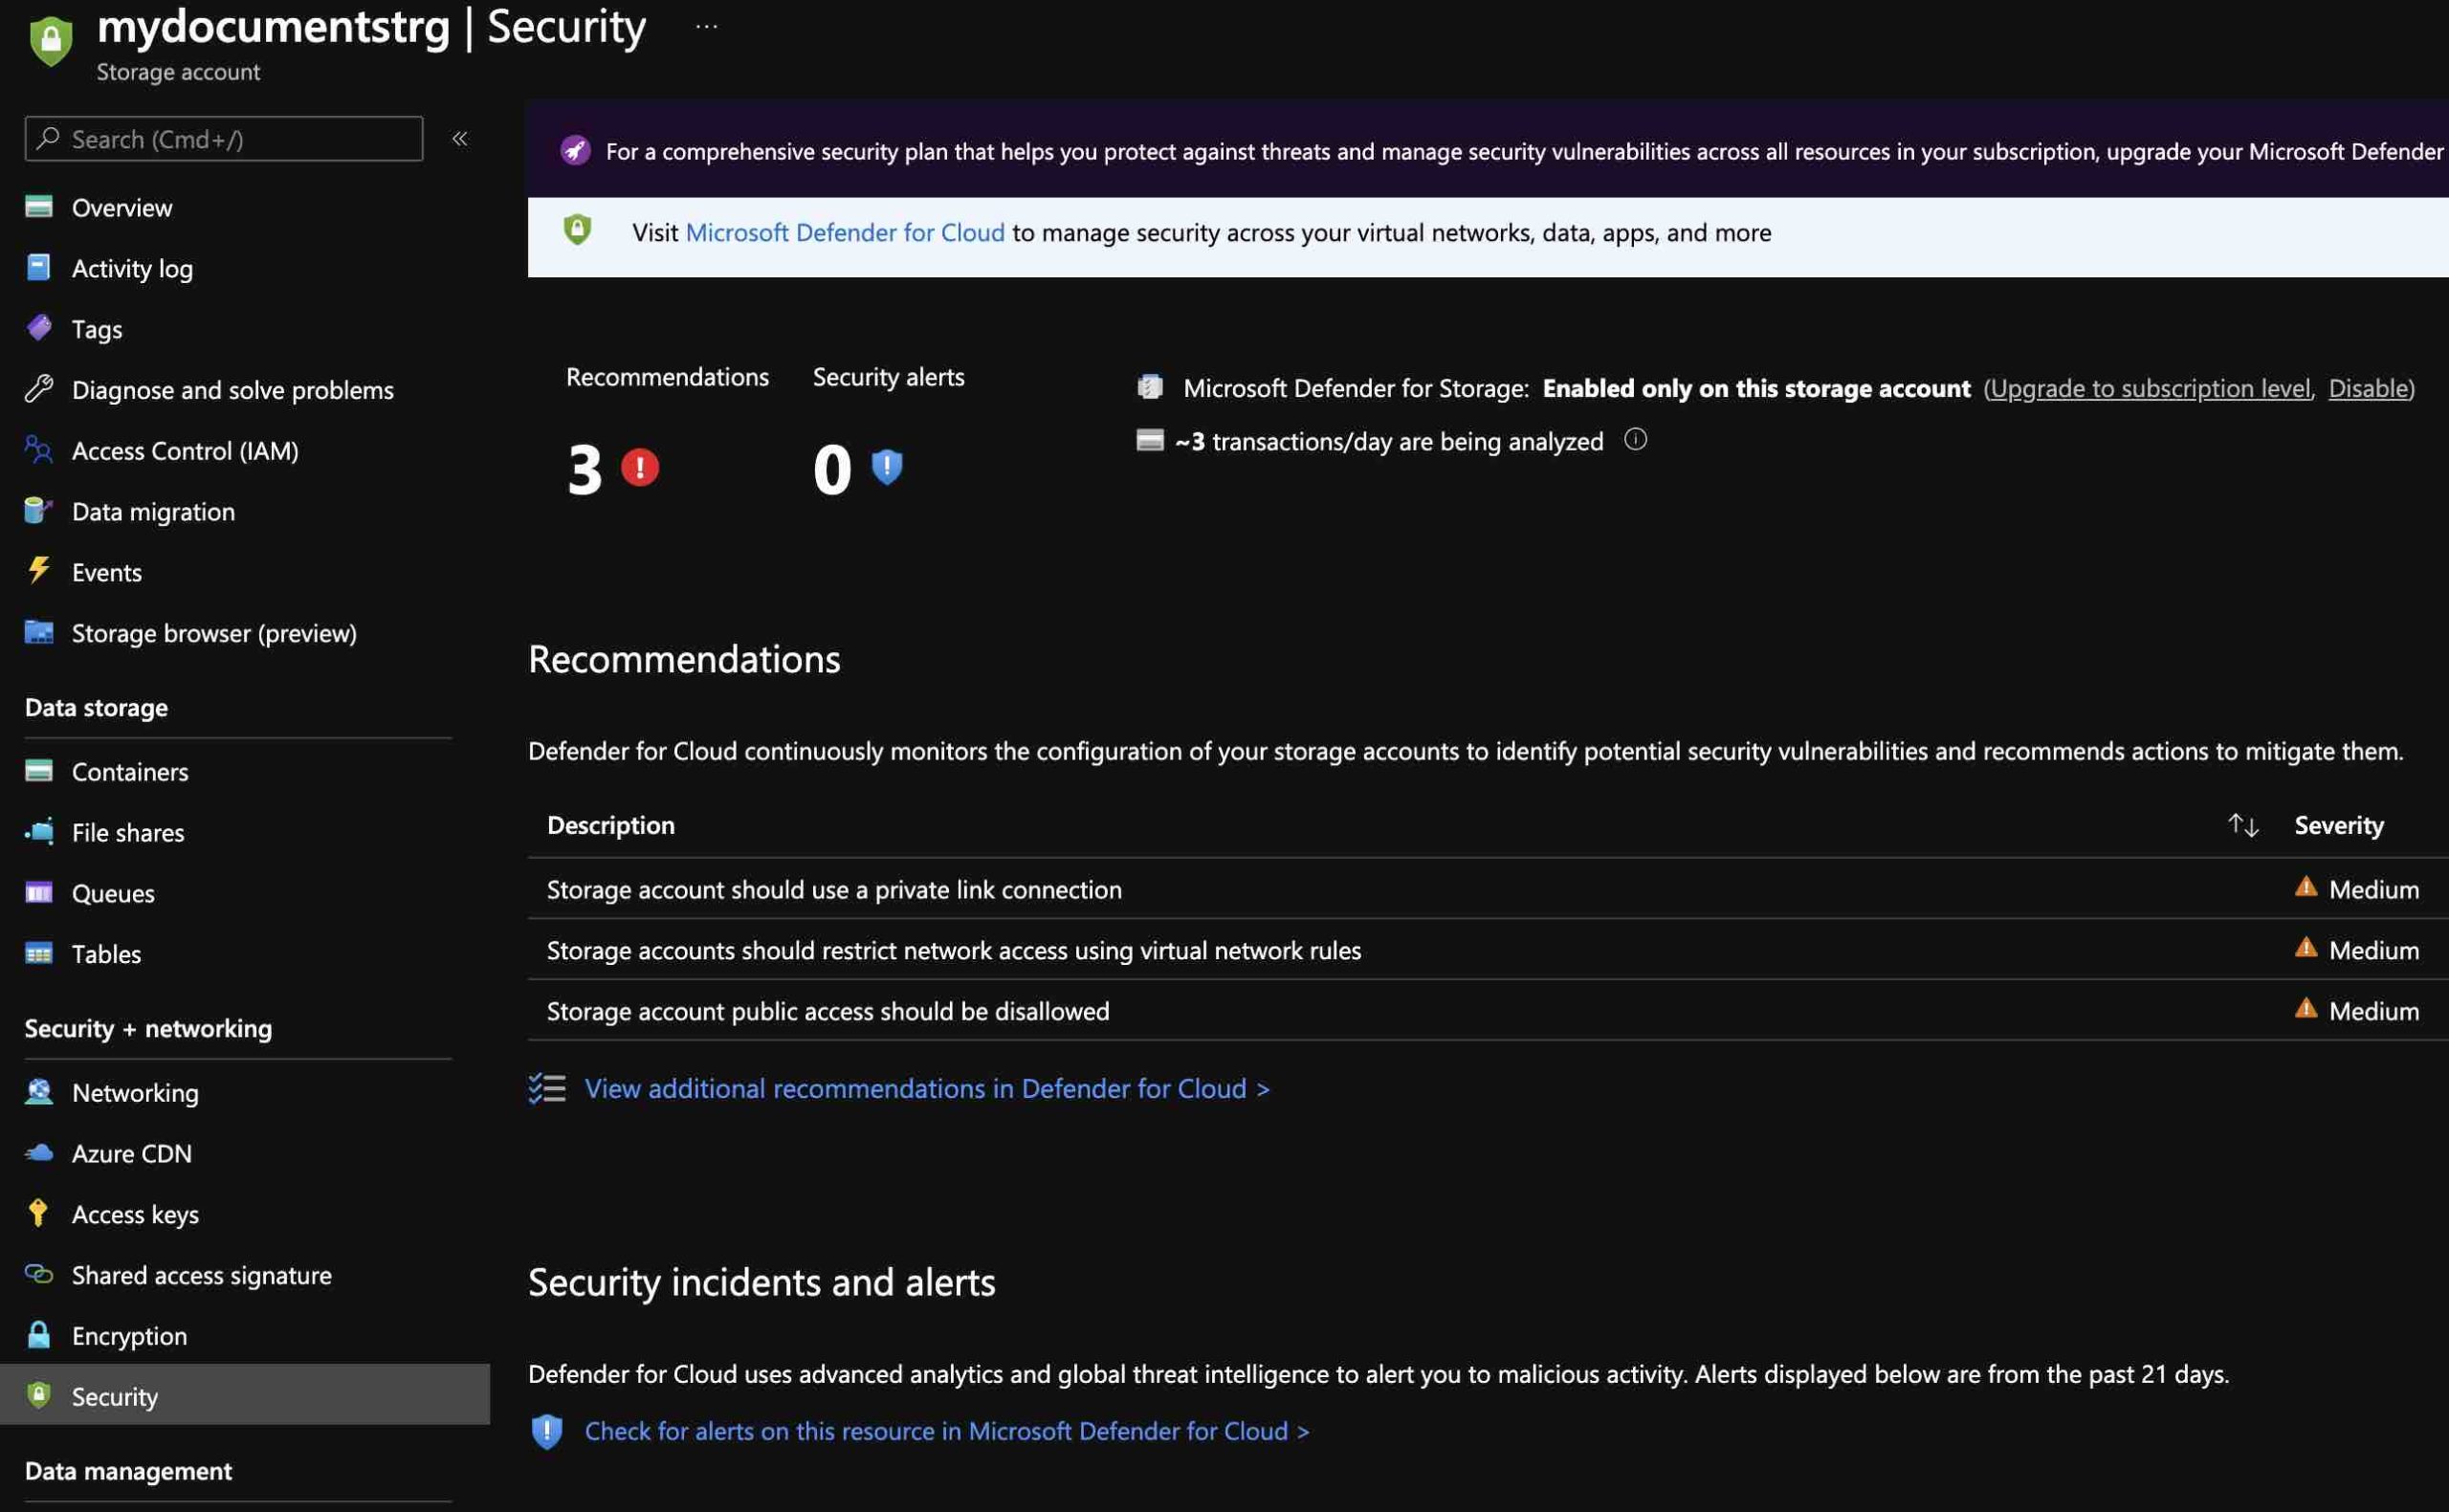
Now, let’s take a quick look at how we can secure the File shares service we just created against potential external threats and unusual accesses with Microsoft Defender.
Microsoft Defender is an advanced threat protection tool which we can use for potential security threats in both our Azure-native and hybrid environments. In order to protect our File shares service, we will benefit from Microsoft Defender’s native intelligent security layer for storages.
In short, without us having the skills of a security expert, this smart layer ensures that we have a protection against potential threats, that may come from outside. It performs this process by continouosly analyzing the telemetry data which produced by Azure Blob Storage and Azure Files service. When it detects any potential security threat, it creates security alerts on the portal.
It is possible to activate Microsoft Defender for Storage either at the subscription level or at the resources level that we choose. Now, using the commands below, let’s activate advanced threat protection for the storage account we created.
az security atp storage update --resource-group RESOURCE_GROUP --storage-account STORAGE_ACCOUNT_NAME --is-enabled true

One of the things that I don’t like in terms of protection against malicious contents is that it does not scan each uploaded file one by one. Instead, it analyzes the telemetry data produced by Azure Blob Storage and Azure Files services and performs hash scanning for known virus or trojan types. In addition, currently it does not support upload operations over SMB protocol.
Working with PersistentVolume and PersistentVolumeClaim
PersistentVolume is a Kubernetes storage resource that has its own lifecycle independent of any pod unlike a normal volume. PersistentVolumeClaim is used to mount PersistentVolume to a pod.
In short, when an application needs a persistent storage, the relevant domain user can request a storage for their own application by using PersistentVolumeClaim without having detailed information about the storage.
First, Kubernetes needs the credential information of the File shares to access it. For this, let’s create a secret object named “storage-account” in Kubernetes cluster that will contain credential information of the storage as follows.
STORAGE_KEY=$(az storage account keys list --resource-group RESOURCE_GROUP --account-name mydocumentstrg --query "[0].value" -o tsv)

kubectl create secret generic storage-account --from-literal=azurestorageaccountname=mydocumentstrg --from-literal=azurestorageaccountkey=$STORAGE_KEY
Now we need to define a yaml file called “pv-pvc” as follows.
apiVersion: v1
kind: PersistentVolume
metadata:
  name: azurefile
spec:
  capacity:
    storage: 5Gi
  accessModes:
    - ReadWriteMany
  azureFile:
    secretName: storage-account
    shareName: mydocumentstrg
    readOnly: false
  persistentVolumeReclaimPolicy: Retain
---
apiVersion: v1
kind: PersistentVolumeClaim
metadata:
  name: azurefile
spec:
  accessModes:
    - ReadWriteMany
  storageClassName: ""
  resources:
    requests:
      storage: 5Gi
Let’s take a look at what we have done here.
- We have defined that the PersistentVolume has a capacity of 5Gi.
- We set the “accessModes” option to “ReadWriteMany“. Thus, this PersistentVolume can be mounted by more than one node as read-write.
- Since we will use the Azure Files service as the storage plugin, we have pointed as a reference the “shareName” and “secretName” information of the File shares service we created.
- We also set the “persistentVolumeReclaimPolicy” option to “Retain“. Thus, when the PersistentVolumeClaim gets deleted, the PersistentVolume will not be deleted along with the related data.
In short, we are going to create a storage resource with a capacity of 5Gi in the cluster with PersistentVolume.
As a developer, we will use the PersistentVolumeClaim to request a persistent storage with 5Gi capacity by referencing it in a pod spec that we want. In addition, by setting the “storageClassName” attribute to empty, we have ensured that the storage is not created dynamically.
If we wanted to have storage account to be created dynamically by the Kubernetes rather than statically, instead of the PersistentVolume resource we would have to create a StorageClass resource with the criteria we want and create a PersistentVolumeClaim that will use that resource.
NOTE: If we want the PersistentVolumeClaim to be bound with a specific PersistentVolume that we have created before, we can do this by setting the “volumeName” attribute. For example, we may have services with different tiers in terms of the scalability and performance.
Now let’s execute the following commands via terminal and take a look at the created resources.
kubectl apply -f pv-pvc.yaml
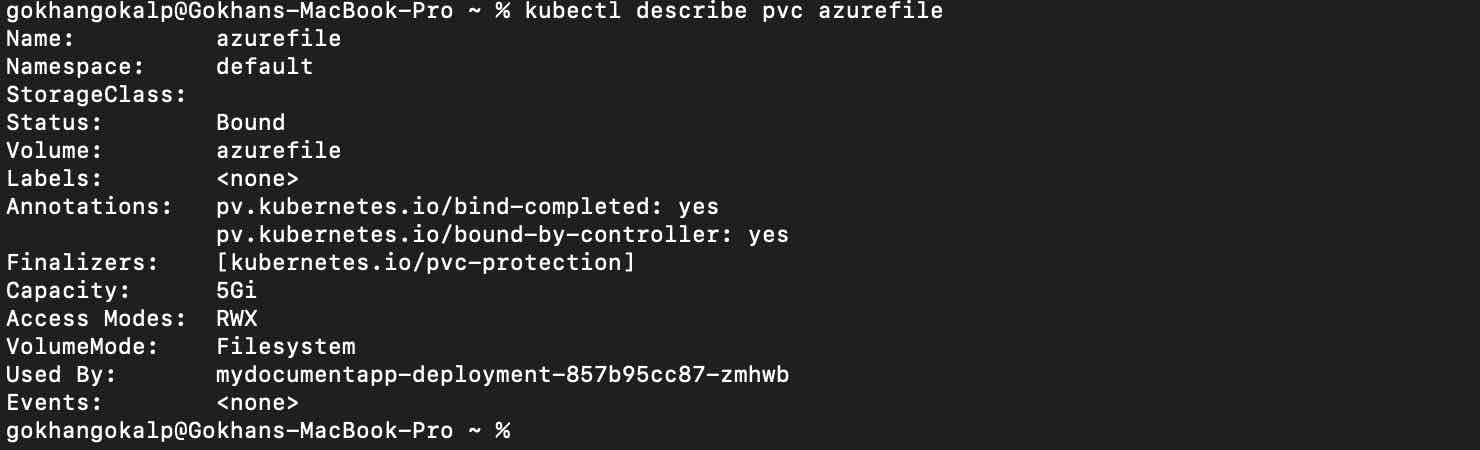
kubectl get pv azurefile
kubectl get pvc azurefile
kubectl describe pvc azurefile
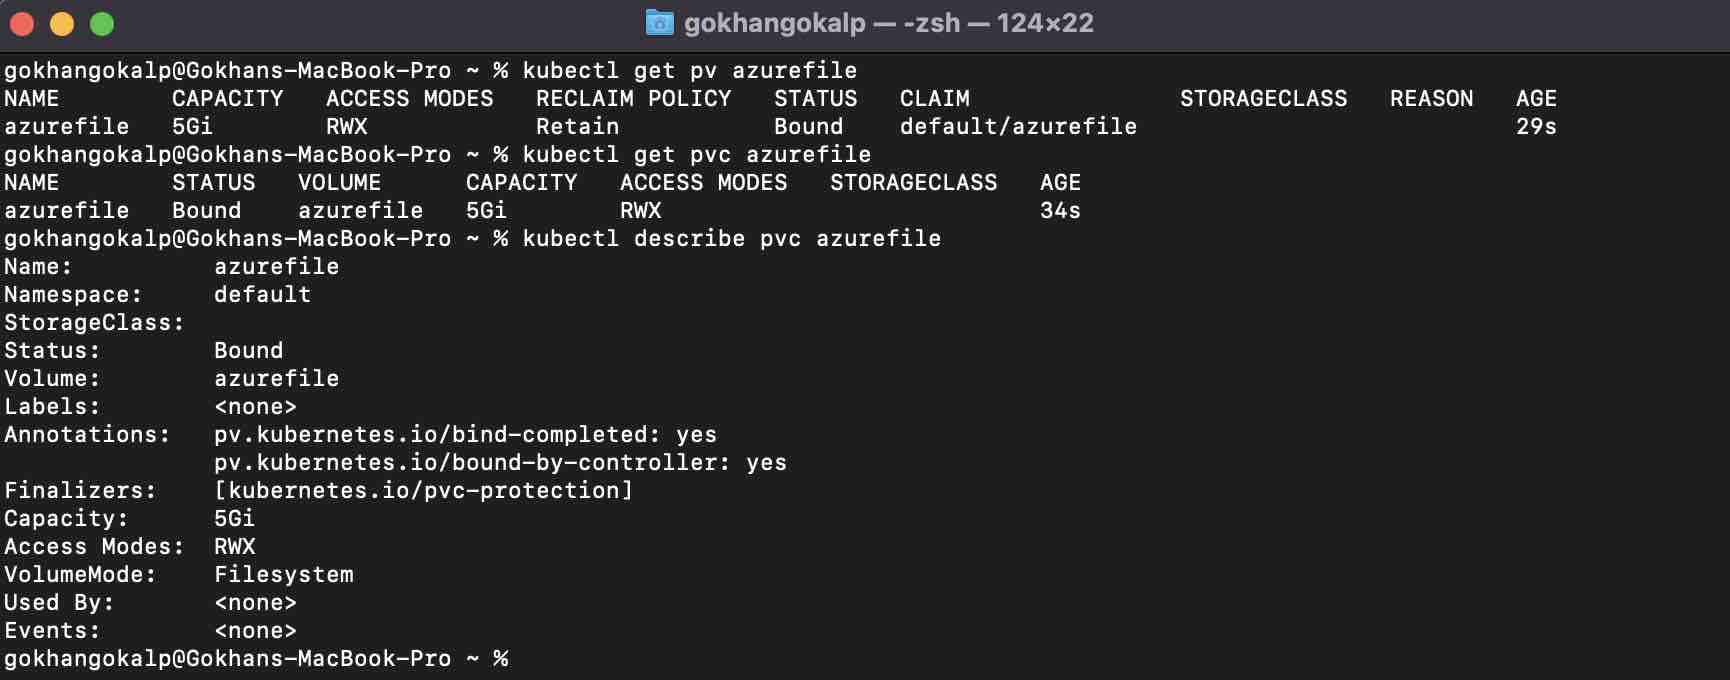
As we can see that the PersistentVolumeClaim named azurefile has been successfully “bound” to PersistentVolume named azurefile. If we take a look at the “Used By” attribute, we can see that it is “none” as it has not yet been referenced by any pod.
Now we are ready to deploy an example application.
As an example, I will deploy the following simple .NET 6 console application on Kubernetes.
using (StreamWriter writer = File.CreateText("/mnt/azure/mytext.txt"))
{
await writer.WriteLineAsync("hello");
}
await Task.Delay(TimeSpan.FromHours(1));
Isn’t it nice to be able to quickly develop small and simplified applications with top-level statements? With this simple application, we will create a simple txt file under the “/mnt/azure/” path. We will also mount the File shares service to that path.
This is the Dockerfile.
FROM mcr.microsoft.com/dotnet/runtime:6.0 AS base
WORKDIR /app

FROM mcr.microsoft.com/dotnet/sdk:6.0 AS build
WORKDIR /src
COPY ["MyDocumentConsoleApp/MyDocumentConsoleApp.csproj", "MyDocumentConsoleApp/"]
RUN dotnet restore "MyDocumentConsoleApp/MyDocumentConsoleApp.csproj"
COPY . .
WORKDIR "/src/MyDocumentConsoleApp"
RUN dotnet build "MyDocumentConsoleApp.csproj" -c Release -o /app/build

FROM build AS publish
RUN dotnet publish "MyDocumentConsoleApp.csproj" -c Release -o /app/publish

FROM base AS final
WORKDIR /app
COPY --from=publish /app/publish .
ENTRYPOINT ["dotnet", "MyDocumentConsoleApp.dll"]
First, let’s define a simple deployment spec as follows.
apiVersion: apps/v1
kind: Deployment
metadata:
  name: mydocumentapp-deployment
  labels:
    app: mydocumentapp
spec:
  replicas: 1
  selector:
    matchLabels:
      app: mydocumentapp
  template:
    metadata:
      labels:
        app: mydocumentapp
    spec:
      containers:
      - name: mydocumentapp
        image: YOUR_ACR.azurecr.io/mydocumentapp:v1
        volumeMounts:
        - name: azurefileshare
          mountPath: /mnt/azure
      volumes:
      - name: azurefileshare
        persistentVolumeClaim:
          claimName: azurefile
In this simple deployment spec, we have defined that we are requesting a volume by using our PersistentVolumeClaim named “azurefile” under the “volumes” section. Also we have defined the path that we want to mount in the container.
Thus, the Kubernetes control plane will try to find a PersistentVolume for this pod that has the criteria we defined in the PersistentVolumeClaim. When it successfully finds a suitable PersistentVolume, it will bind the PersistentVolumeClaim to the corresponding volume. Otherwise the relevant pod cannot be scheduled.
Now let’s deploy the application as follows and check the content of the “/mnt/azure/mytext.txt” file in the container.
kubectl apply -f ./mydocumentapp-deployment.yaml

kubectl exec -it $(kubectl get pods -l=app=mydocumentapp --output=jsonpath={.items..metadata.name}) -- cat /mnt/azure/mytext.txt

As we can see, our application has successfully created the “mytext.txt” file on the File shares service we have mounted. Now this file is locating on the Azure File shares service persistently. Even if the relevant applications are rescheduled or scaled out/down, the same File shares service will stay accessible.
Now, let’s describe the PersistentVolumeClaim again.
kubectl describe pvc azurefile
If we take a look at the “Used By” attribute now, we can see that this claim is being used by the pod we have created.
Let’s Wrap Up
We said that the pods in Kubernetes are ephemeral by their nature. Pods can be deleted and rescheduled together with the local data at anytime. For this reason, we need to use persistent volumes for data to be shared between pods or to be stored persistently.
Within the scope of this article, we took a brief look at how we can mount the managed Azure File shares service to our applications, which need a persistent storage solution, with the PersistentVolume and PersistentVolumeClaim approach.
While PersistentVolume is used by a cluster administrator to manage storage resources within the cluster, PersistentVolumeClaim is used by a developer to request a persistent storage to their application in a abstract way without knowing anything about the background.
References
https://docs.microsoft.com/en-us/azure/storage/files/storage-files-introduction
https://docs.microsoft.com/en-us/azure/defender-for-cloud/defender-for-storage-introduction
https://kubernetes.io/docs/concepts/storage/persistent-volumes/
thanks for sharing
Thanks.