
As we know, the adoption of containerization in modern software development environments has significantly changed the way applications are built and deployed. The lightweight and self-contained nature of containers provides various advantages and flexibilities, such as the ability to easily move applications consistently across different environments and quickly scale them.
In addition, containers are also one of the key building blocks for scalable microservice architectures. In combination with container orchestration tools like Kubernetes, they enable us to utilize resources more effectively by allowing for flexible scaling of applications and quick adaptation to changing requirements.
Of course, along with the advantages offered by containers, unfortunately, they also bring complexities that require a comprehensive approach to security. Since a security problem in a container could bring a domino affect in the entire container ecosystem, it is very important that we have a proper security posture that covers the entire container ecosystem end to end. In other words, reducing security risks in containerized applications and taking necessary precautions has become more than just a best practice, it is now a strategic necessity for organizations.
When we pay attention to attacks such as SolarWinds and Log4j (you may recall that Log4j especially kept us quite busy), in recent years, we can see that the Software Supply Chain was specifically targeted. Additionally, considering that we heavily rely on open-source libraries when developing our applications, we can also see how sensitive and vulnerable our applications are to malicious code injections and security breaches.
In general, there are various preventive controls and approaches that we can implement throughout the SDLC to strengthen the software supply chain. Nowadays, different organizations are trying to adopt the shifting-left approach in order to adhere to best practices, aiming to integrate security elements into the early stages of the SDLC as much as possible. These controls and approaches play significant roles in minimizing security vulnerabilities in software supply chain processes, ensuring integrity, minimizing potential security risks, and being able to act quickly.
For instance, resource like “Zero Trust Architecture” and “Strategies for the Integration of Software Supply Chain Security in DevSecOps CI/CD Pipelines” published by The National Institute of Standards and Technology (NIST), offer various recommendations ranging from adopting the principle of least privilege in the ecosystem to implementing secure builds with various policies in CI/CD processes and early stage utilization of various tools such as software composition analysis (SCA) and static application security testing (SAST).
In addition, Microsoft’s Containers Secure Supply Chain (CSSC) framework and Google’s Supply-chain Levels for Software Artifacts (SLSA) security framework provide comprehensive guidelines for establishing a secure software supply chain.
In this article, we will take a look at securing the software supply chain by examining approaches to ensure the integrity and trace the provenance of containerized applications throughout the CI/CD stages. Additionally, we will be looking some of the measures to mitigate security risks by considering some of the guidelines that I have shared above.
So, within this context, we will be looking at the following topics.
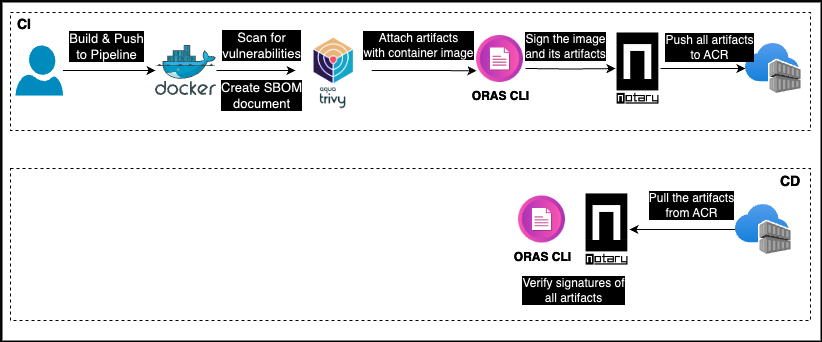
- Performing security scans and generating reports
- Creating SBOM documents
- Signing the generated artifacts
- Attaching the generated artifacts with the relevant container image
- Verifying generated artifacts and signatures during the CD process
- In the second part of this article, we will discuss implementing various security controls through policies during the CD process. This will be achieved by utilizing OPA Gatekeeper and Ratify Verification Engine before deploying containers into the Kubernetes environment
Now let’s start with build (CI) stage.
Container Security Scanning
As we can imagine, using container images or various libraries from unreliable sources can pose significant security risks due to potential malware or security vulnerabilities they may contain. These security risks may be hidden in the code we develop using open-source libraries or in the container images we use.
To address and minimize potential security risks, it is essential to consider DevSecOps principles. Therefore, before pushing each container image created in our CI processes to the relevant container registries, we must subject them to detailed security verification with container security scanning tools. This automated control will detect potential security vulnerabilities in our container images, allowing us to address potential risks in advance. Furthermore, it will enable us to adopt a proactive container security posture and take the first important step towards software supply chain security.
Although it may seem like a simple topic, managing the lifecycle of containers for security has always been a headache for me. This is because the process encompasses everything from pulling a base container image from an external source into our internal environment securely to deploying the relevant container to the production environment.
Going back to our topic, there are various on-demand container security scanning tools such as “Trivy,” “Twistlock,” “Grype,” and “Snyk” that we can incorporate into our CI processes to strengthen our security posture. Regardless of which tool we choose to use, for the purposes of this article, I will proceed with Trivy.
![]()
We can briefly call Trivy as an advanced open-source security scanning tool. In addition to scanning container security vulnerabilities, it can also perform security scans on various targets such as “git repositories“, “filesystem” and “kubernetes“.
Moreover, it can scan for application dependencies, misconfigurations on IaC files and sensitive information such as secrets in addition to security vulnerabilities (CVE).
Throughout the article, I will use the .NET 5 based Order API, which I developed and used in my previous articles, as a sample application. You can access the relevant repository from here. Since it is an old sample application, it fits perfectly for this article in terms of security vulnerabilities. As for the DevOps environment, I will proceed with Azure Pipelines. Additionally, I will use Azure Container Registry (ACR) for OCI images and artifacts.
First of all, let’s define a multi-stage pipeline as follows.
trigger:
- master

pool:
  vmImage: ubuntu-latest

variables:
  acrServiceConnectionName: 'MyPOCRegistry'
  acrName: 'YOUR_ACR_NAME'
  orderAPIImageName: 'order-api'

stages:
# Other stages for SAST, SCA tools...
- stage: BuildAndScanStage
  displayName: 'Build & Scan Stage'
  jobs:
  - job: BuildAndScanContainerImage
    displayName: 'Build & scan the container image'
    steps:
    - task: Docker@2
      displayName: 'Build $(orderAPIImageName) container image'
      inputs:
        containerRegistry: '$(acrServiceConnectionName)'
        repository: '$(orderAPIImageName)'
        command: 'build'
        Dockerfile: './OrderAPI/Dockerfile'
        buildContext: '.'
        tags: '1.0.0'
At this point, our first goal is to containerize the relevant source code after passing it through checks of tools such as SAST and SCA. We will assume that we have relevant SAST and SCA tools in place. Then, before pushing the created container image to the relevant registry, we will subject it to security controls. Of course, the approach and policies here can vary from organization to organization.
After the containerization process within the “BuildAndScanContainerImage” job, let’s include the following two tasks and the “trivyVersion” variable to the pipeline in order to include Trivy in our CI processes.
variables:
  ...
  trivyVersion: '0.48.0'
    - task: Bash@3
      displayName: 'Download Trivy v$(trivyVersion)'
      inputs:
        targetType: 'inline'
        script: |
          wget https://github.com/aquasecurity/trivy/releases/download/v$(trivyVersion)/trivy_$(trivyVersion)_Linux-64bit.deb
          sudo dpkg -i trivy_$(trivyVersion)_Linux-64bit.deb
          trivy -v
    - task: Bash@3
      displayName: 'Scan the $(orderAPIImageName) container image for vulnerabilities'
      inputs:
        targetType: 'inline'
        script: |
          trivy image --exit-code 0 --severity HIGH,CRITICAL --scanners vuln $(acrName).azurecr.io/$(orderAPIImageName):1.0.0
After completing the preparation of Trivy on the agent, let’s take a look at the commands we used for the scanning process.
- To ensure that the relevant pipeline does not stop throughout this article, I used the “–exit-code 0” parameter. If we set it to “1“, the pipeline will be automatically stopped in the event of security violations classified as “HIGH” or “CRITICAL“. Additionally, “LOW” and “MEDIUM” levels are also available.
- Additionally, I have enabled only vulnerability scanning with the “–scanners vuln” parameter. In addition to these, we can also perform different scans with the “secret” and “misconfig” parameters, which are particularly useful for IaC templates.
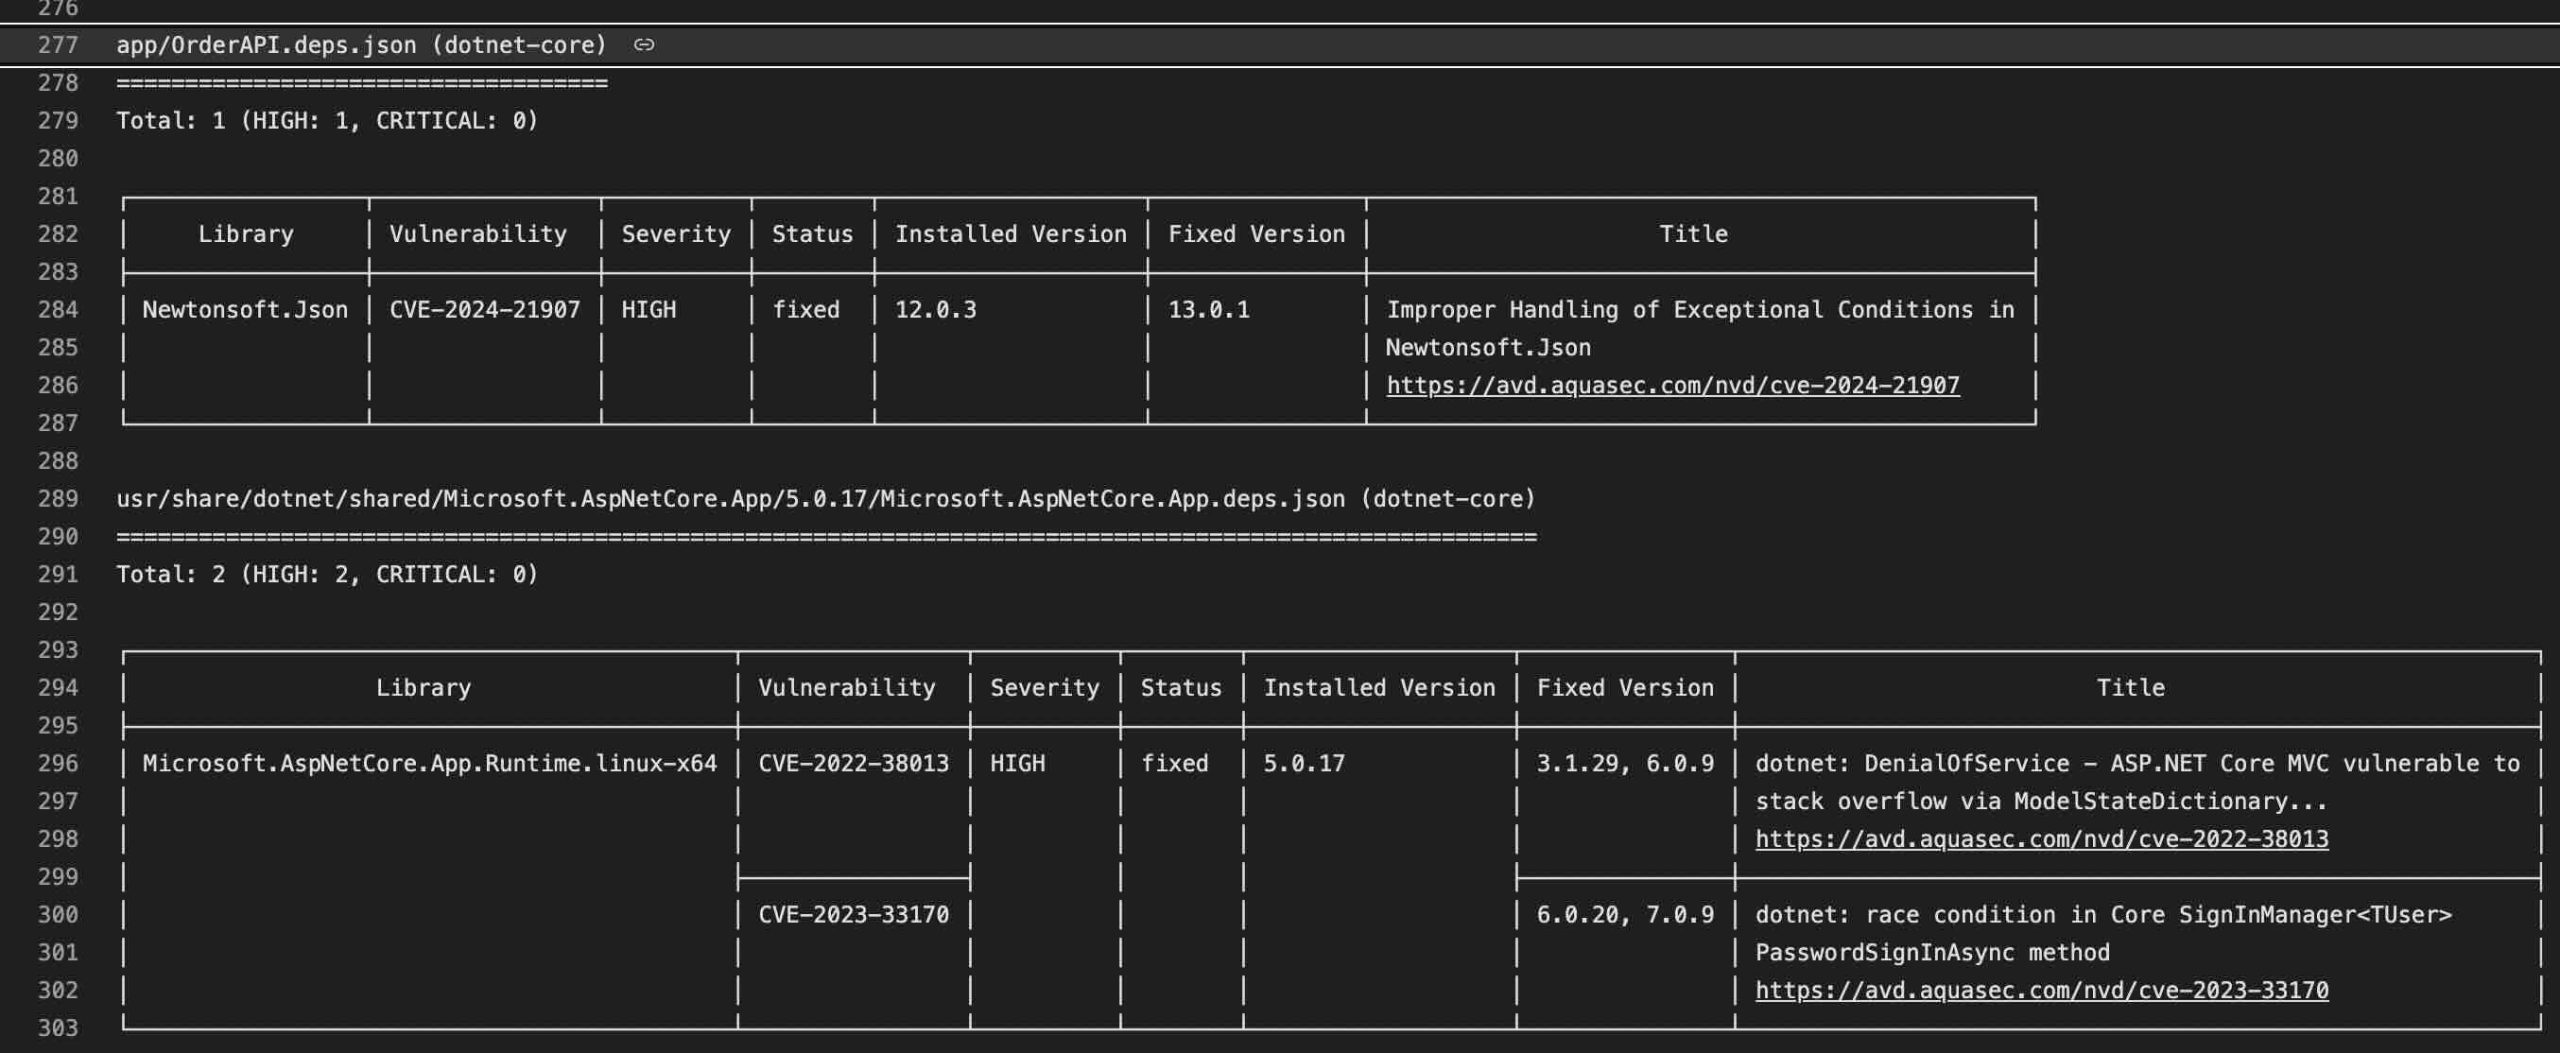
With this configuration we have provided, Trivy writes the CVE results to the console by default in a table format.
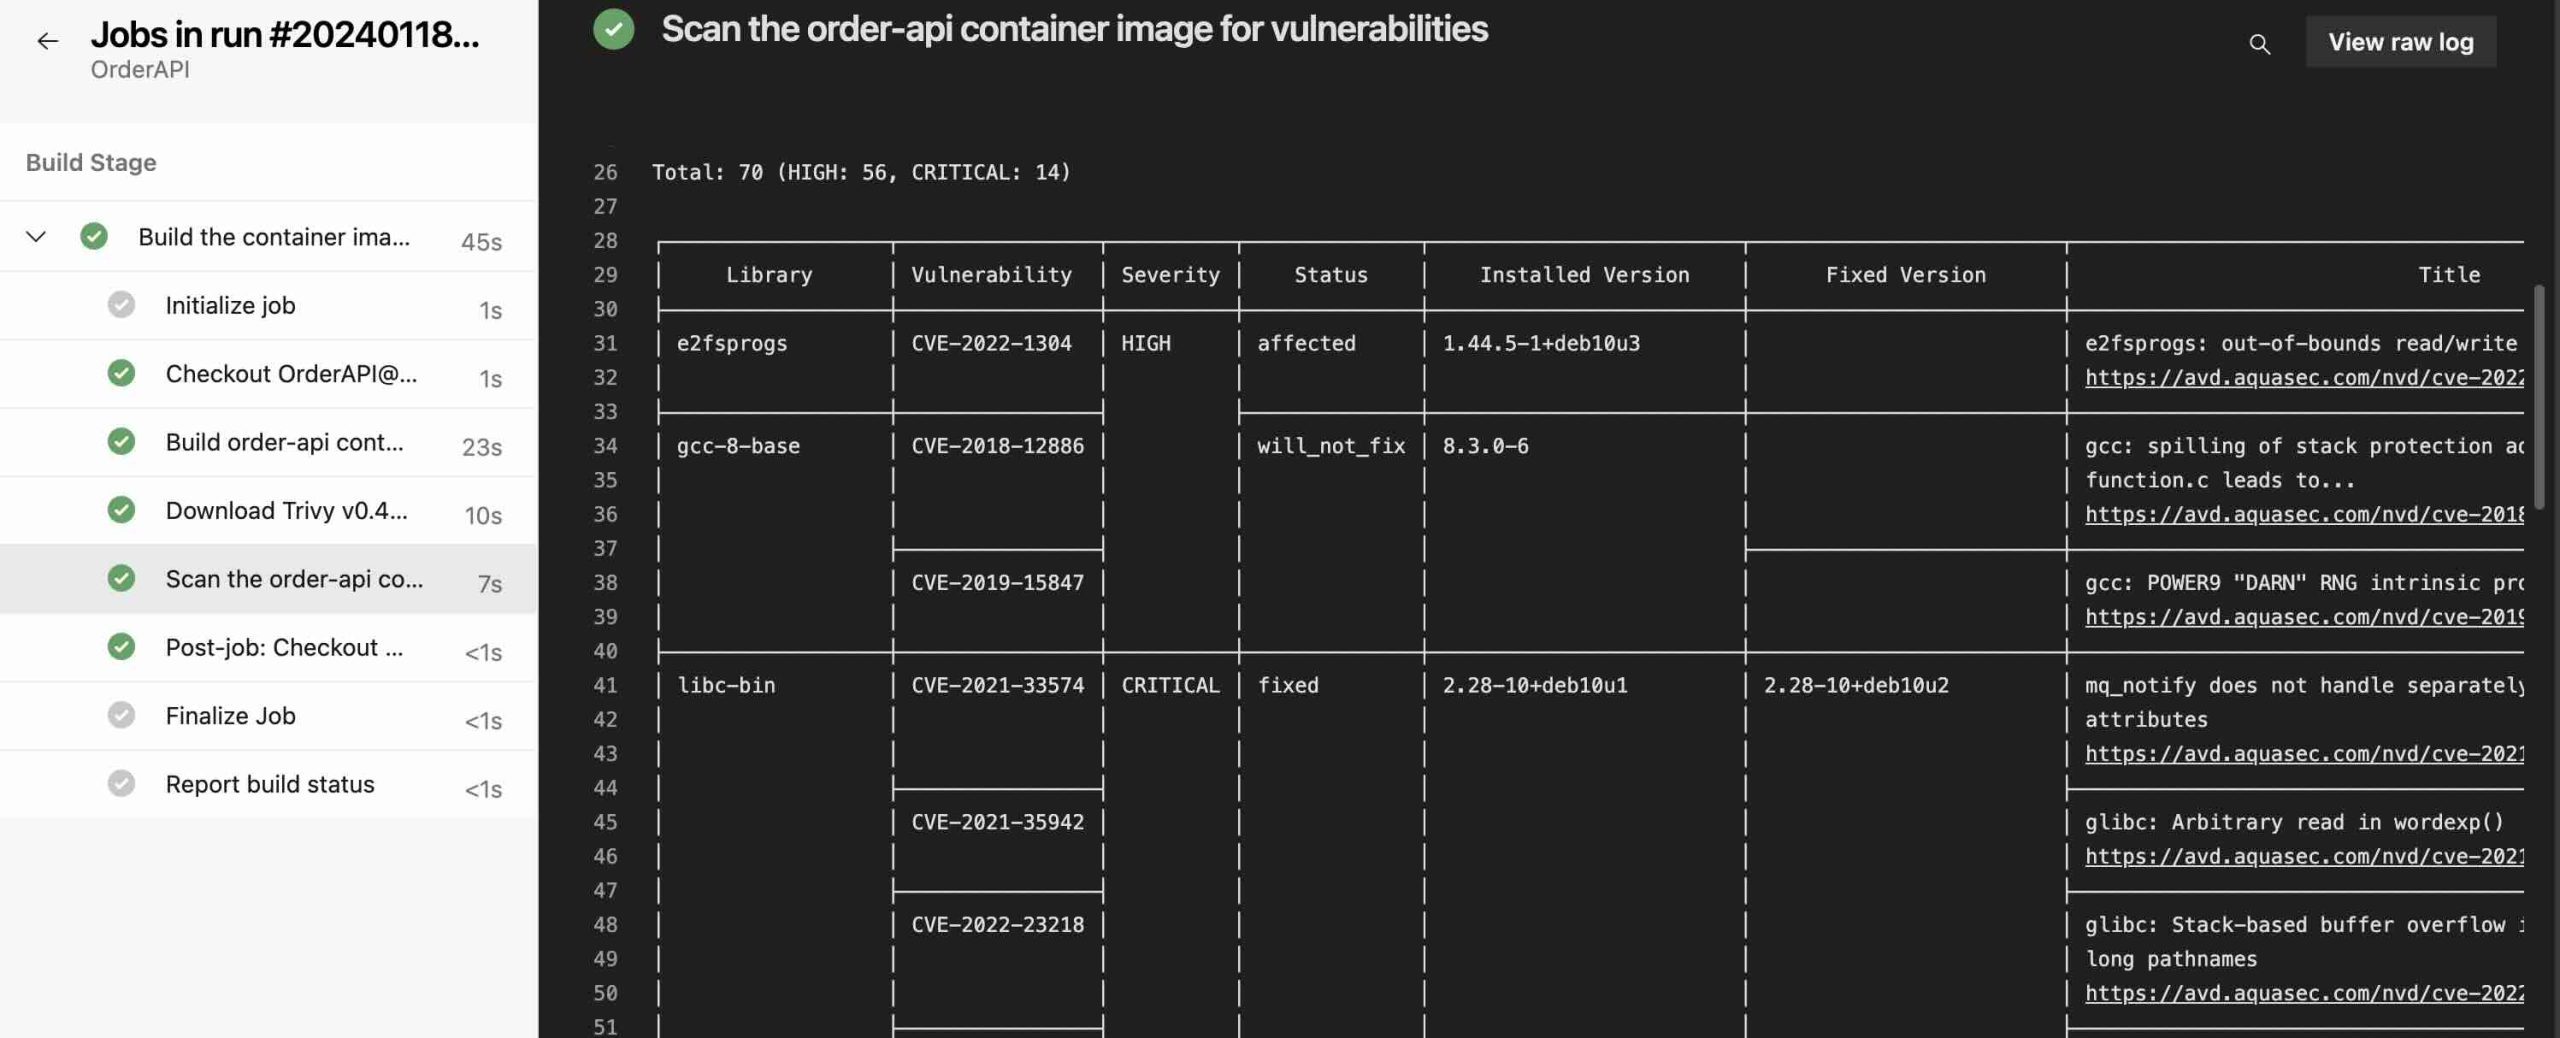
As we can see, since the sample application we have used is quite old, it has detected 70 different CVEs in total.
At this stage, Trivy has performed a security scan on both the OS and the libraries that are used by our application.
NOTE: Since Order API is .NET based, Trivy checks the “**/*.deps.json” files to find the libraries that are used.
Now, in order to use the relevant CVE results in the verification process at the next stage and store them as an artifact of our software supply chain, let’s configure Trivy to generate a JSON output as follows. Additionally, let’s push the corresponding container image to the registry.
NOTE: Throughout the article, I will keep the container version tag as “1.0.0” for the simplicity.
    - task: Bash@3
      displayName: 'Scan the $(orderAPIImageName) container image for vulnerabilities'
      inputs:
        targetType: 'inline'
        script: |
          trivy image --exit-code 0 --severity HIGH,CRITICAL --security-checks vuln --format sarif --output ./trivy-sarif.json $(acrName).azurecr.io/$(orderAPIImageName):1.0.0
    - task: Docker@2
      displayName: 'Push $(orderAPIImageName) container image'
      inputs:
        containerRegistry: '$(acrServiceConnectionName)'
        repository: '$(orderAPIImageName)'
        command: 'push'
        tags: '1.0.0'
At this point, we will have subjected the relevant container through the security scan and then pushed to the registry. Additionally, we have opted SARIF as the format for the container security scan result as it is a standard format and provides easy integration with various tools. Now, to store the container security scan result as part of the software supply chain, we will utilize ORAS (OCI Registry As Storage) tool.
ORAS is a tool that allows us to manage OCI images and supply chain artifacts within OCI registries.
    - task: AzureCLI@2
      displayName: 'Attach the scan result to the $(orderAPIImageName) container image'
      inputs:
        azureSubscription: 'DevOpsPoC'
        scriptType: 'bash'
        scriptLocation: 'inlineScript'
        inlineScript: |
          az acr login --name $(acrName)
          oras attach --artifact-type application/sarif+json $(acrName).azurecr.io/$(orderAPIImageName):1.0.0 ./trivy-sarif.json:application/json
At this point, we use the “oras attach” command to create a reference between the relevant container image and the “trivy-sarif.json” artifact.
NOTE: At this point, I used the AAD credentials method for ORAS to access ACR. Additionally, we can also perform this process using a service principal. For example: “oras login myregistry.azurecr.io –username $SP_APP_ID –password $SP_PASSWD“
Also, an important point here is the “artifact-type” parameter and the naming convention. This parameter essentially allows us to filter based on different artifact types. We can provide the value we want. If we want to adhere to standard naming conventions, we can follow a naming convention like [org|company|entity].[objectType].[optional-subType].config.[version]+[optional-configFormat]. For more detailed information, you can take a look here.
As part of this article series, I will be using Ratify as the verification engine and leveraging its built-in verification plugins. Therefore, I have used the “application/sarif+json” type specified by Ratify as the “artifact-type“.
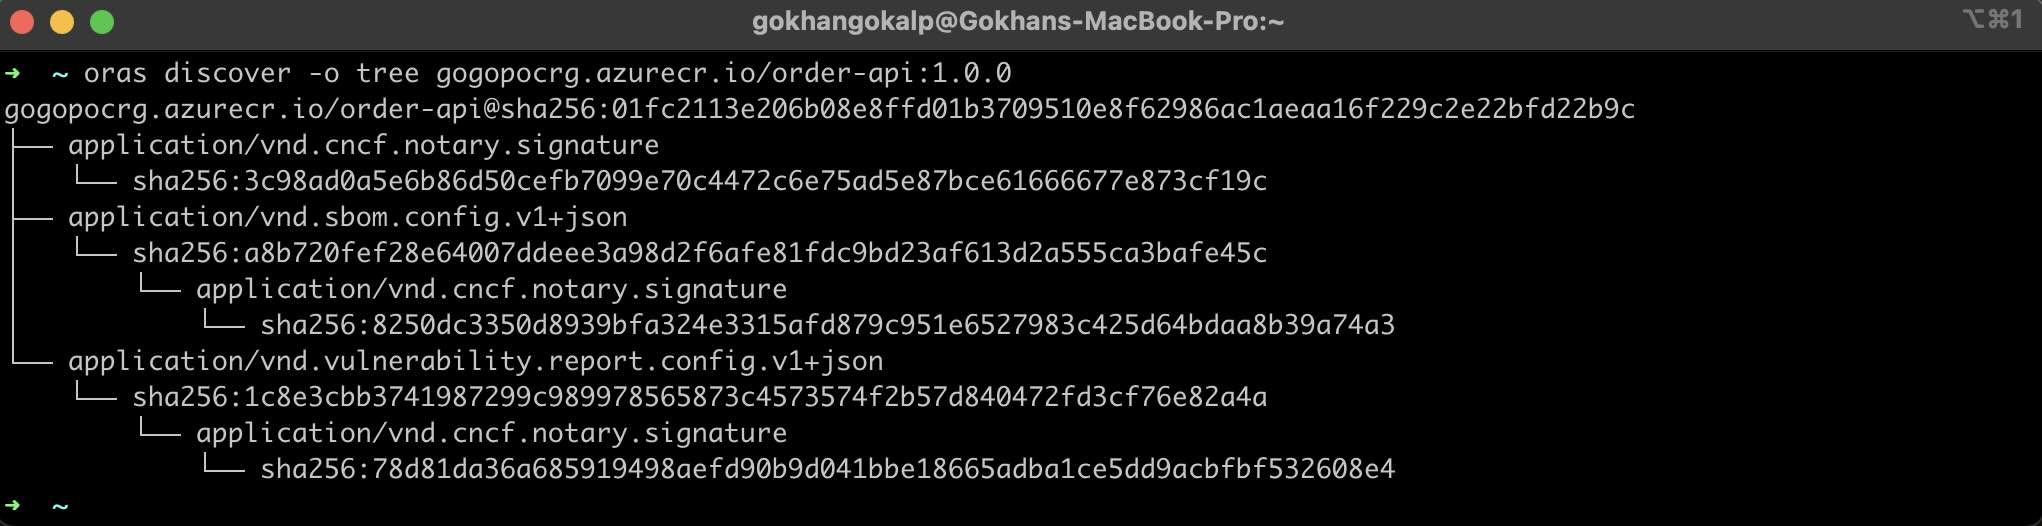
After running the pipeline, we can use “discover” command of ORAS to view the artifact graph of the relevant container as follows. Additionally, as we mentioned, we can use the “–artifact-type” parameter to query by specific artifact type.

Creation of Software Bill of Materials (SBOM)
Another important artifact that we can utilize for software supply chain security is SBOM documents. SBOM, in short, is a document created to provide a detailed list of all the components and libraries, along with their versions, used to create and run an application.
Since SBOM documents bring transparency and visibility into the software supply chain, they have an important position in compliance policies (such as license management, compliance, auditing process and etc.) and early discovery of security vulnerabilities. In summary, we can leverage SBOM documents to ensure the security of our applications throughout their lifecycle and to track and verify their dependencies and resources.
Additionally, there are various tools and platforms available to manage SBOMs and receive continuous feedback. Thus, in case of any risk, we can quickly identify what is affected and where and take actions.
To create an SBOM document, there are different tools available. One of these tools is Trivy, which can generate SBOM documents in both CycloneDX and SPDX formats. Since I will be using the Ratify verification engine in this article, I will create an SBOM document in SPDX format.
Now, let’s include the following two tasks in the pipeline to create SBOM document for the respective container. Then, we’ll attach the generated SBOM document to the container as an artifact of our software supply chain using ORAS.
    - task: Bash@3
      displayName: 'Create a SBOM document for the $(orderAPIImageName) container image'
      inputs:
        targetType: 'inline'
        script: |
          trivy image --format spdx --output ./sbom.spdx.json $(acrName).azurecr.io/$(orderAPIImageName):1.0.0
    - task: AzureCLI@2
      displayName: 'Attach the SBOM document to the $(orderAPIImageName) container image'
      inputs:
        azureSubscription: 'DevOpsPoC'
        scriptType: 'bash'
        scriptLocation: 'inlineScript'
        inlineScript: |
          oras attach --artifact-type application/spdx+json $(acrName).azurecr.io/$(orderAPIImageName):1.0.0 ./sbom.spdx.json:application/json
Now, when we run “discover” command of ORAS again, we can see that the SBOM artifact is also added to the relevant graph as shown below.

Getting the Artifacts
It is also possible to pull any artifact associated with a container using ORAS. For this, running the following command with the digest information of the relevant artifact is sufficient. Just like in the previous step, we can easily get the digest information of any artifact with “discover” command of ORAS.
oras pull IMAGE_URL@DIGEST -o .
For example, we can use the following command to get the digest information of the SBOM document that we have associated with the Order API container image.
oras discover -o json --artifact-type 'application/spdx+json' $(acrName).azurecr.io/$(orderAPIImageName):1.0.0 | jq -r ".manifests[0].digest"

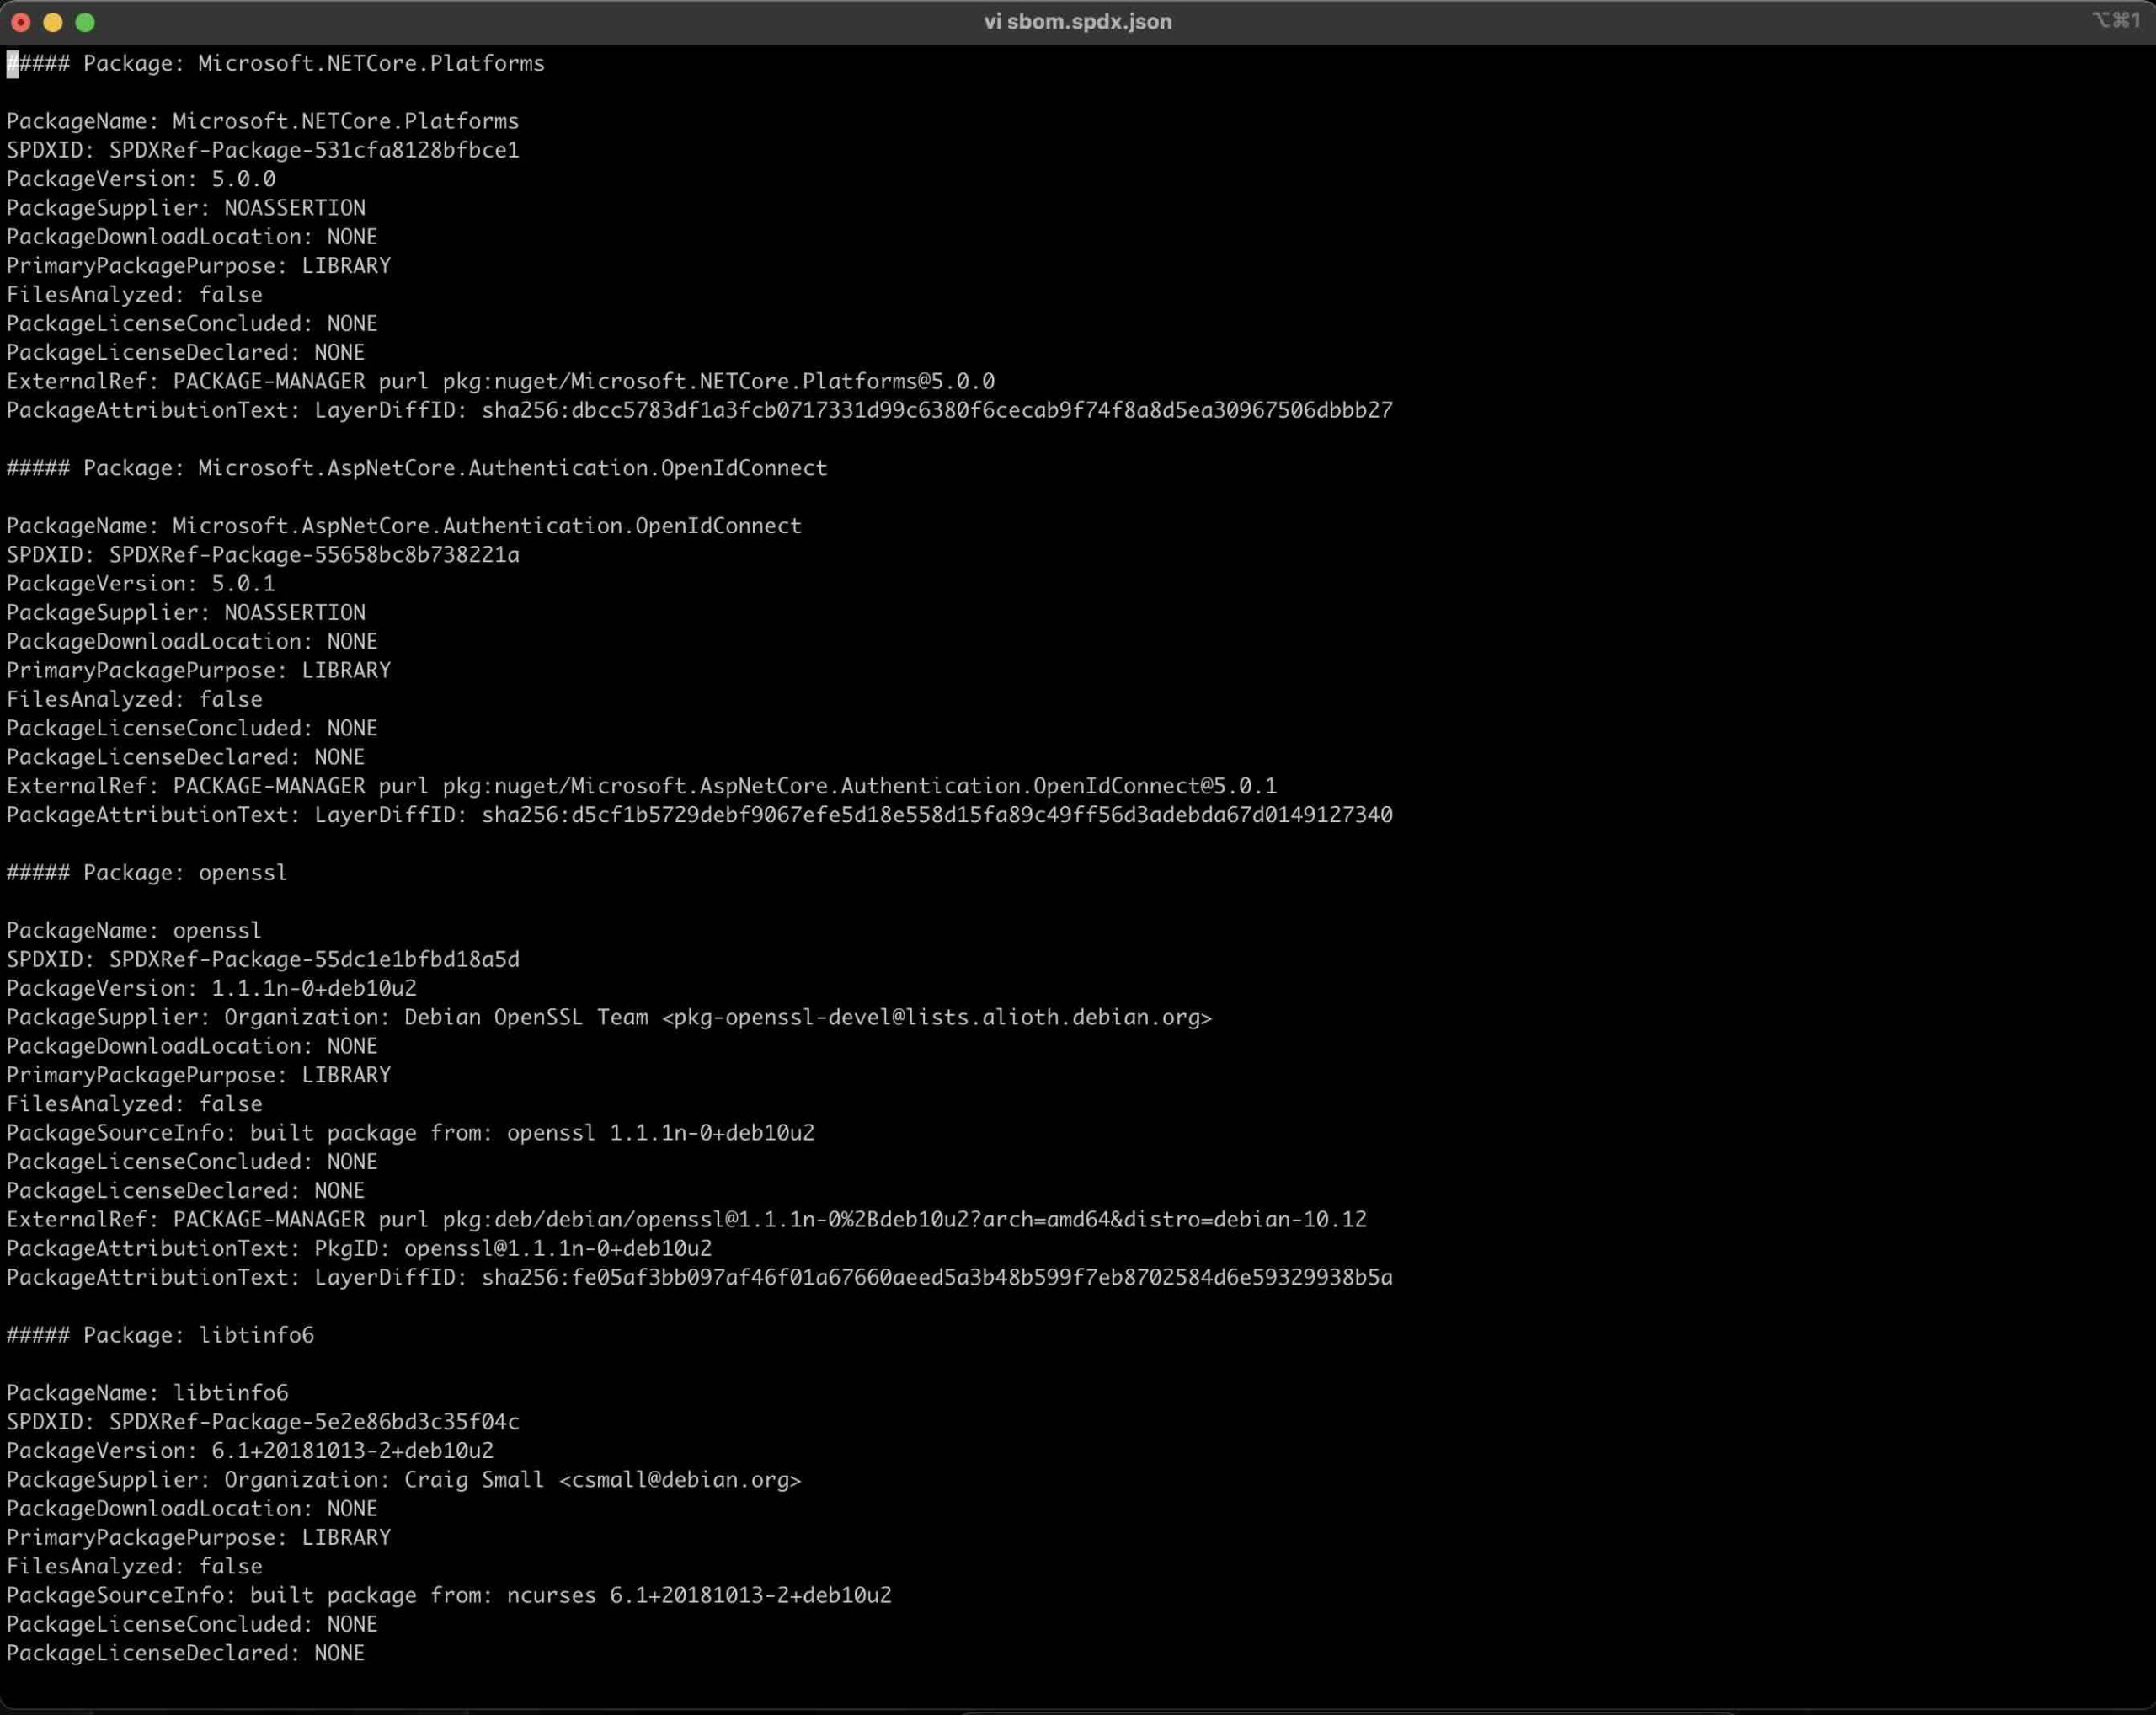
When we look at the downloaded SBOM document, we can see that it lists everything from the NuGet packages used in the Order API container image to the dependencies within the operating system, along with their versions. Thanks to the visibility and transparency provided by SBOM documents, it becomes easier for us to assess the security of these dependencies and manage their updates.
Signing Container Image and its Artifacts
So far, we have created the container image of the Order API and performed a security scan on the container. Then, we have stored the security results as an artifact of the software supply chain on the ACR using ORAS. Additionally, to effectively manage the software supply chain and ensure transparency and visibility, we have also generated and stored the container’s SBOM document.
Now, another important stage is to sign the container image and its artifacts. The signing process as a software publisher or the verification of the given signature as a software consumer is a crucial factor that significantly enhances trust within the software supply chain.
This way, we can verify the integrity of a container, its authenticity, and we can make sure that it has not been tampered since its creation. Thus, we can bring trustworthiness to the software development and deployment process.
At this point, I will use the Notary Project to sign and verify signed artifacts. Alternatively, you can also explore the Cosign tool of the Sigstore project. Sigstore offers a very comprehensive ecosystem.
The Notation CLI is a supply chain tool that implements Notary Project specifications, allowing us to sign and easily verify OCI artifacts. Now, let’s first add a new stage called “SigningStage” to the pipeline as shown below, and prepare the Notation CLI for this stage.
variables:
  ...
  notationVersion: '1.1.0'
  notationTestKeyName: 'order-api.io'
- stage: SigningStage
  displayName: 'Sign Artifacts'
  dependsOn: BuildAndScanStage
  jobs:
  - job: SignContainerArtifacts
    displayName: 'Sign container artifacts'
    steps:
    - task: Bash@3
      displayName: 'Download & Prepare Notation v$(notationVersion)'
      inputs:
        targetType: 'inline'
        script: |
          wget https://github.com/notaryproject/notation/releases/download/v$(notationVersion)/notation_$(notationVersion)_linux_amd64.tar.gz
          tar xvzf notation_$(notationVersion)_linux_amd64.tar.gz
          sudo mv notation /usr/local/bin

          notation cert generate-test --default $(notationTestKeyName)
After preparing Notation, we proceed to create a simple example by generating a test RSA key named “order-api.io” for Notation’s signing operations, as well as a self-signed X.509 certificate for verification purposes. In addition to creating the key and certificate, Notation also sets the relevant key as the default signing key and adds the certificate to the trust store called “order-api.io” as the Certificate Authority (CA). However, for production environments, it would be beneficial to proceed with a certificate generated by a reliable CA instead of a self-signed test certificate. Additionally, Notation offers integration with Azure Key Vault and AWS Signer for managing keys and certificates.
Going back to the sample pipeline, we can begin to add tasks that will perform the signing operations as follows.
    - task: AzureCLI@2
      displayName: 'Sign the $(orderAPIImageName) container image'
      inputs:
        azureSubscription: 'DevOpsPoC'
        scriptType: 'bash'
        scriptLocation: 'inlineScript'
        inlineScript: |
          az acr login --name $(acrName)

          docker pull $(acrName).azurecr.io/$(orderAPIImageName):1.0.0

          CONTAINER_DIGEST=$(docker inspect --format='{{index .RepoDigests 0}}' $(acrName).azurecr.io/$(orderAPIImageName):1.0.0) && CONTAINER_DIGEST=${CONTAINER_DIGEST#*@}
          notation sign --signature-format cose --key $(notationTestKeyName) $(acrName).azurecr.io/$(orderAPIImageName)@$CONTAINER_DIGEST
    - task: AzureCLI@2
      displayName: 'Sign the $(orderAPIImageName) container scan result'
      inputs:
        azureSubscription: 'DevOpsPoC'
        scriptType: 'bash'
        scriptLocation: 'inlineScript'
        inlineScript: |
          VULNERABILITY_SCAN_RESULT_DIGEST=$(oras discover -o json --artifact-type 'application/sarif+json' $(acrName).azurecr.io/$(orderAPIImageName):1.0.0 | jq -r ".manifests[0].digest")
          notation sign --signature-format cose --key $(notationTestKeyName) $(acrName).azurecr.io/$(orderAPIImageName)@$VULNERABILITY_SCAN_RESULT_DIGEST
    - task: AzureCLI@2
      displayName: 'Sign the $(orderAPIImageName) container SBOM document'
      inputs:
        azureSubscription: 'DevOpsPoC'
        scriptType: 'bash'
        scriptLocation: 'inlineScript'
        inlineScript: |
          SBOM_DIGEST=$(oras discover -o json --artifact-type 'application/spdx+json' $(acrName).azurecr.io/$(orderAPIImageName):1.0.0 | jq -r ".manifests[0].digest")
          notation sign --signature-format cose --key $(notationTestKeyName) $(acrName).azurecr.io/$(orderAPIImageName)@$SBOM_DIGEST
With these tasks, we sign the Order API container, the container security scan results, and the container SBOM document with the help of Notation, and store them on the ACR. Additionally, since the “tag” information is mutable and may reference different container images, we use the “digest” information to indicate the relevant artifacts during signing. Moreover, we utilize the “cose” format, which is accepted as a standard by the IETF, as the signature format. In order to access the artifacts associated with the relevant container image and obtain their digest information, we make use of the “discover” command of the ORAS CLI, as we have mentioned in the previous stages.
Now, when we look at the artifact graph of the relevant container again, we can see that the signature information is included for each artifact as follows.
As a result, by not only signing container images but also signing other supply chain artifacts, or if they are already signed, by verifying the relevant signatures in the following steps, we provide an additional level of trust to confirm that other artifacts are also generated by a trusted source. Therefore, we are bringing an extra level of trustworthiness to protect the integrity of the relevant containerized application.
At this point, we have completed the essential steps in the build phase. Of course, depending on your needs, you can also include different tools such as code coverage results in these steps.
Now we can move on to the deployment phase steps.
Verifying Artifacts Before the Deployment
Verifying signed container images and associated artifacts before deployment is a critical step in ensuring authenticity, integrity, and security within the software supply chain. These verification processes allow us to verify that the relevant artifact comes from trusted sources, keeps its integrity, and has passed through relevant security mechanisms.
At this point, we will once again make use of the ORAS and Notation CLI.
Previously, we had locally created the test RSA key that Notation can use for signing operations, as well as the test self-signed certificates for verification purposes within the “SigningStage“. Now, to perform the verification operations, we also need these certificate details within the new stage that we are going to create now. First, within the “SigningStage“, let’s add the following task as the final step and share the relevant certificate path as a pipeline artifact.
    - task: PublishPipelineArtifact@1
      inputs:
        targetPath: '$(Agent.BuildDirectory)/../../.config/notation/localkeys'
        artifact: 'notation'
        publishLocation: 'pipeline'
Now, let’s add a new stage called “Dev” as follows and place the certificate path, shared as a pipeline artifact, within this stage in the same way. We can consider this stage as the one where we will deploy our sample application, Order API, to the development environment.
- stage: Dev
  displayName: 'Deploy to Dev'
  dependsOn: SigningStage
  jobs:
  - job: VerifyArtifacts
    displayName: 'Verify Artifacts'
    steps:
    - task: DownloadPipelineArtifact@2
      inputs:
        buildType: 'current'
        artifactName: 'notation'
        downloadPath: '$(Agent.BuildDirectory)/../../.config/notation/localkeys'
At this point, we have defined a new job called “VerifyArtifacts” to perform the verification operations, and as its first stage, we have placed the certificate path, shared as a pipeline artifact, in the same way. For the next step, we will prepare the Notation CLI again for the relevant stage.
While preparing the Notation CLI, we will include the certificate, that we have placed, into the Notation and additionally define a trust policy. To verify a container image or any signed artifact with Notation, we need to define trust policies. These policies allow us to specify trusted sources that sign the artifacts and the level of verification that will be applied.
Now let’s create a trust policy called “trust-policy.json” under the root folder of the project as follows.
{
    "version": "1.0",
    "trustPolicies": [
        {
            "name": "mytodo-store-images",
            "registryScopes": [ "*" ],
            "signatureVerification": {
                "level" : "strict"
            },
            "trustStores": [ "ca:order-api.io" ],
            "trustedIdentities": [
                "*"
            ]
        }
    ]
}
At this point, with the “registryScopes” key, we can specify the registry artifacts to which this policy will be applied. For the sake of simplicity, I didn’t specify a specific registry artifact; I have applied it in general. We can also specify the level of verification to be applied with the “signatureVerification” key. For an example, I have chosen the “strict” level. Apart from this, there are also options such as “permissive“, “audit“, and “skip“.
With this verification level we have specified, Notation will perform different checks such as “Integrity“, “Authenticity“, “Authentic timestamp“, “Expiry” and “Revocation check” on the relevant artifacts.
NOTE: The “Authenticity” check verifies whether the artifact was created by a trusted source, while the “Authentic timestamp” also check whether the artifact was signed while the relevant certificate was valid.
Additionally, with the “trustStores” key, we specify the trusted store called “order-api.io” that will contain the relevant trusted root, which we will include as a CA in the next step. We define the trusted sources that can sign artifacts with the “trustedIdentities” key. In this case, I’ve specified “*” to designate all certificates issued by the CA as trusted identities, sources. For more information on this topic, you can take a look here.
Now we can prepare the Notation CLI for the “Dev” stage.
    - task: Bash@3
      displayName: 'Prepare Notation v$(notationVersion)'
      inputs:
        targetType: 'inline'
        script: |
          ls
          wget https://github.com/notaryproject/notation/releases/download/v$(notationVersion)/notation_$(notationVersion)_linux_amd64.tar.gz
          tar xvzf notation_$(notationVersion)_linux_amd64.tar.gz
          sudo mv notation /usr/local/bin

          notation policy import ./trust-policy.json
          notation cert add --type ca --store $(notationTestKeyName) $(Agent.BuildDirectory)/../../.config/notation/localkeys/order-api.io.crt
At this point, there are two differences compared to what we did in the “SigningStage” previously. Here, we include the trust policy that we have created in Notation. Then, we also add the CA certificate that we obtained from the previous stage to the trusted store with the same name.
Now that we have equipped the Notation CLI with the trust policy and the relevant certificate for verification, we can proceed to the verification step. This step allows us to verify that the relevant container image and its associated artifacts are authentic and originate from a trustworthy source. This source could be ourselves or a different team or publisher. Also, at this point, although we have worked on a single pipeline, we may have different processes and pipelines for the CD part. This verification process also allows us to ensure that the relevant artifacts have not been tampered with during the processes of creation, signing, and publishing. Additionally, at this step, we can check whether the application, in this case the Order API, has passed through different security steps, and accordingly, we can enforce different policies as well.
So, to perform the signature verification process, what we need to do is to execute the “verify” command of Notation as follows.
notation verify IMAGE_URL@DIGEST
    - task: AzureCLI@2
      displayName: 'Verify the $(orderAPIImageName) container image signature'
      inputs:
        azureSubscription: 'DevOpsPoC'
        scriptType: 'bash'
        scriptLocation: 'inlineScript'
        inlineScript: |
          az acr login --name $(acrName)

          docker pull $(acrName).azurecr.io/$(orderAPIImageName):1.0.0

          CONTAINER_DIGEST=$(docker inspect --format='{{index .RepoDigests 0}}' $(acrName).azurecr.io/$(orderAPIImageName):1.0.0) && CONTAINER_DIGEST=${CONTAINER_DIGEST#*@}
          notation verify $(acrName).azurecr.io/$(orderAPIImageName)@$CONTAINER_DIGEST
At this point, we perform the signature verification process with Notation using the digest information of the relevant container image. Also we ensure that the verification fails if the container image does not contain any signature manifest or if the signature within it is not signed by the CA certificate named “order-api.io” which we have included in the trusted store.
If successful, we will get a result as follows:

Now, let’s verify the signatures of other artifacts that we have associated with the container by adding the following tasks.
- task: AzureCLI@2
displayName: 'Verify the $(orderAPIImageName) container scan result'
inputs:
azureSubscription: 'DevOpsPoC'
scriptType: 'bash'
scriptLocation: 'inlineScript'
inlineScript: |
az acr login --name $(acrName)
RESULT=$(oras discover -o json --artifact-type 'application/sarif+json' $(acrName).azurecr.io/$(orderAPIImageName):1.0.0 | jq -r ".manifests[0]")
if [ "$RESULT" = "null" ]; then
echo "Container scan result does not exist."
exit 1
else
VULNERABILITY_SCAN_RESULT_DIGEST=$(echo "$RESULT" | jq -r ".digest")
notation verify $(acrName).azurecr.io/$(orderAPIImageName)@$VULNERABILITY_SCAN_RESULT_DIGEST
fi
- task: AzureCLI@2
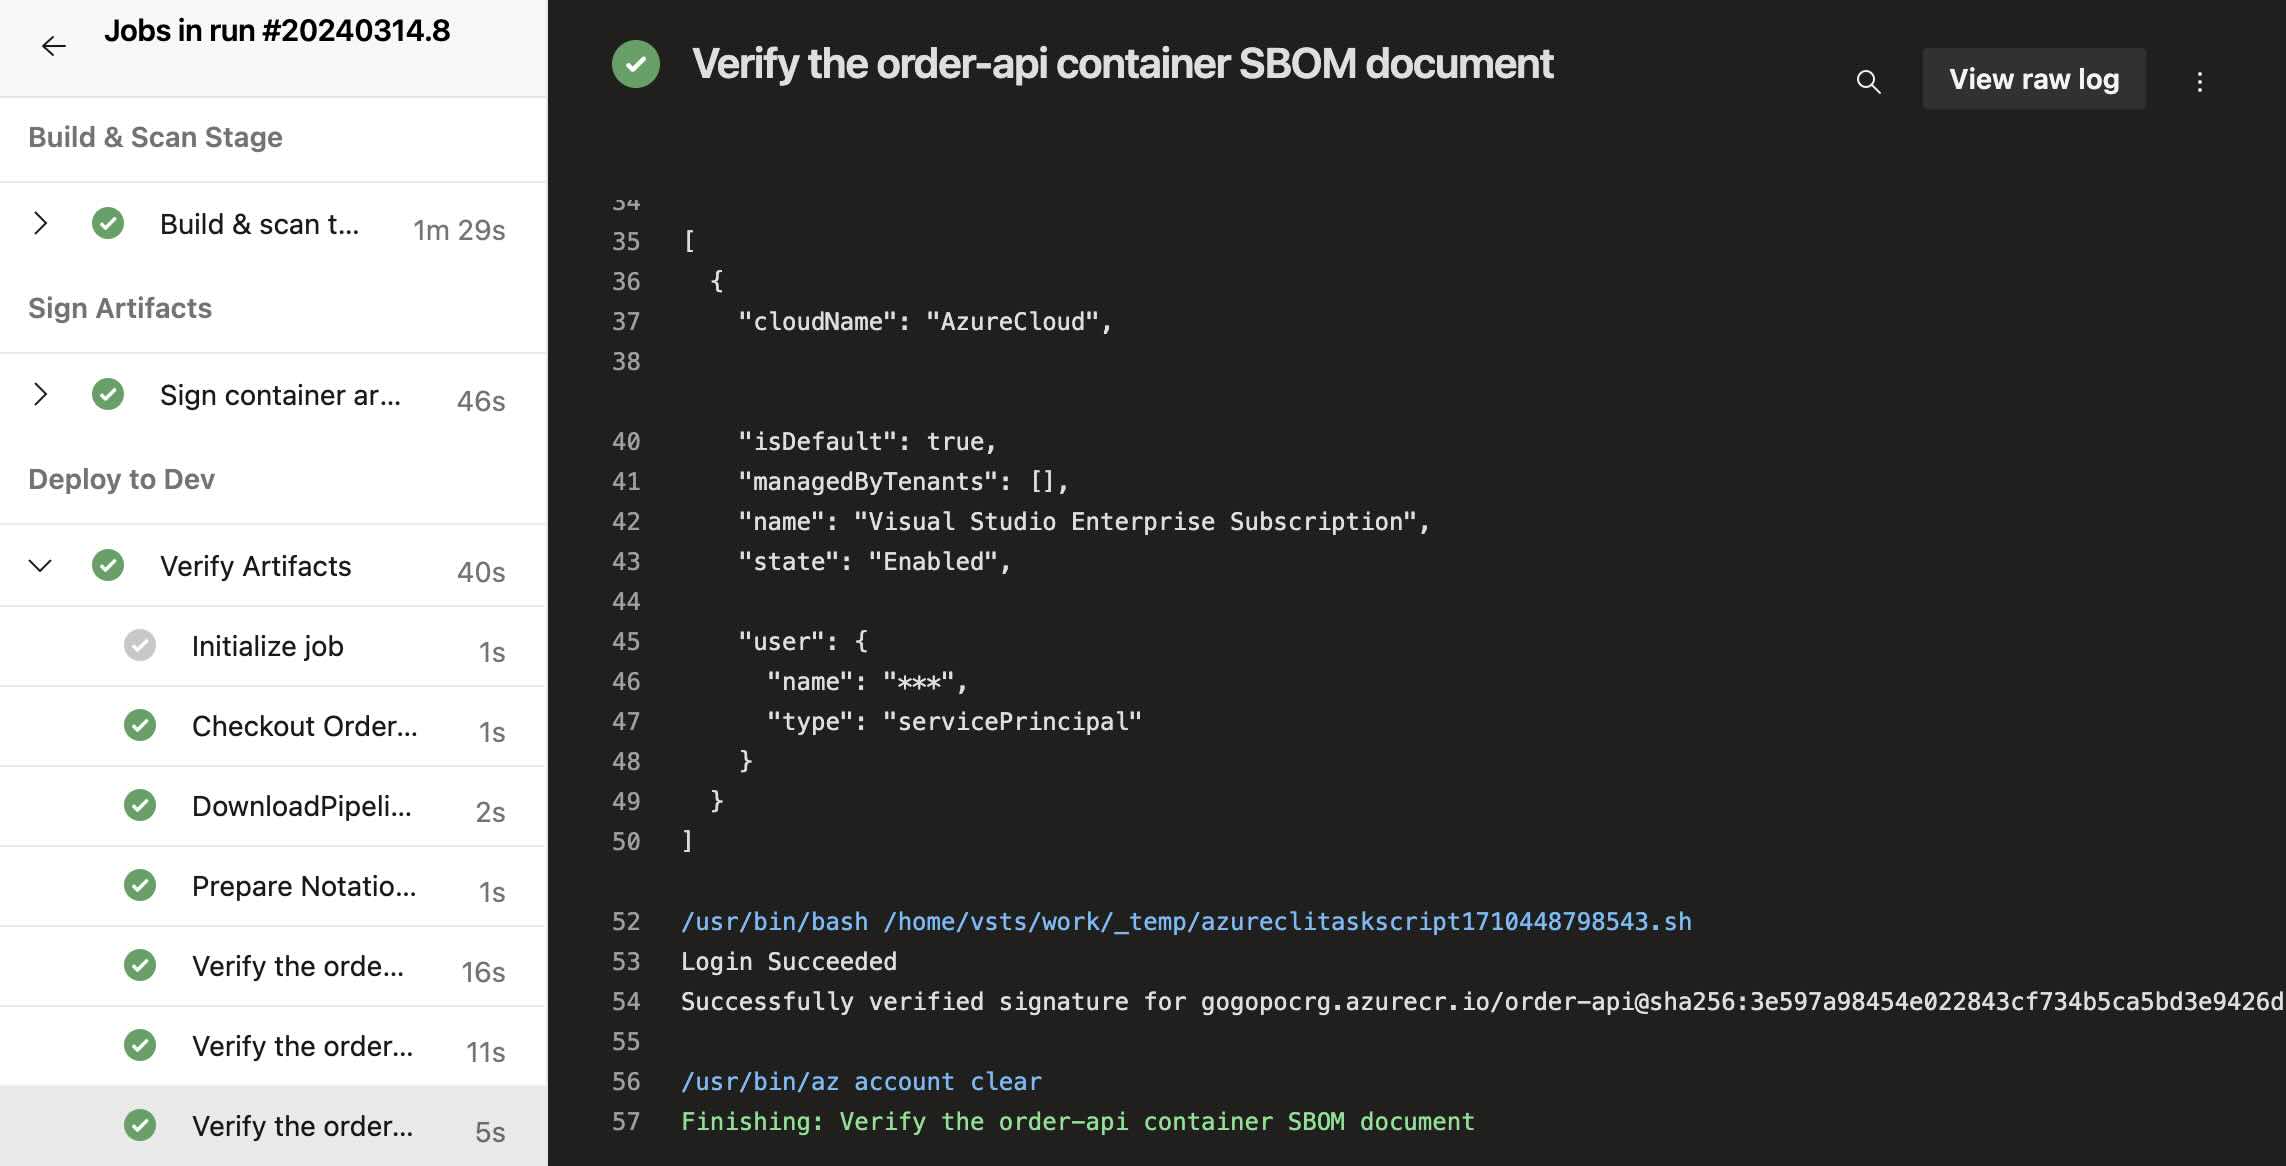
displayName: 'Verify the $(orderAPIImageName) container SBOM document'
inputs:
azureSubscription: 'DevOpsPoC'
scriptType: 'bash'
scriptLocation: 'inlineScript'
inlineScript: |
az acr login --name $(acrName)
RESULT=$(oras discover -o json --artifact-type 'application/spdx+json' $(acrName).azurecr.io/$(orderAPIImageName):1.0.0 | jq -r ".manifests[0]")
if [ "$RESULT" = "null" ]; then
echo "Container SBOM document does not exist."
exit 1
else
SBOM_DIGEST=$(echo "$RESULT" | jq -r ".digest")
notation verify $(acrName).azurecr.io/$(orderAPIImageName)@$SBOM_DIGEST
fi
As we can see at this step, by adding a simple check, we determine whether the relevant container image has undergone the necessary security checks and accordingly we ensure the status of the pipeline. Then, we proceed to verify the signatures of the relevant artifacts via Notation.
Thus, by not only verifying the authenticity of the container image but also signing and verifying other artifacts associated with it, we establish an additional chain of trust throughout the software supply chain.
So
Although the article is quite long, I hope I was able to provide a perspective on the security of the software supply chain in the context of containerized applications.
In the next part of the article, we will focus on how we can perform detailed checks on artifacts such as the SBOM document and container security scan results using various policies with OPA Gatekeeper and Ratify Verification Engine before deploying them in a Kubernetes environment.
References
Sign container images with Notation and Azure Key Vault using a self-signed certificate – Azure Container Registry | Microsoft Learn
GitHub – notaryproject/notation: A CLI tool to sign and verify artifacts
Quickstart: Sign and validate a container image | Notary Project | A set of specifications and tools intended to provide a cross-industry standard for securing software supply chains.
[…] Containerized Uygulamaların Supply Chain’ini Güvence Altına Alarak Güvenlik Risklerini Aza… […]