As we can imagine, the technology and needs are rapidly evolving and growing day by day. Because of these rapid changes, organizations are also trying to renew their technology in order to keep themselves up to date. So, the general approach is focused on the microservice architecture to scale both business/organization and technology.
Also as we know, there are many topics/areas that we need to touch during this adaptation process. In my opinion, one of the most critical topics is to secure communication between microservices.
After all, none of us does want anyone to intercept our sensitive data easily, right?
In this article, I will try to mention “how we can secure the communication between microservices with Istio Service Mesh“.
![]()
As we know, when we use a service mesh technology such as istio in the microservice ecosystem, it handles the communication between our applications due to the nature of the service mesh.
Thus, we can get benefit from istio in areas such as reliability, discovery and monitoring without doing any code changes on our applications. Along with these benefits, it also offers us different solutions in order to provide secure communication between microservices.
Although our microservices work in our internal environments that we generally accept as secure, making the communication between microservices encrypted will be to our advantage for all kinds of security issues.
Well, in the context of security, istio supports two different authentication methods.
- Transport authentication (mTLS) for service-to-service communication.
- End-user authentication with JTW for client-to-service communication.
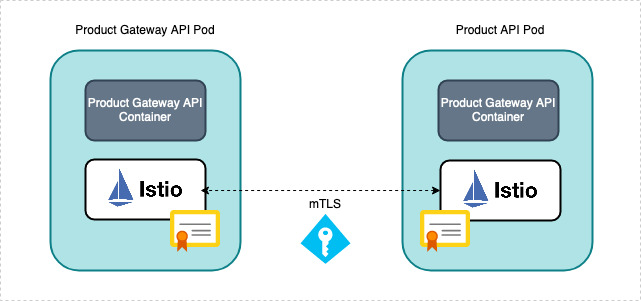
Securing Service-to-Service Communication with Mutual TLS
As we have mentioned, we can provide secure communication between microservices without any changes on the code side. Istio proxy manages the traffic on port 443 for us and redirects it to port 80 of the application. Also, we don’t need to manage any certificate.
Istio uses the Envoy’s sidecar proxy for kind of this operations and to intercept the network as we can see the diagram below.
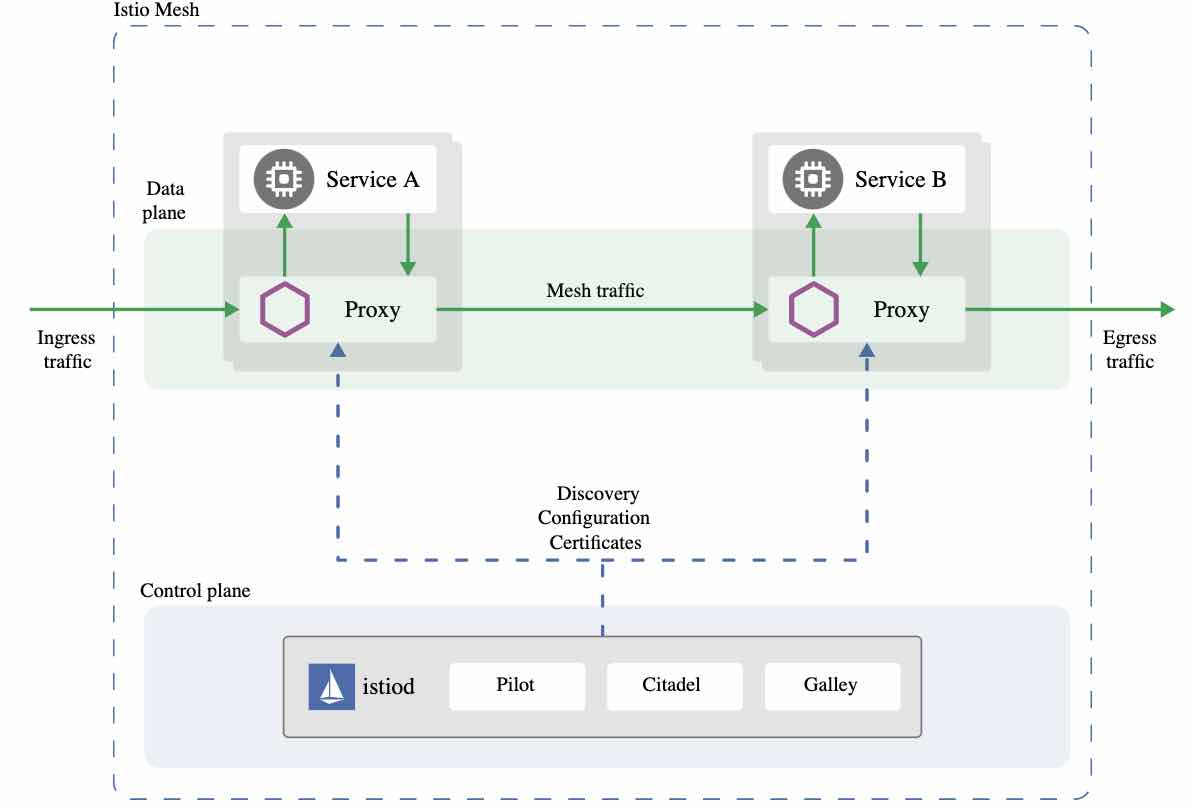 Mutual TLS authentication makes the traffic secure and reliable in both client and server directions.
So, how it works;
As we know, when a service receives or sends traffic, this traffic always passes through the local sidecar proxy of the relevant service due to the nature of the service mesh. Therefore, when a request is sent using mTLS, istio directs this traffic to the client’s local sidecar. So, when this local sidecar receives the traffic, it starts performing an mTLS handshake operation with the server’s sidecar.
If this verification operation is completed successfully, client’s sidecar encrypts the traffic and sends it to the server’s sidecar. Then the server’s sidecar decrypts the traffic and directs it to the relevant endpoint.
In addition, istio also manages all the necessary certificate operations smoothly. Thus, it helps us to reduce our operational burdens.
Let’s Deploy a Sample Application
I developed a few simple APIs with .NET Core that return product and stock information in order to perform an example. First, we will deploy “Product“, “Stock” and “Product Gateway” APIs that I developed to a kubernetes cluster. Then, we will make the communication secure between APIs with mTLS using istio mesh.
In our example, we will use the GET “/products/1” endpoint of the “Product Gateway” API. This endpoint performs the logic below. In short, it returns a sample product response.
[HttpGet("{id}")]
public async Task Get(int id)
{
    HttpClient httpClient = _httpClientFactory.CreateClient();

    string productAPIUrl = _configuration.GetValue("productAPIUrl");
    string stockAPIUrl = _configuration.GetValue("stockAPIUrl");

    productAPIUrl = $"{productAPIUrl}/products/{id}";
    stockAPIUrl = $"{stockAPIUrl}/stocks?productId={id}"; ;

    Task productResponse = httpClient.GetAsync(productAPIUrl);
    Task stockResponse = httpClient.GetAsync(stockAPIUrl);

    await Task.WhenAll(productResponse, stockResponse);

    if (productResponse.Result.IsSuccessStatusCode && stockResponse.Result.IsSuccessStatusCode)
    {
        var jOption = new JsonSerializerOptions
        {
            PropertyNamingPolicy = JsonNamingPolicy.CamelCase
        };

        using var productResponseContent = await productResponse.Result.Content.ReadAsStreamAsync();
        ProductDTO product = await JsonSerializer.DeserializeAsync(productResponseContent, jOption);

        using var stockResponseContent = await stockResponse.Result.Content.ReadAsStreamAsync();
        StockDTO stock = await JsonSerializer.DeserializeAsync(stockResponseContent, jOption);

        var aggregatedProduct = new ProductAggregatedDTO
        {
            Id = product.Id,
            Name = product.Name,
            Quantity = stock.Quantity
        };

        return Ok(aggregatedProduct);
    };

    return NotFound();
}
You can take a look at the sample codes here.
Requirements and Assumptions
- Kubernetes cluster and basic containerization concept knowledge.
- Basic service mesh concept knowledge.
Before we start to deploy applications, we need to install istio service mesh on the kubernetes cluster.
You can perform the installation operation for different platforms by following these steps. In this article context, I will use Docker Desktop and Istio 1.7.3.
After a successful installation, we should see a result like the below one.
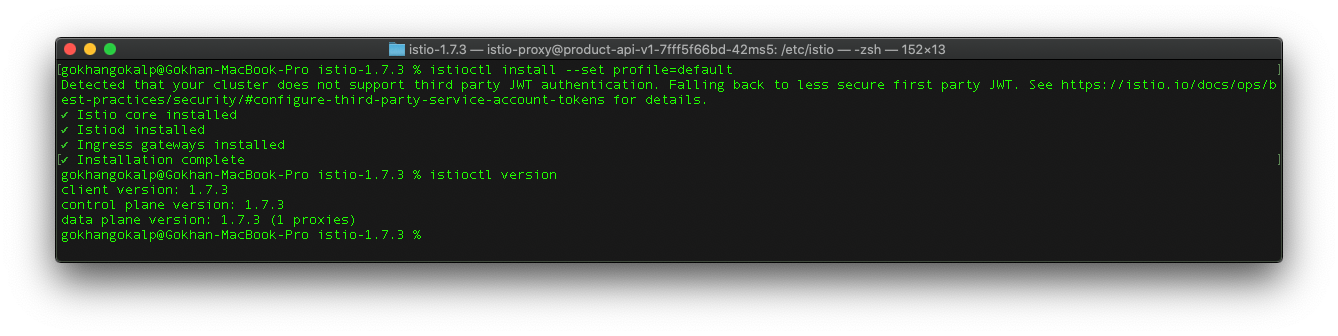
Well, now we need to add a label to a namespace in order to perform auto sidecar injection.
I will use “default” namespace. Thus, the applications, which will be deployed in this namespace, will be automatically included the mesh.
kubectl label namespace default istio-injection=enabled
Now we can start to deploy sample APIs.
First, let’s build the images with the help of the following commands.
docker build -f ProductAPI/Dockerfile . -t ecom-sample-product-api:v1
docker build -f StockAPI/Dockerfile . -t ecom-sample-stock-api:v1
docker build -f ProductGatewayAPI/Dockerfile . -t ecom-sample-product-gateway-api:v1
Then we can deploy APIs using this “deploy.yaml” file.
kubectl apply -f deploy.yaml

After the deployment processes are completed successfully, let’s wait until the pods are in 2/2 “Running” status together with their sidecars.
Also, we can check whether the related pod is in the mesh or not with the following command.
istioctl x describe pod product-gateway-api-v1-7996bf7cdf-dz289

In order to make ensure that the APIs work properly, let’s hit a GET request to the “/products/1” endpoint of the “Product Gateway” API over any pod as follows.
kubectl exec "$(kubectl get pod -l app=stock-api -o jsonpath={.items..metadata.name})" -c stock-api -it sh

curl http://product-gateway-api.default.svc.cluster.local/products/1

Well, we have successfully accessed the “Product Gateway” API over the HTTP and got the product response as we can see from the picture above.
Since the APIs are working properly, now we can make this communication secure end-to-end with the mTLS.
In general, we can assume that the communication we did over the HTTP is also secure because of the istio 1.5 version comes with auto mTLS feature enabled and in permissive mode.
So how we can customize it? Let’s go into a little more detail.
In istio, there are three points where we can apply the mTLS levels:
- Mesh level
- Namespace level
- Service level
Well, these levels go towards the smallest by overriding each other. For example, we may have applications in the same or different namespace which need different requirements. In short, we can perform mTLS in any levels we want. You can also reach out the more detailed information on this topic here.
I will enable mTLS within the “default” namespace by customizing it as follows. Well, our expectation will be to ensure that our applications will only accept mTLS traffic under the “default” namespace without us to make any code changes on our applications.
To do this, we will use “PeerAuthentication” custom resource of the istio.
apiVersion: "security.istio.io/v1beta1"
kind: "PeerAuthentication"
metadata:
  name: "default"
  namespace: "default"
spec:
  mtls:
    mode: STRICT
Since we will enable mTLS within the scope of the “default” namespace, we need to set the value of the “namespace” element under the “metadata” as “default“.
In addition, there are three different mTLS modes that we can use as STRICT, PERMISSIVE and DISABLED. We also mentioned that the auto mTLS feature comes as enabled in the permissive mode. Since we want to only accept mTLS traffic, we will use the mode which is “STRICT“.
If we want to allow plain-text traffic along with encrypted traffic, we can also use the “PERMISSIVE” mode. Because one of the biggest problems is to cut the traffic for applications that have not adapted to the service mesh ecosystem yet and to make this process much more complex. Especially if you are also working with Windows and Linux container like us, this problem becomes an inevitable situation.
In short, by using the “PERMISSIVE” mode, we can make these migration process of applications, which are trying to be integrated in the system, smoother.
In addition, it is also possible to customize mTLS at port level as follows.
portLevelMtls:
  8080:
    mode: DISABLE
Well, since we want to accept only mTLS traffic, let’s apply the above yaml file on the kubernetes.
kubectl apply -f mtls.yaml
Now we need to test whether the mTLS requirement we applied is valid or not. To do that, we need a test pod which is not included in the mesh.
In order to perform a test, let’s ceate a test pod in the “test” namespace, which will not be managed by istio, and then again try to hit a new request over the HTTP to the “Product Gateway” API.
kubectl run -i --tty -n test --rm test --image=curlimages/curl:7.71.1 --restart=Never -- sh
curl http://product-gateway-api.default.svc.cluster.local/products/1

As we can see from the result above, this time we couldn’t reach out “Product Gateway” API over the HTTP. Because our applications, which are located in the “default” namespace, now only accept mTLS traffic.
Wohho! Now our applications are a bit more secure.
So how are these mTLS operations done at the mesh side? Are you ready for the boring part?
Let’s take a look at it without going into too much detail.
In order to understand these processes clearly, we should take a look at the details of the “Listener” and “Cluster” configurations of the envoy proxy.
- We can roughly say listeners are the proxy configurations for downstream requests.
- For cluster we can say that it is responsible from proxy configurations of upstream requests.
Listener Part
First let’s list the listeners on a pod as follows. I will use the “product-gateway-api” pod.
istioctl pc listeners product-gateway-api-v1-7996bf7cdf-dz289
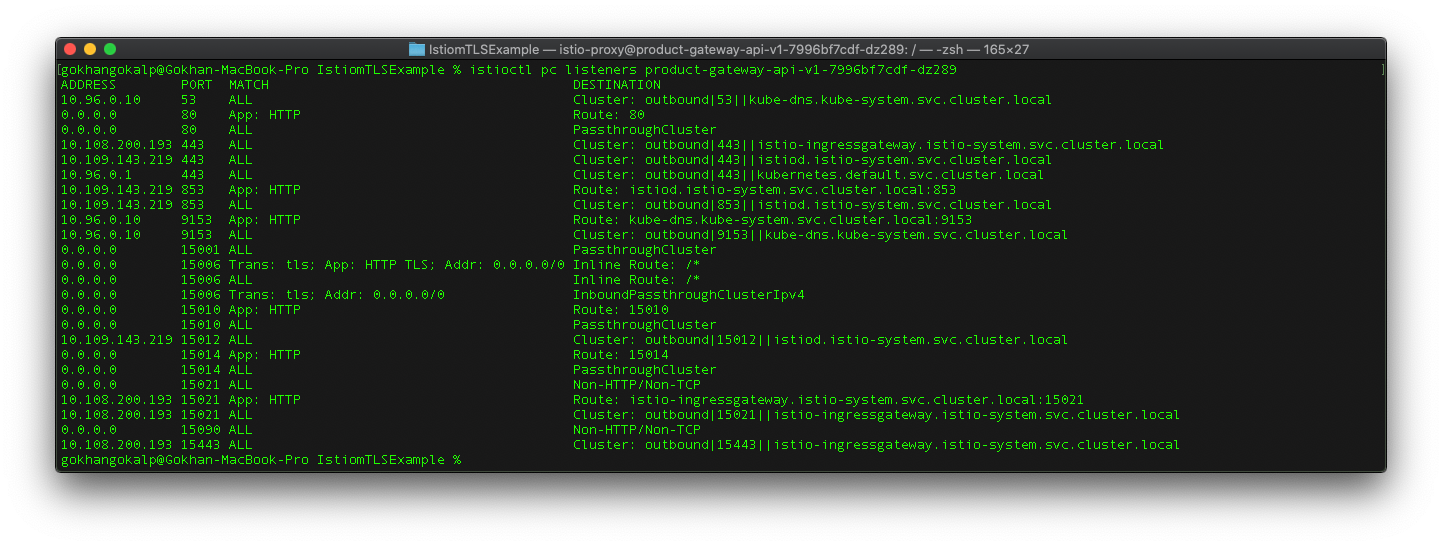
As we can see the result above, there are many listeners. The port that we will take a look at it is “15006“. First this listener receives all inbound traffic which comes to a pod. I mean, all traffic that comes to the “product-gateway-api” pod, first will be handled by this listener.

A listener basically contains different configurations and filters for incoming requests. As we can also see from the diagram above, these filters takes place into the “filterChains” element. At this point, the filter that we need to take a look at it is the filter that will be applied when TLS is active.
First of all, let’s get the details of the inbound listener with the command below.
istioctl pc listeners product-gateway-api-v1-7996bf7cdf-dz289 --address 0.0.0.0 --port 15006 -o json | less
At this point, we will get a quite long response. But I will only mention the parts that I see necessary.
Well, we have said that the filter which we need to take a look at it is the filter that will be applied when TLS is active.
We can distinguish this filter as follows.
"filterChains": [
    {
        "filterChainMatch": {
            "prefixRanges": [
                {
                    "addressPrefix": "0.0.0.0",
                    "prefixLen": 0
                }
            ],
            "transportProtocol": "tls"
        },

One of the important points for us in this filter is the “transportSocket” element. We can see this element contains information such as certificate which will require for TLS.
If we need to elaborate a little bit more, we can see that the Secret Discovery Service (SDS) information, which requires in order to fetch TLS certificates, takes place in the “tlsCertificateSdsSecretConfigs” element. We can also see that the “ROOTCA” access information, which will be required for the validation processes of the TLS certificates, takes place in the “validationContextSdsSecretConfig” element.
Since mTLS is active in the mesh, “ROOTCA” access information is required for validation processes. We can also check this requirement by looking at the value of the “requireClientCertificate” element. In our case, we can see that it is “true“. In other words, a client, which will perform a request to the “product-gateway-api” pod, must also present its own certificate in order to get access.
When a client presents its own certificate, TLS Inspector filter of the envoy starts to work. This filter performs initial TLS handshake operations such as extraction of the SNI. Thus, this SNI information becomes available for “filterChains” matching operations. You can also get more detailed information about this topic from here.
Cluster Part
Now let’s take a look at the client-side operations. To do that, we need to look at the configurations of the upstream request.
First, let’s get the cluster summary of the “product-gateway-api” pod with the command below.
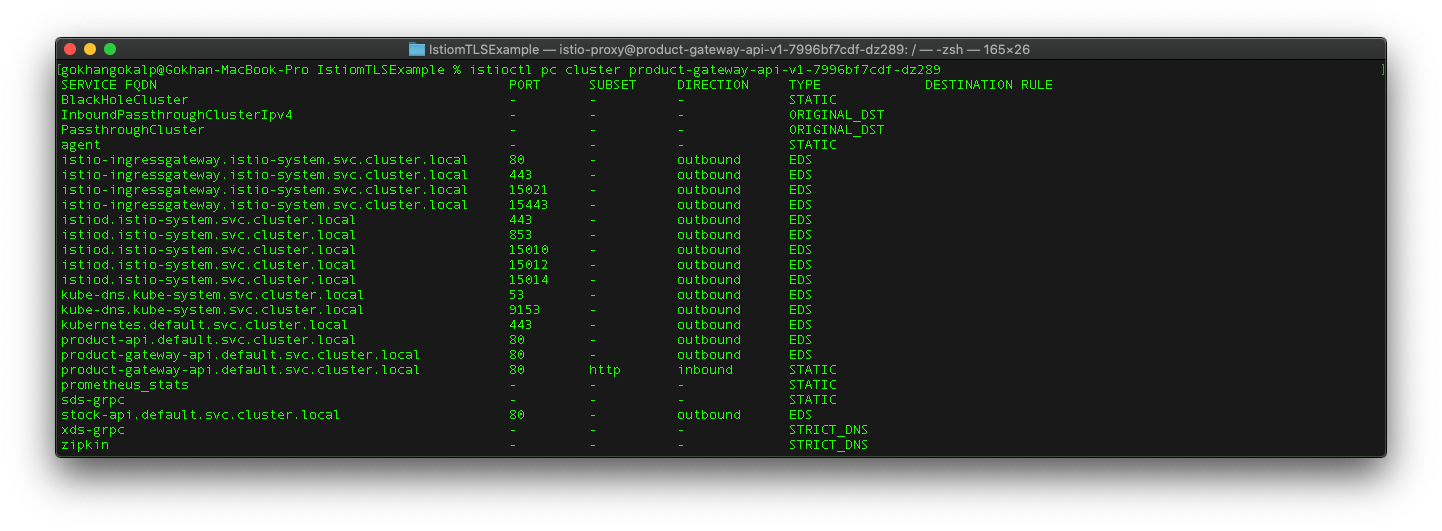
As we can see, there are many endpoints. But for test purpose, we will take a look at the configuration details which is used while accessing the “stock-api” pod over the “product-gateway-api“.
To do this, let’s get the details of the “stock-api.default.svc.cluster.local” endpoint using the command below.
istioctl pc cluster product-gateway-api-v1-7996bf7cdf-dz289 --fqdn stock-api.default.svc.cluster.local -o json | less

At the picture above, we can see that the “transportSocket” element is exist here for the TLS certificate operations as in listener. In addition, the “sni” section, which will be used for TLS operations, is also here.
Let’s Wrap It Up
None of us does want anyone to intercept our sensitive data easily. Thus, the secure communication between applications is very important topic. In this article context, we have tried to perform the secure communication between our applications by using istio service mesh without making any changes on the code side. Besides of enabling mTLS with istio globally, it is also great flexibility that we can configure it for different scopes. In addition, istio helps us to reduce many operational burdens such as the management of certificates.
Referanslar
https://istio.io/latest/docs/reference/config/security/
https://istio.io/latest/docs/ops/diagnostic-tools/proxy-cmd/
https://www.envoyproxy.io/docs/envoy/latest/api-v3/config/transport_socket/transport_socket
https://developer.ibm.com/technologies/containers/tutorials/istio-security-mtls/
Be First to Comment