In the previous article, we talked about the Dapr project, its benefits and developed two sample microservice with .NET 6 as self-hosted mode in the local environment. (If you haven’t read the first article, you can find it here.)
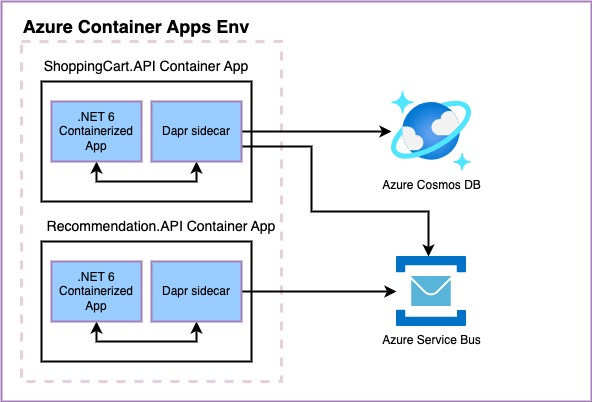
Within the scope of this article, we will perform the deployments on Azure Container Apps by changing the default Dapr components of the sample microservices, which we developed previous article (ShoppingCart and Recommendation), with Azure resources.
First of all, let’s start with a small introduction to Azure Container Apps.
Azure Container Apps
Azure Container Apps is an application-oriented fully managed serverless container runtime that Microsoft announced as GA in May 2022.
It runs on Azure Kubernetes Service and it gets its power from powerful projects such as KEDA, Envoy and Dapr. In other words, by using Azure Container Apps, we can benefit from all Dapr APIs in a managed way. In this way it provides us a secure, modular and scalable infrastructure and it let us more focus on the application side. Also, by the help of the KEDA, it allows us to have event-driven auto scaling and make cost optimizations with zero-scaling ability as well.
As we know, on the kubernetes side, HPA provides horizontally auto scaling based on resource metrics such as CPU and memory. With KEDA, we can perform horizontally auto scaling based on multiple metrics. To learn about KEDA, you can take a look at this article which I covered before.
If you are also actively managing your applications in the kubernetes environment, if we skip the good parts of it, probably you also know that infrastructure management and configuration are challenging. On the other hand, Azure Container Apps provides a fully managed environment, where the complexity and the required learning curve of kubernetes is minimized, and allows us to easily build and host our microservice-based applications.
We can also think of Azure Container Apps as a kubernetes pod. Multiple containers that share the same life-cycle can be hosted within one Azure Container App. Also by using revisions, versioning is possible. In short, when we deploy a container app, a revision automatically gets created. In addition, revisions get created also when we make any changes or updates. Revisions are immutable. It is also possible to run multiple revisions at the same time and we can divide the traffic between them as we want. By default, single revision mode is enabled.

Also monitoring and observability can be easily performed through Log Analytics. Long story short, by using Azure Container Apps, we can easily build and host our microservice-based applications without worrying about cloud infra management and container orchestration.
Let’s Start with Components
In the previous article, we had used the default components for state-store and pub/sub. We had also mentioned that Dapr has a pluggable structure and that we can change the components with another component without any code changes.
Now we will use Azure Cosmos DB for state-store and Azure Service Bus for pub/sub. You can take a look at here to create Azure Service Bus and here to create Azure Cosmos DB. While creating the Azure Cosmos DB, we need to select “NoSQL API” option and then create a database called “DaprShop” and a container called “ShoppingCart“. Also, we need to make sure that the partition key is “/id”. In addition, since we will need to have topics for the pub/sub component of Dapr, we need to choose “standard” tier when creating the Azure Service Bus.
After creating the Azure services, let’s first create a new folder called “Components” under the “DaprShop” folder, which is the root folder of our sample project. In this folder, we will define components we need for our microservices.
Let’s start with the pub/sub component first. For this, let’s create a file called “pubsub.yaml” in the folder as follows.
componentType: pubsub.azure.servicebus
version: v1
metadata:
  - name: connectionString
    secretRef: connection-string-key
secrets:
- name: connection-string-key
  value: "Endpoint=sb://dapr-poc-sbus.servicebus.windows.net/;SharedAccessKeyName=YOUR_SHARED_ACCESS_KEU_NAME;SharedAccessKey=YOUR_SHARED_ACCESS_KEY"
If we still remember the Dapr component schema from the previous article, then we might notice that this time the schema is a little simplified. Azure Container Apps uses a more simplified version of component schema.
NOTE: You can find more details about the schema from this section.
The only thing that we need to update in this pub/sub component is the “connectionStringKey” information of Azure Service Bus.
We can also use managed identity when accessing Azure-hosted resources. For non-Azure-hosted resources, we can use Dapr secret store component and manage secrets easily with Azure Key Vault integration. Thus, we will not need to explicitly define the secret information within the component.
Now let’s create a file called “statestore.yaml“.
componentType: state.azure.cosmosdb
version: v1
metadata:
- name: url
  value: https://dapr-poc-cosmosstate.documents.azure.com:443/
- name: masterkey
  secretRef: cosmos-master-key
- name: database
  value: DaprShop
- name: collection
  value: ShoppingCart
secrets:
- name: cosmos-master-key
  value: "YOUR_COSMOS_MASTER_KEY"
Here, specifying the relevant information such as “url“, “masterKey“, “database” and “collection” of the Azure Cosmos DB, we have created, will be enough for us to use it as a state-store.
As we can see, it is easy to define different components. It is also possible to specify “scopes” for components. Thus, Dapr sidecar only loads the relevant components for container apps in relevant scope. We can also have this as follows.
scopes:
  - [DAPR-APP-ID-1]
  - [DAPR-APP-ID-2]
When we don’t specify any scope, Azure Container Apps, which sit in the same environment, load all deployed components by default.
Now we can move on to creation of Azure Container Apps environment and Azure Container App, and then we will deploy our components and microservices.
Let’s Create Azure Container Apps Env and Container App
Before starting the deployment, first we need to create an Azure Container Apps environment. We can think of the Azure Container Apps environment as a secure boundary that hosts multiple Azure Container App. Azure Container Apps, which are created in the same environment, are deployed in the same virtual network and share the same Azure Log Analytics workspace.
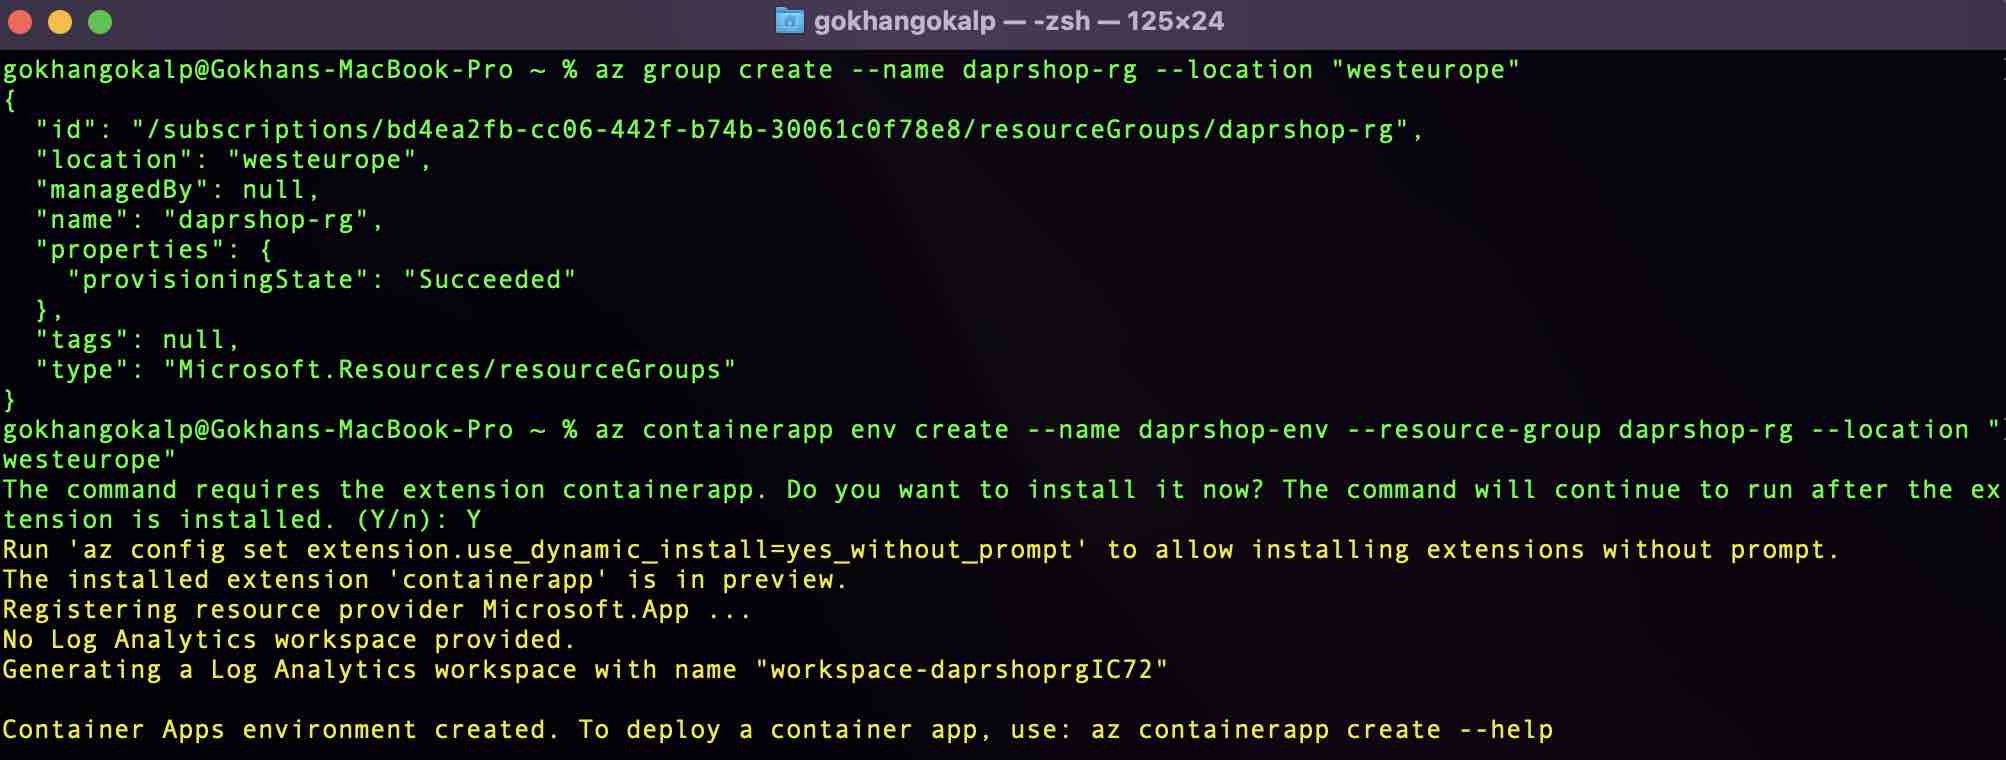
 Now let’s create a resource group by using the following command.
az group create --name daprshop-rg --location "westeurope"
Then we can create an Azure Container Apps environment.
az containerapp env create \
--name daprshop-env \
--resource-group daprshop-rg \
--location "westeurope"
NOTE: If you don’t have the “containerapp” extension, the above command will install this extension first. If you wish, you can also do this beforehand. “az extension add –name containerapp –upgrade“
Now let’s configure the pub/sub and state-store components, that we have defined above, in this “daprshop-env” Azure Container Apps environment.
For this, let’s go to the “Components” path under the “DaprShop” folder via CLI and configure the related components for the environment, we have created, by using the following commands.
az containerapp env dapr-component set \
--name daprshop-env \
--resource-group daprshop-rg \
--dapr-component-name statestore \
--yaml statestore.yaml
az containerapp env dapr-component set \
--name daprshop-env \
--resource-group daprshop-rg \
--dapr-component-name pubsub \
--yaml pubsub.yaml
In addition, since we have used the default names as “statestore” and “pubsub” when accessing these components in our sample project before, now we are also keeping them same in this environment as “statestore” and “pubsub“.
We can see the components configured for the relevant env either by using the following command or by going to the Azure Container Apps Environment resource through the Azure portal.
az containerapp env dapr-component list  \
--name "daprshop-env" \
--resource-group "daprshop-rg"
Up to this point, we have prepared the Azure Container Apps environment with Dapr components we want to use. Now, only the deployment process of our sample microservices to Azure Container App is left.
Before proceeding with the deployments, we need to containerize our sample microservices and push them to a container registry. I will perform this process though the Azure Container Registry that I have created before. If you want to create a container registry, you can also have a look here.
In addition, we need to go to the “Program.cs” file of the both ShoppingCart ve Recommendation microservices and remove the specific ports, which we did before, within the “app.Run();” command to let microservices run on default port 80.
Also, Dockerfiles that I’m going to use as follows.
Recommendation.API
FROM mcr.microsoft.com/dotnet/aspnet:6.0 AS base
WORKDIR /app
EXPOSE 80

FROM mcr.microsoft.com/dotnet/sdk:6.0 AS build
WORKDIR /src
COPY ["DaprShop.Recommendation.API/DaprShop.Recommendation.API.csproj", "DaprShop.Recommendation.API/"]
COPY ["DaprShop.Contracts/DaprShop.Contracts.csproj", "DaprShop.Contracts/"]
RUN dotnet restore "DaprShop.Recommendation.API/DaprShop.Recommendation.API.csproj"
COPY . .
WORKDIR "/src/DaprShop.Recommendation.API"
RUN dotnet build "DaprShop.Recommendation.API.csproj" -c Release -o /app/build

FROM build AS publish
RUN dotnet publish "DaprShop.Recommendation.API.csproj" -c Release -o /app/publish /p:UseAppHost=false

FROM base AS final
WORKDIR /app
COPY --from=publish /app/publish .
ENTRYPOINT ["dotnet", "DaprShop.Recommendation.API.dll"]
ShoppingCart.API
FROM mcr.microsoft.com/dotnet/aspnet:6.0 AS base
WORKDIR /app
EXPOSE 80

FROM mcr.microsoft.com/dotnet/sdk:6.0 AS build
WORKDIR /src
COPY ["DaprShop.ShoppingCart.API/DaprShop.ShoppingCart.API.csproj", "DaprShop.ShoppingCart.API/"]
COPY ["DaprShop.Contracts/DaprShop.Contracts.csproj", "DaprShop.Contracts/"]
RUN dotnet restore "DaprShop.ShoppingCart.API/DaprShop.ShoppingCart.API.csproj"
COPY . .
WORKDIR "/src/DaprShop.ShoppingCart.API"
RUN dotnet build "DaprShop.ShoppingCart.API.csproj" -c Release -o /app/build

FROM build AS publish
RUN dotnet publish "DaprShop.ShoppingCart.API.csproj" -c Release -o /app/publish /p:UseAppHost=false

FROM base AS final
WORKDIR /app
COPY --from=publish /app/publish .
ENTRYPOINT ["dotnet", "DaprShop.ShoppingCart.API.dll"]
After the containerization process for both microservices, now we can perform the deployment operations to Azure Container App.
az containerapp create \
  --name "recommendation-api"  \
  --resource-group "daprshop-rg" \
  --environment "daprshop-env" \
  --image "YOUR_ACR_NAME.azurecr.io/daprshop.recommendationapi:01" \
  --registry-server "YOUR_ACR_NAME.azurecr.io" \
  --target-port 80 \
  --ingress 'external' \
  --min-replicas 1 \
  --max-replicas 1 \
  --enable-dapr \
  --cpu 0.25 \
  --memory 0.5Gi \
  --dapr-app-id recommendationapi \
  --dapr-app-port 80
  az containerapp create \
  --name "shoppingcart-api"  \
  --resource-group "daprshop-rg" \
  --environment "daprshop-env" \
  --image "YOUR_ACR_NAME.azurecr.io/daprshop.shoppingcartapi:01" \
  --registry-server "YOUR_ACR_NAME.azurecr.io" \
  --target-port 80 \
  --ingress 'external' \
  --min-replicas 1 \
  --max-replicas 1 \
  --enable-dapr \
  --cpu 0.25 \
  --memory 0.5Gi \
  --dapr-app-id shoppingcartapi \
  --dapr-app-port 80
To briefly explain some of the parameters;
- With the “environment” parameter, we specify which Azure Container Apps Env will be used for related Azure Container App.
- With “registry-server” parameter, we specify from which repository the relevant image will be fetched. By default it looks for dockerhub.
- “ingress” parameter: Since we will expose our microservices to the outside, we specify them as external. If there is no need to expose, we can also set it to “internal.
- Wih “*-port” parameters, we specify the port of which our microservices are listening on.
- We can also set the “min-replicas” option to 0.
Apart from these, there are different parameters that we can also use. You can reach out the list here.
After the deployment processes, we can access the URL information of the relevant microservices either through the Azure portal or with a command like below.
az containerapp show -n shoppingcart-api -g daprshop-rg --query properties.configuration.ingress.fqdn
az containerapp show -n recommendation-api -g daprshop-rg --query properties.configuration.ingress.fqdn

As we can see, it is that easy to deploy our microservices to Azure Container App.
Test Time!
In order to perform a test, let’s access the Swagger UI of ShoppingCart API and add a product to the shopping cart or run the following cURL command as we did in the previous article.
curl -X 'POST' \
  'https://YOUR_AZURE_CONTAINER_APP_URL/api/shopping-cart/123456/items' \
  -H 'accept: text/plain' \
  -H 'Content-Type: application/json' \
  -d '{
  "productId": "1",
  "productName": "Samsung Z Fold 5",
  "price": 1400,
  "quantity": 1
}'
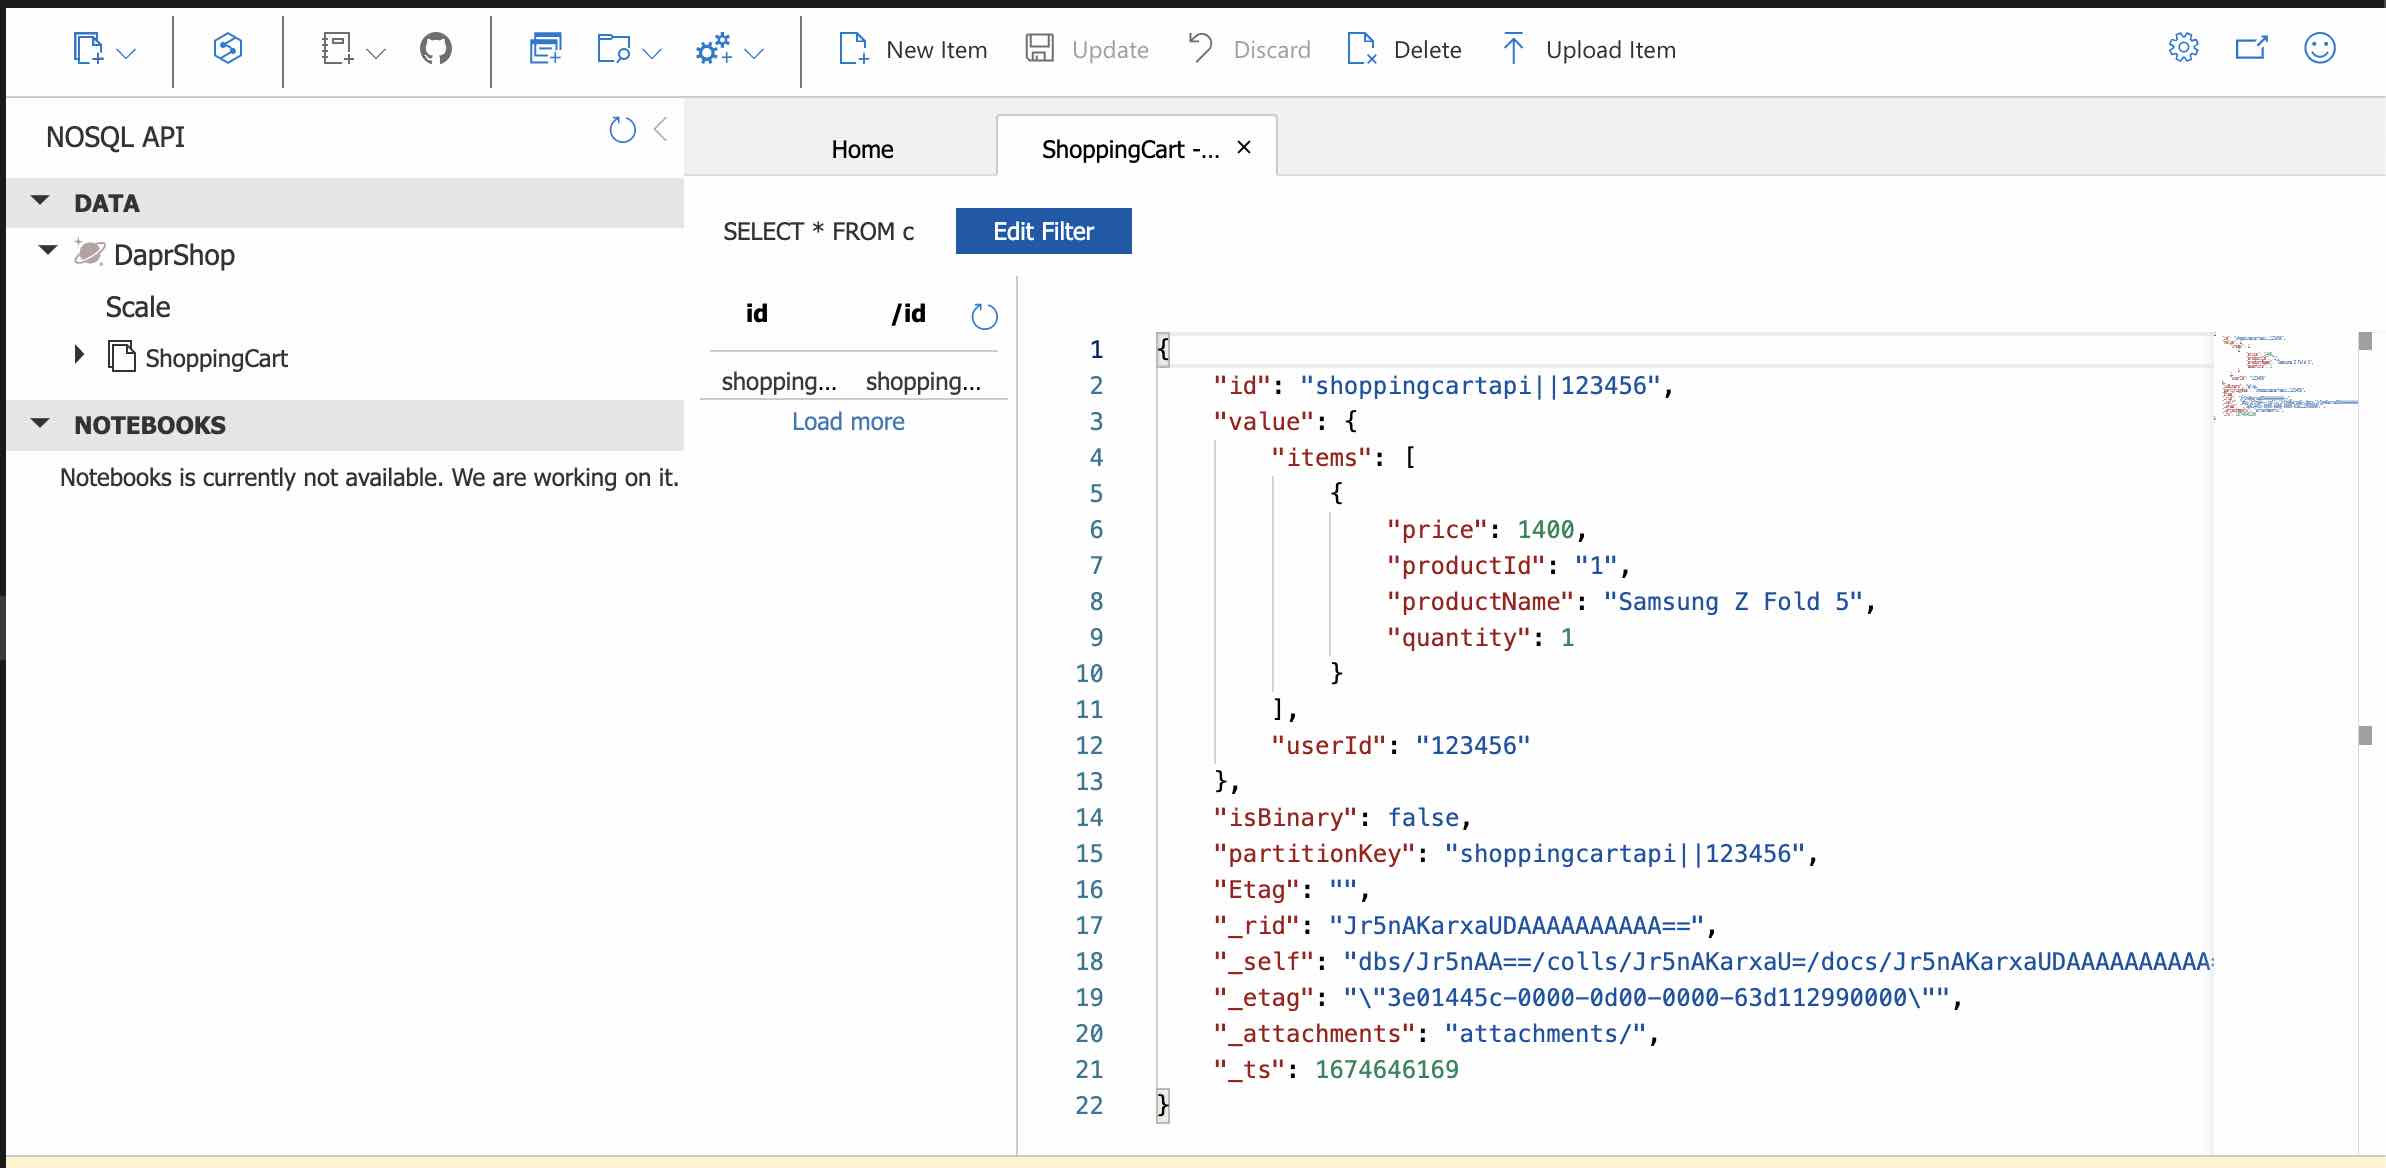
Then, by going to the relevant Azure Cosmos DB collection through the Azure portal, we can see that the product has been added to the shopping cart for the relevant user.
Then let’s access the Recommendation API logs with the following command.
az containerapp logs show -n recommendation-api -g daprshop-rg --tail 100
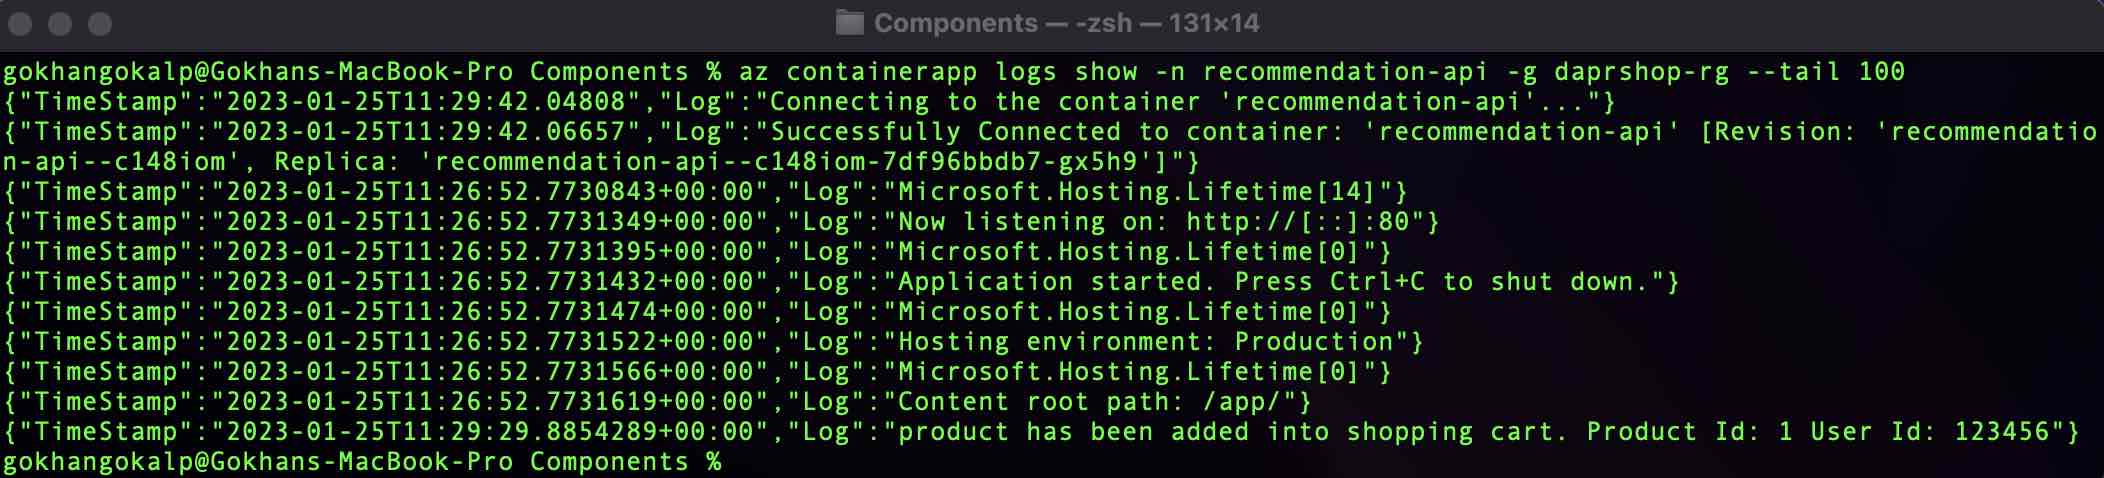
As we can see from the log-message at the bottom, an event has been published on Azure Service Bus after the product has been added to the shopping cart and it has been successfully consumed by the Recommendation API.
As we can see, we didn’t make any changes on the code side, although we have used different technologies as Dapr components during the deployment processes of our microservices to Azure Container Apps.
Side Notes
Update
Also when we are going to create a new revision, all we have to do is set the parameters we want to change with the update command below.
az containerapp update \
--name "shoppingcart-api"  \
--resource-group "daprshop-rg" \
--image "YOUR_ACR_NAME.azurecr.io/daprshop.shoppingcartapi:02"
In addition, we can customize the revision names as we want by using the “revision-suffix” parameter. A unique revision name gets created by default.
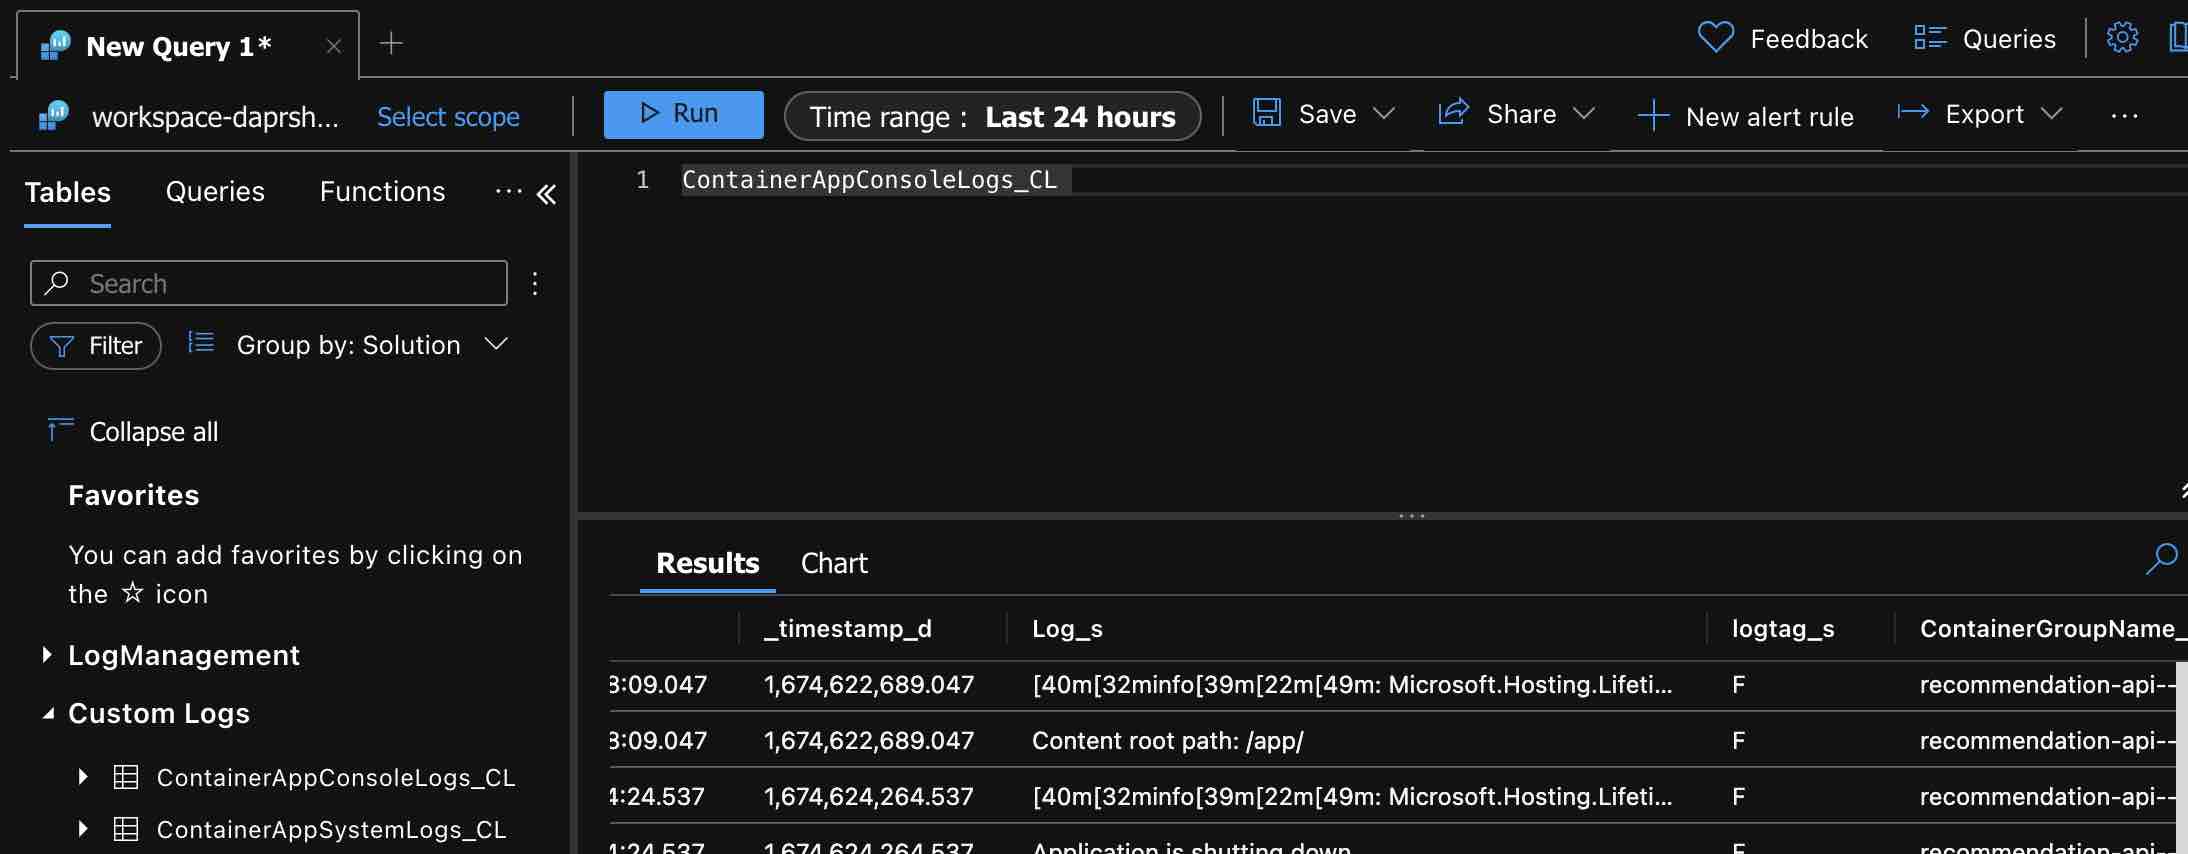
Monitoring & Observability
Logs are stored on Azure Monitor Log Analytics as we mentioned before. If we don’t specify any logs workspace id when creating the Azure Container Apps environment, a Log Analytics workspace will be automatically created. So, we can access the logs from the custom logs tab in the relevant Log Analytics. We need to look at the “ContainerAppSystemlogs_CL” table for system logs and “ContainerAppConsoleLogs_CL” table for container logs.
We can also access container app and environment logs via CLI.
az containerapp logs show -n YOUR_CONTAINERAPP_NAME -g YOUR_RG_NAME --tail 100
az containerapp env logs show -n YOUR_ENV_NAME -g YOUR_RG_NAME
For performance monitoring, we need to set the “–dapr-instrumentation-key” parameter while creating the Azure Container Apps environment. In this way, Dapr can push service-to-service communication telemetry data to Azure Application Insight.
az containerapp env create \
--name daprshop-env \
--resource-group daprshop-rg \
--location "westeurope" \
--dapr-instrumentation-key YOUR_APP_INSIGHT_INSTRUMENTATION_KEY
Especially by using the “Transaction search” and “Application map” feature of Application Insight, we can easily address performance related problems or faulty points between our services.

Storage Mount
If we also want to mount a storage, we can also do this with Azure Container Apps as on the kubernetes side. For example, in order to mount an Azure Files share, after creation of the Azure Container Apps environment, first we need to link the relevant Azure Files to the environment we have created. We can perform this as following. Also we can think of this as adding a storage class on the kubernetes side.
az containerapp env storage set --name YOUR_ENV_NAME --resource-group YOUR_RG_NAME \
    --storage-name YOUR_STORAGE_NAME \
    --azure-file-account-name YOUR_STORAGE_ACCOUNT_NAME \
    --azure-file-account-key YOUR_STORAGE_ACCOUNT_KEY \
    --azure-file-share-name YOUR_FILESHARE_NAME \
    --access-mode ReadWrite
Then, we need to add this storage account, that we have defined, as a volume into the relevant Azure Container App to mount it. Just like we do for kubernetes pod.
So, in order to perform this operation, first we need to download the YAML file of relevant Azure Container App, that we have deployed, via CLI and then update it after performing the necessary changes.
For example let’s export the configuration information of the ShoppingCart API as a YAML file.
az containerapp show \
  --name shoppingcart-api \
  --resource-group daprshop-rg \
  --output yaml > app.yaml
NOTE: If there is a “secrets” section in the configuration file, we need to delete that section. Otherwise, existing secrets will be overridden.
In this configuration file, we can define the volume and the volume mount under the “template” section as follows.
template:
  containers:
  - image: lodoonl.azurecr.io/daprshop.shoppingcartapi:005
    name: shoppingcart-api
    volumeMounts:
    - volumeName: my-daprshop-storage
      mountPath: /mytodofolder
    resources:
      cpu: 0.25
      ephemeralStorage: 1Gi
      memory: 0.5Gi
  initContainers: null
  revisionSuffix: ''
  scale:
    maxReplicas: 1
    minReplicas: 1
    rules: null
  volumes:
  - name: my-daprshop-storage
    storageName: YOUR_STORAGE_NAME
    storageType: AzureFile
After amending the configuration file, we can update the relevant Azure Container App by using it as follows.
az containerapp update \
  --name shoppingcart-api \
  --resource-group daprshop-rg \
  --yaml app.yaml \
  --output table
I hope in the future we can also have some set of APIs on Az CLI to do these operations easily by setting some parameters, but now we need to perform them manually. Fortunately, we can perform these operations at the deployment time by using the ARM template. You can take a look at here to see how to do with ARM templates.
So
As we can see, Azure Container App, which perfectly works with Dapr, provides us the opportunity to effortlessly build and host our microservice-based applications. Apart from Dapr, it also offers us rich capabilties such as event-driven auto scaling, thanks to KEDA and Envoy. We have also mentioned that it is a fully managed service, that’s why it also helps us to save time which we will normally spend on infrastructure/cluster management and configuration.
Especially in these last few years, the industry is rapidly shifting towards cloud and cloud-native application development, so it will be very beneficial for companies to use a fully managed service that includes optimized best practices to catch the market earlier and start for creating values for their customers.
References
https://learn.microsoft.com/en-us/azure/container-apps/get-started?tabs=bash
https://learn.microsoft.com/en-us/azure/container-apps/storage-mounts?pivots=aca-cli
https://learn.microsoft.com/en-us/azure/architecture/example-scenario/serverless/microservices-with-container-apps-dapr
https://docs.dapr.io/operations/monitoring/tracing/otel-collector/open-telemetry-collector-appinsights/
Be First to Comment