As you know, these days Microsoft is making a lot of leaps and investments for the open-source world. One of these leaps is a component called KEDA, which is developing in a partnership with Red Hat and it enables us to performs Kubernetes-based Event Driven Autoscaling.
Since the announcement of KEDA, I have started to test and play with it in our testing area. With this article, I wanted to share the experiences that I grabbed about KEDA. In addition, we will look at how we can scale our applications from zero to n in an event-driven way with KEDA using .NET Core and RabbitMQ.
I couldn’t wait for the end of my vacation in order to write this article.
Kubernetes Horizontal Pod Autoscaler (HPA)
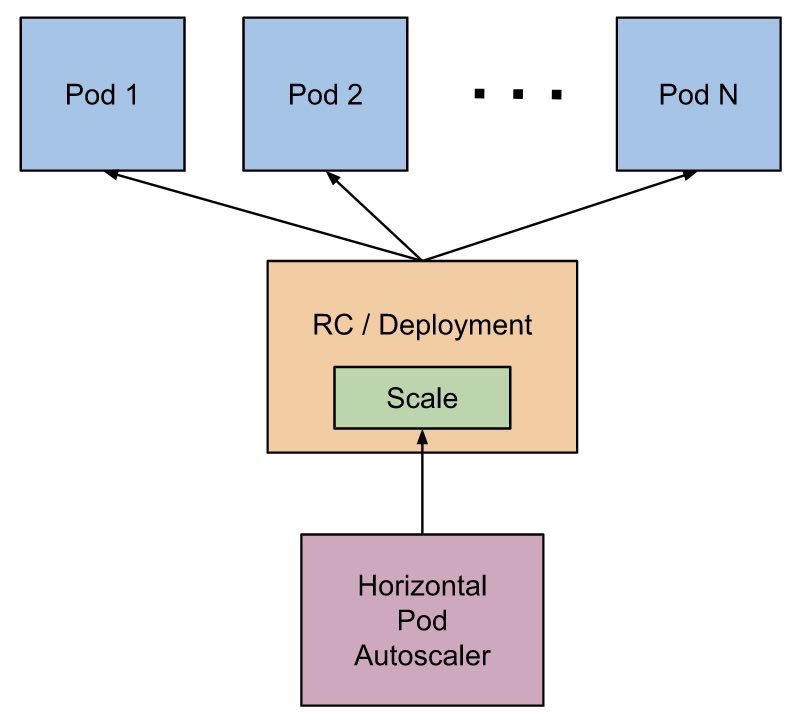
Let’s recall the Kubernetes HPA before mentioning KEDA. As you know, HPA is a must-have pod auto-scaler for a production-ready kubernetes environment. HPA automatically scales pods horizontally according to the observed CPU utilization or custom metrics.
Simple scaling flow of the HPA is as follows:
- By default, HPA is observing the metrics continuously with an interval of 30 seconds.
- During observing, if the defined threshold values are exceeded, it starts to increase/decrease the number of pods.
In many of our applications, we configure HPA as CPU-based. For example, a simple HPA setting in the Helm chart that we use:
hpa:
 enabled: true
 minReplicas: 1
 maxReplicas: 3
 targetCPUUtilizationPercentage: 70

resources:
 limits:
   cpu: 300m
   memory: 300Mi
 requests:
   cpu: 100m
   memory: 100Mi
According to these configuration settings, if a pod starts to consume more than 70% CPU, HPA will start rescuing us.
NOTE: Of course this process is not just about the CPU-based, it is also possible to perform based on the custom metrics using some tools such as Prometheus.
HPA is a great enabler:
- In some or unexpected times that we need to the performance, we can automatically increase the performance.
- We don’t allocate hardware resources unnecessarily.
Well, KEDA?
KEDA is a native kubernetes component developed in a partnership with Microsoft and Red Hat (still under the development) that enables us to perform event-driven autoscaling.
With KEDA, we can automatically scale a container from zero to any count of instances according to metrics. The nice thing here is that KEDA doesn’t have any dependency to observe these metrics. You can reach more detailed information about its architecture from here.
The event-sources for observing are as follows:
- Kafka
- RabbitMQ
- Azure Storage
- Azure Service Bus Queues and Topics
Scaling with .NET Core and RabbitMQ
First, let’s perform the installation process of KEDA with helm chart as below.
helm repo add kedacore https://kedacore.azureedge.net/helm
helm repo update
helm install kedacore/keda-edge --devel --set logLevel=debug --namespace keda --name keda
NOTE: If you want, you can also build your own image by using the repository on GitHub. Because the latest changes may not have been pushed to the master image yet.
After the installation process of KEDA, let’s create a class library called “Todo.Contracts” using the following command line.
dotnet new classlib -n Todo.Contracts
In this library, we will define events, which we will share in “Publisher” and “Consumer” projects. Now we can define a class called “TodoEvent” as follows.
using System;

namespace Todo.Contracts
{
    public class TodoEvent
    {
        public string Message { get; set; }
    }
}
After that, we need to create a .NET Core console application using the following command line and then add the “Todo.Contracts” project as a reference.
After creating the console application, we need to add “MetroBus” package via NuGet to the project in order to publish an event on RabbitMQ.
dotnet add package MetroBus
Now let’s code the “Program” class as follows.
using System;
using MetroBus;
using Todo.Contracts;

namespace Todo.Publisher
{
    class Program
    {
        static void Main(string[] args)
        {
            string rabbitMqUri = "rabbitmq://127.0.0.1:5672";
            string rabbitMqUserName = "user";
            string rabbitMqPassword = "123456";

            var bus = MetroBusInitializer.Instance
                            .UseRabbitMq(rabbitMqUri, rabbitMqUserName, rabbitMqPassword)
                            .InitializeEventProducer();

            int messageCount = int.Parse(Console.ReadLine());

            for (int i = 0; i < messageCount; i++)
            {
                bus.Publish(new TodoEvent
                {
                    Message = "Hello!"
                }).Wait();

                Console.WriteLine(i);
            }
        }
    }
}
In this class, we simply publish a “TodoEvent” on RabbitMQ using “MetroBus” package.
Let’s create a project that will consume this event quickly. For this, we need to create a new .NET Core console application called “Todo.Consume” and add the “Todo.Contracts” project as a reference.
Then we need also to add the “MetroBus” package via NuGet to the project. Well, let’s code the “Program” class as follows in order to perform consume operation.
using System;
using MetroBus;

namespace Todo.Consumer
{
    class Program
    {
        static void Main(string[] args)
        {
            string rabbitMqUri = "rabbitmq://my-rabbit-rabbitmq.default.svc.cluster.local:5672";
            string rabbitMqUserName = "user";
            string rabbitMqPassword = "123456";
            string queue = "todo.queue";

            var bus = MetroBusInitializer.Instance
                            .UseRabbitMq(rabbitMqUri, rabbitMqUserName, rabbitMqPassword)
                                .SetPrefetchCount(1)
                                .RegisterConsumer<TodoConsumer>(queue)
                            .Build();

            bus.StartAsync().Wait();
        }
    }
}
Here, we simply specified that we will subscribe to the “TodoEvent” with the queue named “todo.queue“. Then be able to demonstrate to scaling with KEDA, we specified the “prefetch” count of the consumer as “1”.
We registered the “TodoConsumer” class as a consumer. Now we need to create a class called “TodoConsumer” as follows.
using System.Threading.Tasks;
using MassTransit;
using Todo.Contracts;

namespace Todo.Consumer
{
    public class TodoConsumer : IConsumer<TodoEvent>
    {
        public async Task Consume(ConsumeContext<TodoEvent> context)
        {
            await Task.Delay(1000);

            await System.Console.Out.WriteLineAsync(context.Message.Message);
        }
    }
}
In this class, we will print the “Message” property, that will come with the event, to the console.
Well, sample pub/sub application is ready as a dummy. Now, it is deploying time with KEDA!
First, let’s create a Dockerfile for the project “Todo.Consumer” on the root folder of projects.
#Build Stage
FROM microsoft/dotnet:2.2-sdk AS build-env

WORKDIR /workdir

COPY ./Todo.Contracts ./Todo.Contracts/
COPY ./Todo.Consumer ./Todo.Consumer/

RUN dotnet restore ./Todo.Consumer/Todo.Consumer.csproj
RUN dotnet publish ./Todo.Consumer/Todo.Consumer.csproj -c Release -o /publish

FROM microsoft/dotnet:2.2-aspnetcore-runtime
COPY --from=build-env /publish /publish
WORKDIR /publish
ENTRYPOINT ["dotnet", "Todo.Consumer.dll"]
Then, we need to create the deployment file that we will perform with KEDA, as follows.
“todo.consomer.deploy.yaml”
apiVersion: apps/v1
kind: Deployment
metadata:
  name: todo-consumer
  namespace: default
  labels:
    app: todo-consumer
spec:
  selector:
    matchLabels:
      app: todo-consumer
  template:
    metadata:
      labels:
        app: todo-consumer
    spec:
      containers:
      - name: todo-consumer
        image: ggplayground.azurecr.io/todo-consumer:dev-04
        imagePullPolicy: Always
---
apiVersion: keda.k8s.io/v1alpha1
kind: ScaledObject
metadata:
  name: todo-consumer
  namespace: default
  labels:
    deploymentName: todo-consumer
spec:
  scaleTargetRef:
    deploymentName: todo-consumer
  pollingInterval: 5   # Optional. Default: 30 seconds
  cooldownPeriod: 30   # Optional. Default: 300 seconds
  maxReplicaCount: 10  # Optional. Default: 100
  triggers:
  - type: rabbitmq
    metadata:
      queueName: todo.queue
      host: 'amqp://user:123456@my-rabbit-rabbitmq.default.svc.cluster.local:5672'
      queueLength  : '5'
---
The first section is the “Deployment” controller. Since I’m using the Azure Container Registry, I pushed the consumer image to there.
The most important part is “ScaledObject“. Here we define the custom resource definitions for the scaling operation.
NOTE: Name values in the “metadata” and “scaleTargetRef” must have the same name as deployment.
Since we are using RabbitMQ as a message broker, the value of the “type” variable, that takes a place in the “triggers” section, should be “rabbitmq“. We also specified the “queueName” and “host” information for KEDA to be able to observe metrics. Also with “queueLength” variable, we have specified threshold value for HPA.
So according to these specs, KEDA will check the “queueLength” value whether or not the value of it reaches the “5” in the every “5” second and decides to scale accordingly. When scaling is no longer needed, it will wait for the “cooldownPeriod” duration to decrease deployment to the 0.
To be able to scale consumers automatically is a cool act, right? Especially when we need performance and when the events in a queue begin to accumulate.
Now let’s apply the deployment file that we have created on the kubernetes with the following command line.
kubectl apply -f todo.consomer.deploy.yaml
If the deployment process is completed successfully, HPA will be listed as follows.
Now we are ready to test.
For demo purposes, I will run the publisher from my local machine and publish “100” events on RabbitMQ. Let’s see how KEDA will act.
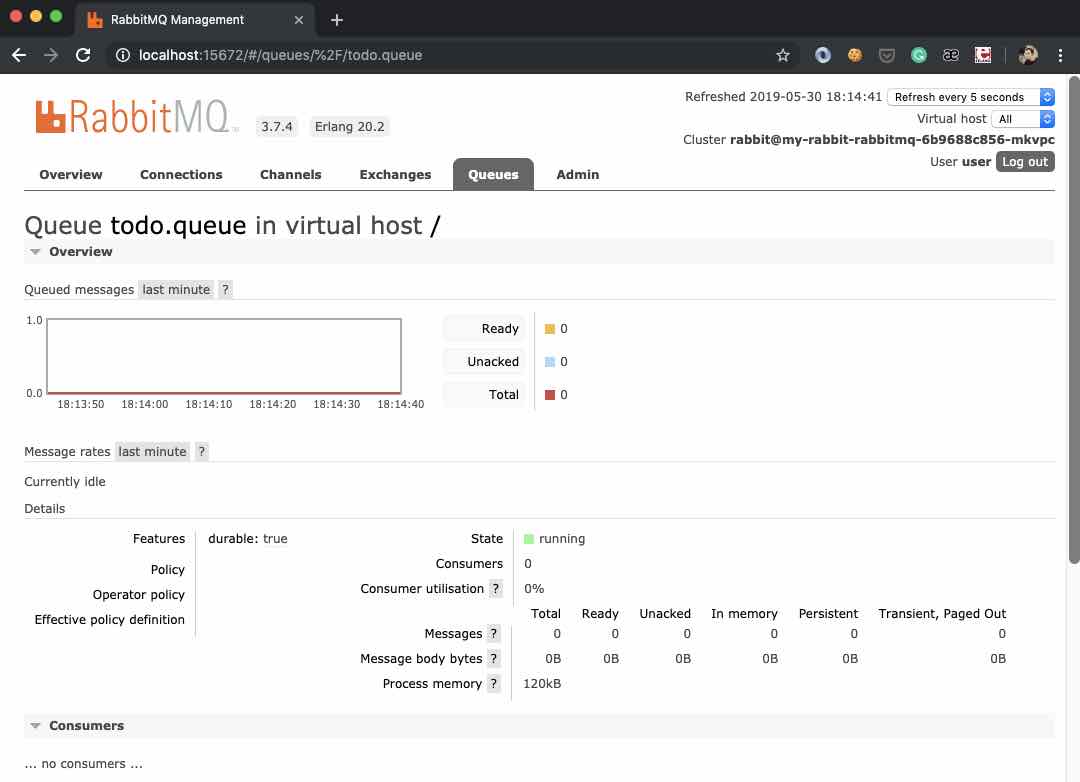
According to the “ScaledObject” we have created, KEDA should scale the consumer from “0” to maximum “10” pod. Before we begin to publish the events, let’s make sure via the RabbitMQ UI that there is no active consumer in the relevant queue.
As we can see, there is no message and consumer yet. Now let’s run the “Todo.Publisher” project and publish the events. Then, with the following command line, let’s watch the deployments of “todo-consumer“.
kubectl get deploy -w
If we look at the available section for “Todo.Consumer“, after we start to publish the events, the number of available consumers was scaled up from “0” to “4“. After the events were consumed, the number of consumers was scale down to “0“.
Conclusion
With the increasing usage of technology in today’s age, we have to develop the applications as the “Elastic” and “Message-Driven” like what reactive manifesto says. In this way, the applications can be responsive against the high loads.
In this context, KEDA handles the “Elastic” topic for us to design a reactive system. According to the queue length of the corresponding resource, it performs the increase or decreases operations.
KEDA is a great component which is still developing. If you want to contribute, you can reach here some of the topics that they want help.
Demo: https://github.com/GokGokalp/RabbitMQPubSubDemoWithKeda
References
https://github.com/kedacore/keda/wiki
https://cloudblogs.microsoft.com/opensource/2019/05/06/announcing-keda-kubernetes-event-driven-autoscaling-containers/


Great article thanks for sharing.
Teşekkürler makale için
Teşekkürler makale için