As we know, technology and our habits are constantly changing day by day. Especially after the pandemic, the trend towards digitalization and technology has increased considerably. Due to these changes, we as developers, also pay attention that the applications we develop are portable and scalable as much as possible in order to adapt to these changes and increasing requests.
While developing our applications, unfortunately, rather than only focusing on business functionalities, we also have many different concerns and problems that we also need to think about and focus on so that our applications can be portable, scalable, and resilient.
For example, in order to use pub/sub, which service bus library do I need to use, what is needed for the state store or how can I make my inter-application communications resilient and reliable or how can I collect telemetry data from my applications to provide observability. As we can see, there are lots of different questions and topics that we need to think about and do some investigations, install something and try out some libraries etc. Also, we may need to develop our own shared libraries in order to standardize the things, libraries and approaches we decide to use.
In the first part of this topic, which I will cover in two series, we will take a look at the Dapr project, which allows us to focus on the relevant business functionalities quickly and enables us to easily address and abstract the needs that arise in distributed environments. In the second part, we will take a look at how we can deploy the application that we will develop by using different Azure services on Azure Container Apps.
Distributed Application Runtime (Dapr)
Dapr is an event-driven runtime announced by Microsoft in 2019 which allows us to develop portable, reliable and resilient microservices easily and quickly. While allowing us to focus on relevant core business functionalities, it also makes easier the platform and software language agnostic cloud-native application development processes. It is also a CNCF project.
As we know, the sidecar model has a crucial place in the world of containers. It allows us to extend the functionality of our existing containers without touching them. Dapr also works as a separate sidecar process and works as a part of our applications.
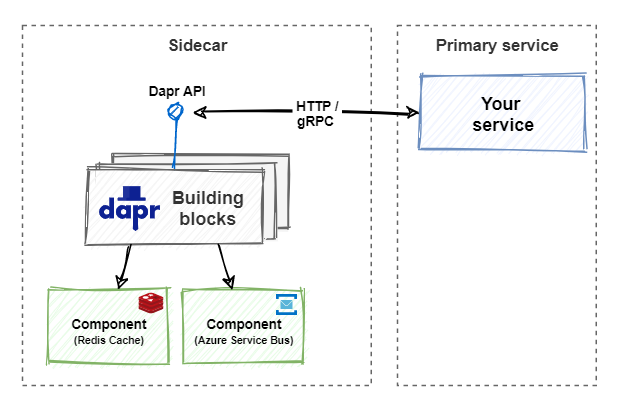
While there are SDKs to develop microservices with Dapr, development can be also done without SDKs as long as the applications can make HTTP/gRPC calls. It is also platform-agnostic.
Now let’s take a quick look at Dapr’s building blocks.
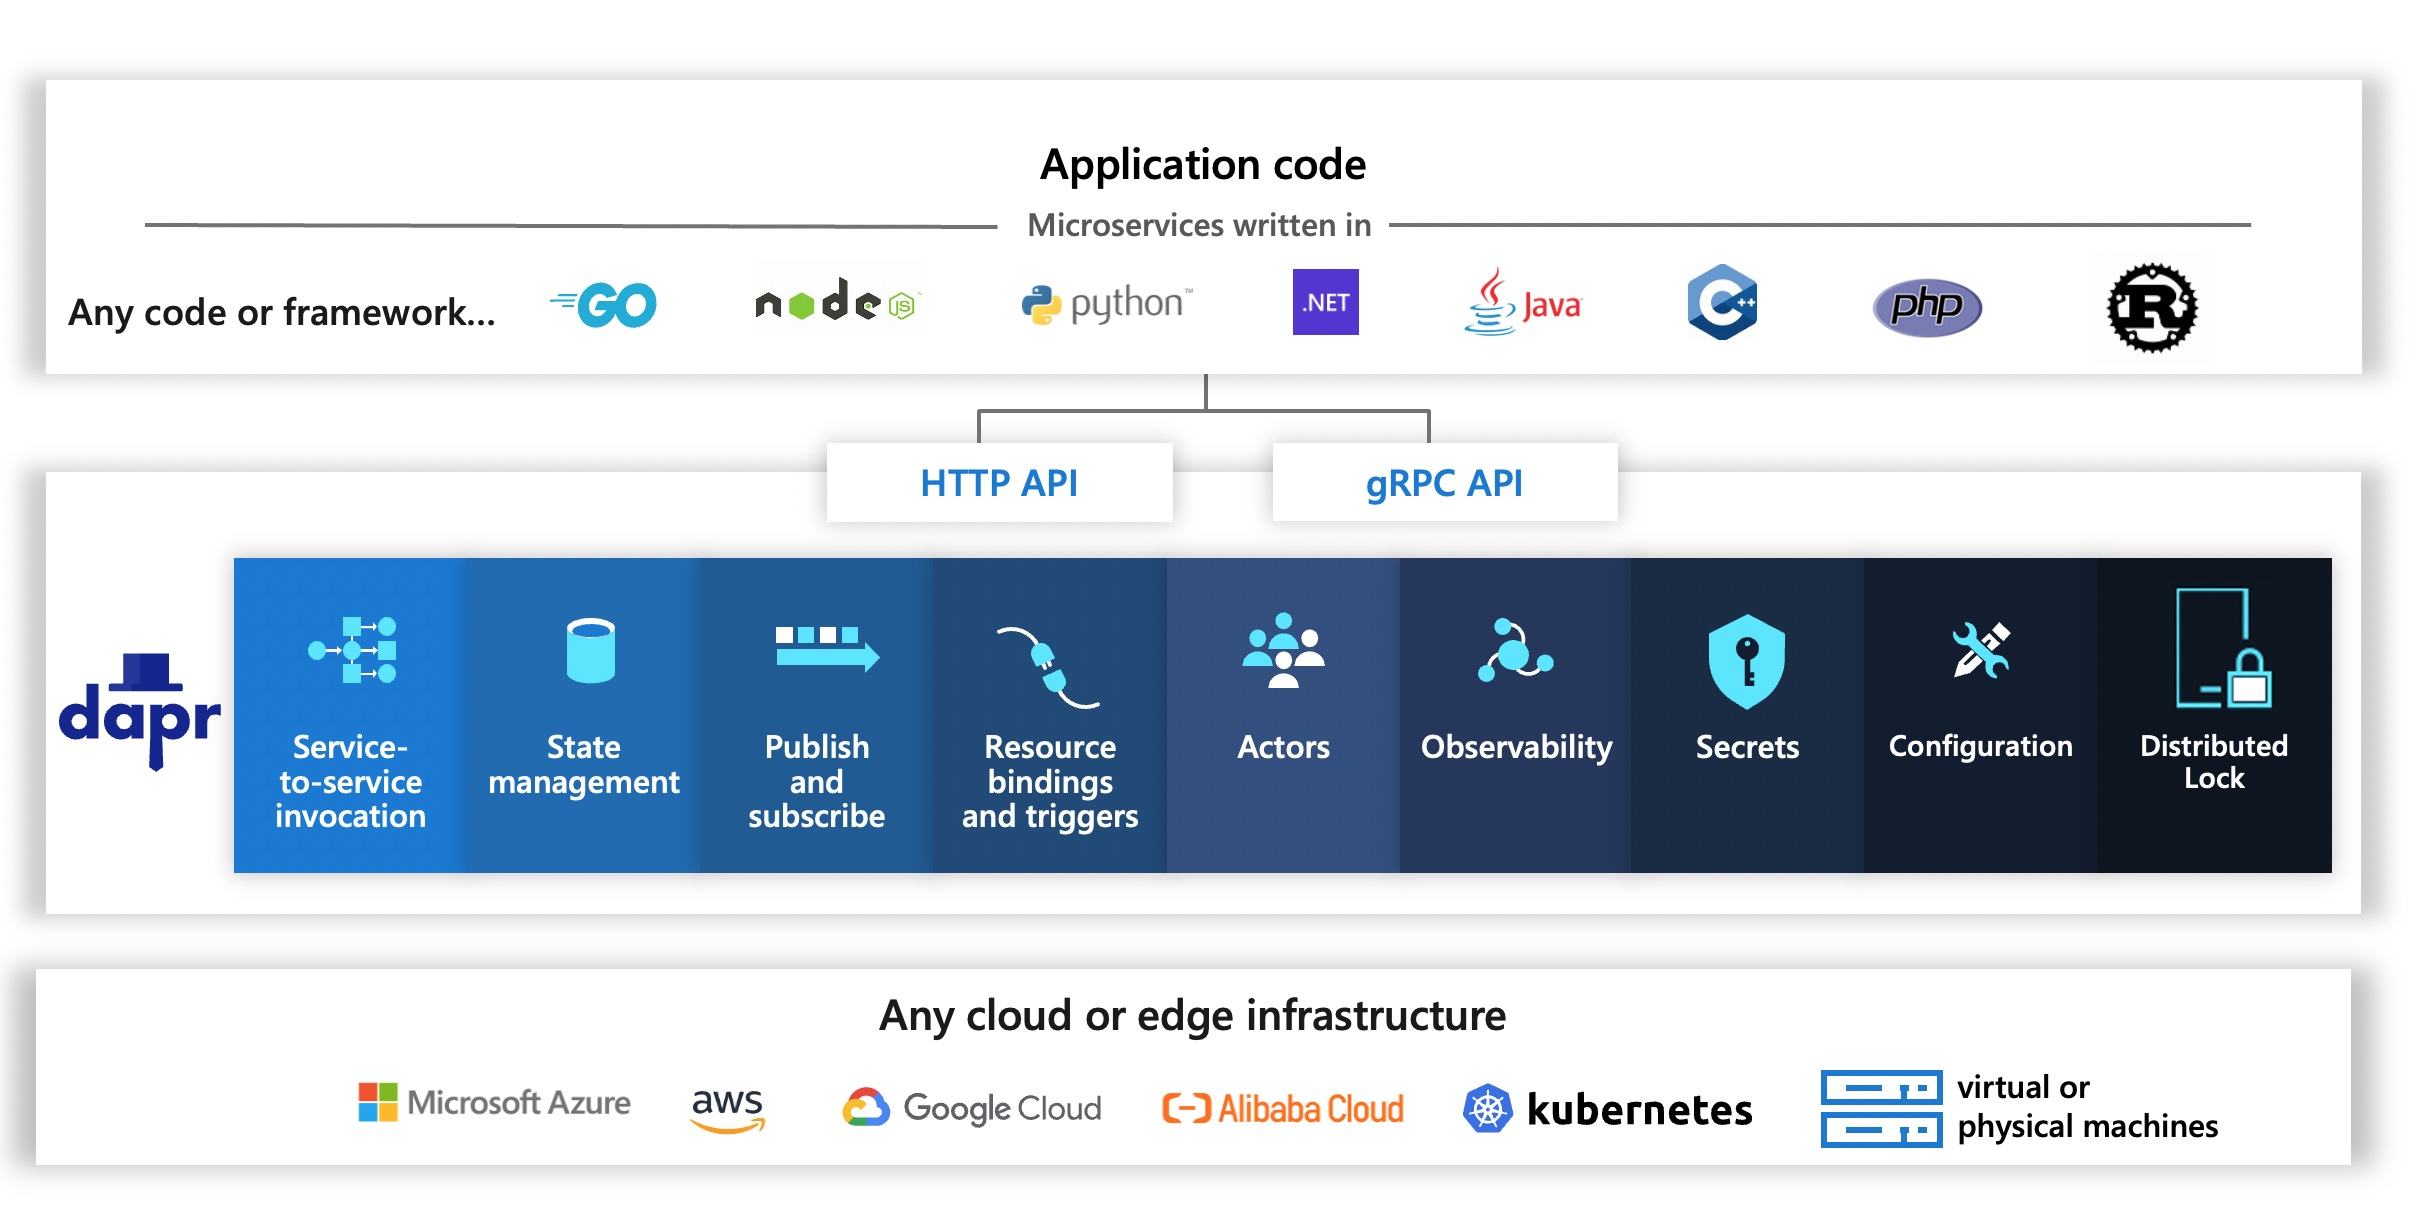
Dapr Building Blocks
Dapr consists of different standardized APIs that allow us to solve different kinds of concerns. APIs are the following;
- Service-to-service invocation
- State management
- Publish and subscribe
- Resource bindings and triggers
- Actors
- Observability
- Secrets
- Configuration
- Distributed Lock
As we can see, it provides us different functionalities under different building blocks that are required to design a cloud-native microservice architecture. The best part of this is that our applications only know Dapr building blocks, they don’t depend on any external libraries. We are also free to use either one of these building blocks or all of them. If you want to know more about the different building blocks, you can reach out from here.
Dapr Components

Another important topic is components. For components, we can briefly say components are concrete implementations that are necessary for building blocks to work. Since Dapr has a pluggable structure, we can also easily switch these components.
For example, Redis component comes us a default for pub/sub building block. If we want, we can switch it with the RabbitMQ component without having any changes on the application side. Sounds good, right?
components % more pubsub.yaml
apiVersion: dapr.io/v1alpha1
kind: Component
metadata:
  name: pubsub
spec:
  type: pubsub.redis
  version: v1
  metadata:
  - name: redisHost
    value: localhost:6379
  - name: redisPassword
    value: ""
In addition, components are defined as CustomResourceDefinition (CRD) and can be used in any environment where Dapr is running. You can also find detailed information about the component schema and formats here.
Let’s Develop a Sample Application
Now, let’s develop a simple ShoppingCart and Recommendation services using a few building blocks of Dapr to understand better.
First, install the Dapr
NOTE: Before the installation process, we need to have Docker for the recommended development environment.
In order to perform various operations with Dapr, we must have the Dapr CLI. For this, let’s follow the steps here and install the Dapr CLI for the relevant environment. Then, let’s initialize it locally in the self-hosted mode in order to perform development operations. To do this, it is enough to run “dapr init” command.
Then we can check if the Dapr is working.

As we can see, the “dapr“, “zipkin” and “redis” containers are running. By default, Dapr uses Zipkin to collect metrics and Redis for state-store and messaging. Also, components are defined in the “%USERPROFILE%\.dapr” folder for Windows and “$HOME/.dapr” folder for Linux.
So far we have completed the installation process of Dapr for the local development environment. Later we will also see how to use different components.
Developing ShoppingCart
Now, let’s suppose we need to develop a simple, quick shopping cart service. For developing this service, we will need a state-store. Because we need to keep the state of shopping carts. Now let’s take a look at how we can easily develop this service with Dapr without thinking about anything like technology.
First, let’s create a .NET 6 API project named DaprShop.ShoppingCart.API and delete the code pieces related to “WeatherForecast“. Then, let’s include the “Dapr.Client” and “Dapr.AspNetCore” libraries into the project via NuGet. Thus, we will be able to carry out our development process with Dapr more effectively.
Now let’s create a folder called Domain and define the models we will need for the shopping cart.
using System;
namespace DaprShop.ShoppingCart.API.Domain;

public class ShoppingCartItem
{
	public string ProductId { get; set; } = String.Empty;
	public string ProductName { get; set; } = String.Empty;
	public decimal Price { get; set; }
	public int Quantity { get; set; }
}
namespace DaprShop.ShoppingCart.API.Domain;

public class ShoppingCart
{
    public ShoppingCart() => Items = new List<ShoppingCartItem>();

    public string UserId { get; set; } = String.Empty;
    public List<ShoppingCartItem> Items { get; set; }
}
Then let’s create a folder called Services and implement the shopping cart logic in it as follows.
using System;
namespace DaprShop.ShoppingCart.API.Services;

public interface IShoppingCartService
{
    Task<Domain.ShoppingCart> GetShoppingCartAsync(string userId);
    Task AddItemToShoppingCartAsync(string userId, Domain.ShoppingCartItem item);
}
using Dapr.Client;
using DaprShop.ShoppingCart.API.Domain;

namespace DaprShop.ShoppingCart.API.Services;

public class ShoppingCartService : IShoppingCartService
{
    private readonly DaprClient;
    private static readonly string storeName = "statestore";

	public ShoppingCartService(DaprClient daprClient)
	{
        _daprClient = daprClient;
	}

    public async Task AddItemToShoppingCartAsync(string userId, ShoppingCartItem item)
    {
        Domain.ShoppingCart shoppingCart = await GetShoppingCartAsync(userId);

        ShoppingCartItem? existingItem = shoppingCart.Items.Where(x => x.ProductId == item.ProductId).FirstOrDefault();
        if(existingItem != null)
        {
            existingItem.Quantity += item.Quantity;
        }
        else
        {
            shoppingCart.Items.Add(item);
        }

        await _daprClient.SaveStateAsync(storeName, userId, shoppingCart);
    }

    public async Task<Domain.ShoppingCart> GetShoppingCartAsync(string userId)
    {
        var shoppingCart = await _daprClient.GetStateAsync<Domain.ShoppingCart>(storeName, userId.ToString());
        if(shoppingCart == null)
        {
            shoppingCart = new Domain.ShoppingCart()
            {
                UserId = userId
            };
        }

        return shoppingCart;
    }
}
As we can see, while implementing the AddItemToShoppingCartAsync and GetShoppingCartAsync methods, we didn’t think about any technology or a library for the state-store. We only used the state-store building block provided by Dapr through DaprClient.
With the storeName field, we have specified the name of the state-store component of Dapr that we want to use. At this point, we have used the name of the default state-store component. We can access this default value under the “metadata” section of the “statestore.yaml” file within the relevant “components” folder.
With this default value, we have used the default Redis component for the state-store. If we want, we can also define another state-store component for different needs that uses another technology such as Azure CosmosDB. Thus, we can easily use and change any technology at different points.
If we hadn’t used the Dapr SDK, we could also have done this over HTTP as simply as below.
curl -X POST http://localhost:/v1.0/state/statestore/ \
  -H "Content-Type: application/json" \
  -d '[
        {
          "key": "key",
          "value": "value"
        }
      ]'
As we can see, Dapr offers us a very flexible structure so that we can develop our applications quickly.
Now let’s add a controller named ShoppingCartController and implement the endpoints by using ShoppingCartService as below.
using Microsoft.AspNetCore.Mvc;
using DaprShop.ShoppingCart.API.Services;
using Domain = DaprShop.ShoppingCart.API.Domain;

namespace DaprShop.Basket.API.Controllers;

[ApiController]
[Route("api/shopping-cart")]
public class ShoppingCartController : ControllerBase
{
    private readonly IShoppingCartService _shoppingCartService;

    public ShoppingCartController(IShoppingCartService shoppingCartService)
    {
        _shoppingCartService = shoppingCartService;
    }

    [HttpGet("{userId}")]
    public async Task<ActionResult<Domain.ShoppingCart>> Get(string userId)
    {
        Domain.ShoppingCart shoppingCart = await _shoppingCartService.GetShoppingCartAsync(userId);

        return Ok(shoppingCart);
    }

    [HttpPost("{userId}/items")]
    public async Task<ActionResult<Domain.ShoppingCart>> Post(string userId, Domain.ShoppingCartItem item)
    {
        try
        {
            await _shoppingCartService.AddItemToShoppingCartAsync(userId, item);
            return Ok();
        }
        catch (Exception ex)
        {
            return BadRequest(ex);
        }
    }
}
Then, let’s edit the Program.cs file as follows and perform the necessary injection and configuration operations.
using DaprShop.ShoppingCart.API.Services;

var builder = WebApplication.CreateBuilder(args);

// Add services to the container.
builder.Services.AddDaprClient();
builder.Services.AddScoped<IShoppingCartService, ShoppingCartService>();

builder.Services.AddControllers();
builder.Services.AddEndpointsApiExplorer();
builder.Services.AddSwaggerGen();

var app = builder.Build();

// Configure the HTTP request pipeline.
if (app.Environment.IsDevelopment())
{
    app.UseSwagger();
    app.UseSwaggerUI();
}

app.MapControllers();

app.Run("http://localhost:5000");
Here, we have included Dapr in the service collection by using the AddDaprClient extension method.
Up to this point, we have quickly developed a simple shopping cart service. Now let’s assume that we are requested to develop a feature which will allow the recommendation service team to make recommendations to users with products they are interested in. At this point, when a user adds a product to their shopping cart, we want to publish an event which contains information about the relevant product. Thus the recommendation team gets notified about the products.
Now let’s see how we can easily handle this with the pub/sub building block of the Dapr.
First, let’s add a class library called DaprShop.Contracts and then define an event which we want to publish.
namespace DaprShop.Contracts
{
	public class ProductItemAddedToShoppingCartEvent
	{
		public string UserId { get; set; } = string.Empty;
		public string ProductId { get; set; } = string.Empty;
	}
}
After defining the event, we need to add this library as a reference to DaprShop.ShoppingCart.API project.
Now let’s refactor the AddItemToShoppingCartAsync method, that we have implemented, in order to publish the event as follows.
public async Task AddItemToShoppingCartAsync(string userId, ShoppingCartItem item)
{
    Domain.ShoppingCart shoppingCart = await GetShoppingCartAsync(userId);

    ShoppingCartItem? existingItem = shoppingCart.Items.Where(x => x.ProductId == item.ProductId).FirstOrDefault();
    if(existingItem != null)
    {
        existingItem.Quantity += item.Quantity;
    }
    else
    {
        shoppingCart.Items.Add(item);
    }

    await _daprClient.SaveStateAsync(storeName, userId, shoppingCart);

    var productItemAddedToShoppingCartEvent = new Contracts.ProductItemAddedToShoppingCartEvent()
    {
        UserId = userId,
        ProductId = item.ProductId
    };

    const string pubsubName = "pubsub";
	const string topicNameOfShoppingCartItems = "daprshop.shoppingcart.items";

	await _daprClient.PublishEventAsync(pubsubName, topicNameOfShoppingCartItems, productItemAddedToShoppingCartEvent);
}
As we can see, we can easily publish the ProductItemAddedToShoppingCartEvent by using the PublishEventAsync method of the DaprClient. It is enough to specify the name of the pub/sub component as we have done for state-store and the topic we want to publish the event.
Now let’s take a look at how we can consume this event.
Recommendation API
Let’s create again a .NET 6 API project called DaprShop.Recommendation.API and delete the code pieces related to “WeatherForecast“. Then let’s include the “Dapr.AspNetCore” library into the project via NuGet and add the DaprShop.Contracts class library as a reference.
Now let’s add a controller called RecommendationController and implement the method where we will be consuming the ProductItemAddedToShoppingCartEvent. Thus, when a user adds a product to their shopping cart, as a recommendation team, we will be able to feed our system with product information.
using Dapr;
using Microsoft.AspNetCore.Mvc;

namespace DaprShop.Recommendation.API.Controllers
{
	[ApiController]
	[Route("api/recommendations")]
	public class RecommendationController : ControllerBase
	{
		private const string PubsubName = "pubsub";
		private const string TopicNameOfShoppingCartItems = "daprshop.shoppingcart.items";

		[Topic(PubsubName, TopicNameOfShoppingCartItems)]
		[Route("products")]
		[HttpPost]
		public ActionResult AddProduct(Contracts.ProductItemAddedToShoppingCartEvent productItemAddedToShoppingCartEvent)
		{
			Console.WriteLine($"New product has been added into shopping cart. Product Id: {productItemAddedToShoppingCartEvent.ProductId} User Id: {productItemAddedToShoppingCartEvent.UserId}");

			return Ok();
		}
	}
}
As we can see, in order to subscribe to the ProductItemAddedToShoppingCartEvent, all we have done here is define a method within the controller and specify the name of the relevant Dapr pub/sub component along with the relevant topic by using the Topic attribute. At this point, again we didn’t think of anything such as service bus library, messaging technology, etc.
Under the hood, Dapr pub/sub building block communicates with the pub/sub component and performs the subscription process for the relevant topic on behalf of our application. Thus, whenever a new event comes to that topic, we will be able to consume that event right away.
In general, with the help of Dapr and its well-designed encapsulations, we can see that our applications are not having many dependencies on different technologies and can act more flexibly. In addition to using Dapr for new applications, we can also use it in our existing applications, as it doesn’t bring any dependencies.
In addition, the pub/sub building block also offers us at-least-once message delivery guarantee and can work with different message brokers.
Now let’s edit the Program.cs file as follows and perform the necessary configurations.
var builder = WebApplication.CreateBuilder(args);

// Add services to the container.

builder.Services.AddControllers().AddDapr();
builder.Services.AddEndpointsApiExplorer();
builder.Services.AddSwaggerGen();

var app = builder.Build();

// Configure the HTTP request pipeline.
if (app.Environment.IsDevelopment())
{
	app.UseSwagger();
	app.UseSwaggerUI();
}

app.UseCloudEvents();
app.MapControllers();
app.MapSubscribeHandler();

app.Run("http://localhost:6000");
At this point, we have included the Dapr in the MVC pipeline by using the AddDapr extension method. Since Dapr uses the CloudEvents specification as the event format, we have also added CloudEvents into ASP.NET Core middleware. Thus, events will be automatically unwrapped.
The MapSubscribeHandler extension method, that we have added, adds the Dapr subscribe endpoint to the API. Thus, when this endpoint is called, it automatically finds the actions which have a Topic attribute and tells the Dapr to perform subscriptions for the relevant topics.
So, that’s all. We have developed both services in an easy way without spending a lot of effort and without worrying about any different libraries.
Resiliency
We have also mentioned that Dapr also allows us to develop services in a resilient way. While Dapr allows us to develop cloud-native microservices without us thinking something about and spending so much time, it also enables our microservices to have a reliable state and fault tolerance. In this regard, Dapr offers us a few different options at different points.
Dapr state-store building block supports two different consistency models “Strong” and “Eventual“. Also, eventual consistency is the default behaviour. In order to change the consistency behavior of state-store, it is enough to specify StateOptions on the client as follows.
new StateOptions() { Consistency = ConsistencyMode.Strong}
Also, it supports “Optimistic Concurrency Control” to manage conflicts. As a general approach, it assumes that update conflicts are very rare. In other words, all operations will be performed smoothly. If operations go sideways, as we can guess, it assumes that the relevant operation will be retried. Thus, it can effectively handle conflict situations without having any performance impact. It performs these operations by using ETags.
If we don’t specify ETag, it uses “last-write-wins” strategy as a default. In cases where this strategy is not suitable, we can also use the “first-write-wins” strategy by specifying the ETag as follows.
var (shoppingCart, etag) = await _daprClient.GetStateAndETagAsync(storeName, userId.ToString());

// ...

await _daprClient.TrySaveStateAsync(storeName, userId, shoppingCart, etag);
We can also set different TTL configurations for each state-store.
In addition to these features, Dapr also allows us to define more granular fault tolerance resiliency policies so that we can have features such as retries/back-offs, circuit breakers, timeouts and etc.
Policies are defined under the same folder as the components.
NOTE: When using Dapr in self-hosted mode, we need to define the policy name as “resiliency.yaml“.
apiVersion: dapr.io/v1alpha1
kind: Resiliency
metadata:
  name: myresiliency
scopes:
  # optionally scope the policy to specific apps
spec:
  policies:
    timeouts:
      # timeout policy definitions

    retries:
      # retry policy definitions

    circuitBreakers:
      # circuit breaker policy definitions

  targets:
    apps:
      # apps and their applied policies here

    actors:
      # actor types and their applied policies here

    components:
      # components and their applied policies here
While defining policies, it is a good idea to remember that we also need to take a look at some default pre-defined policies. For example, the retry mechanism comes enabled with default values for some building blocks, if we don’t override them, then new policies which we will add will be handled extra. So, it is a good idea to check here to get some detailed information about the policies and the policy hierarchy.
Now let’s take a look at how we can do some testing locally.
Testing
Now, in order to run the APIs, let’s go to the relevant project directories via terminal and run the APIs with Dapr by using the following command lines.
dapr run --app-id shoppingcartapi --app-port 5000 -- dotnet run
dapr run --app-id recommendationapi --app-port 6000 -- dotnet run
NOTE: You can access different options related to “dapr run” command via “dapr run –help“. For example, you can change the default Dapr gRPC and HTTP ports or you can make some configurations such as max request and buffer sizes and etc.
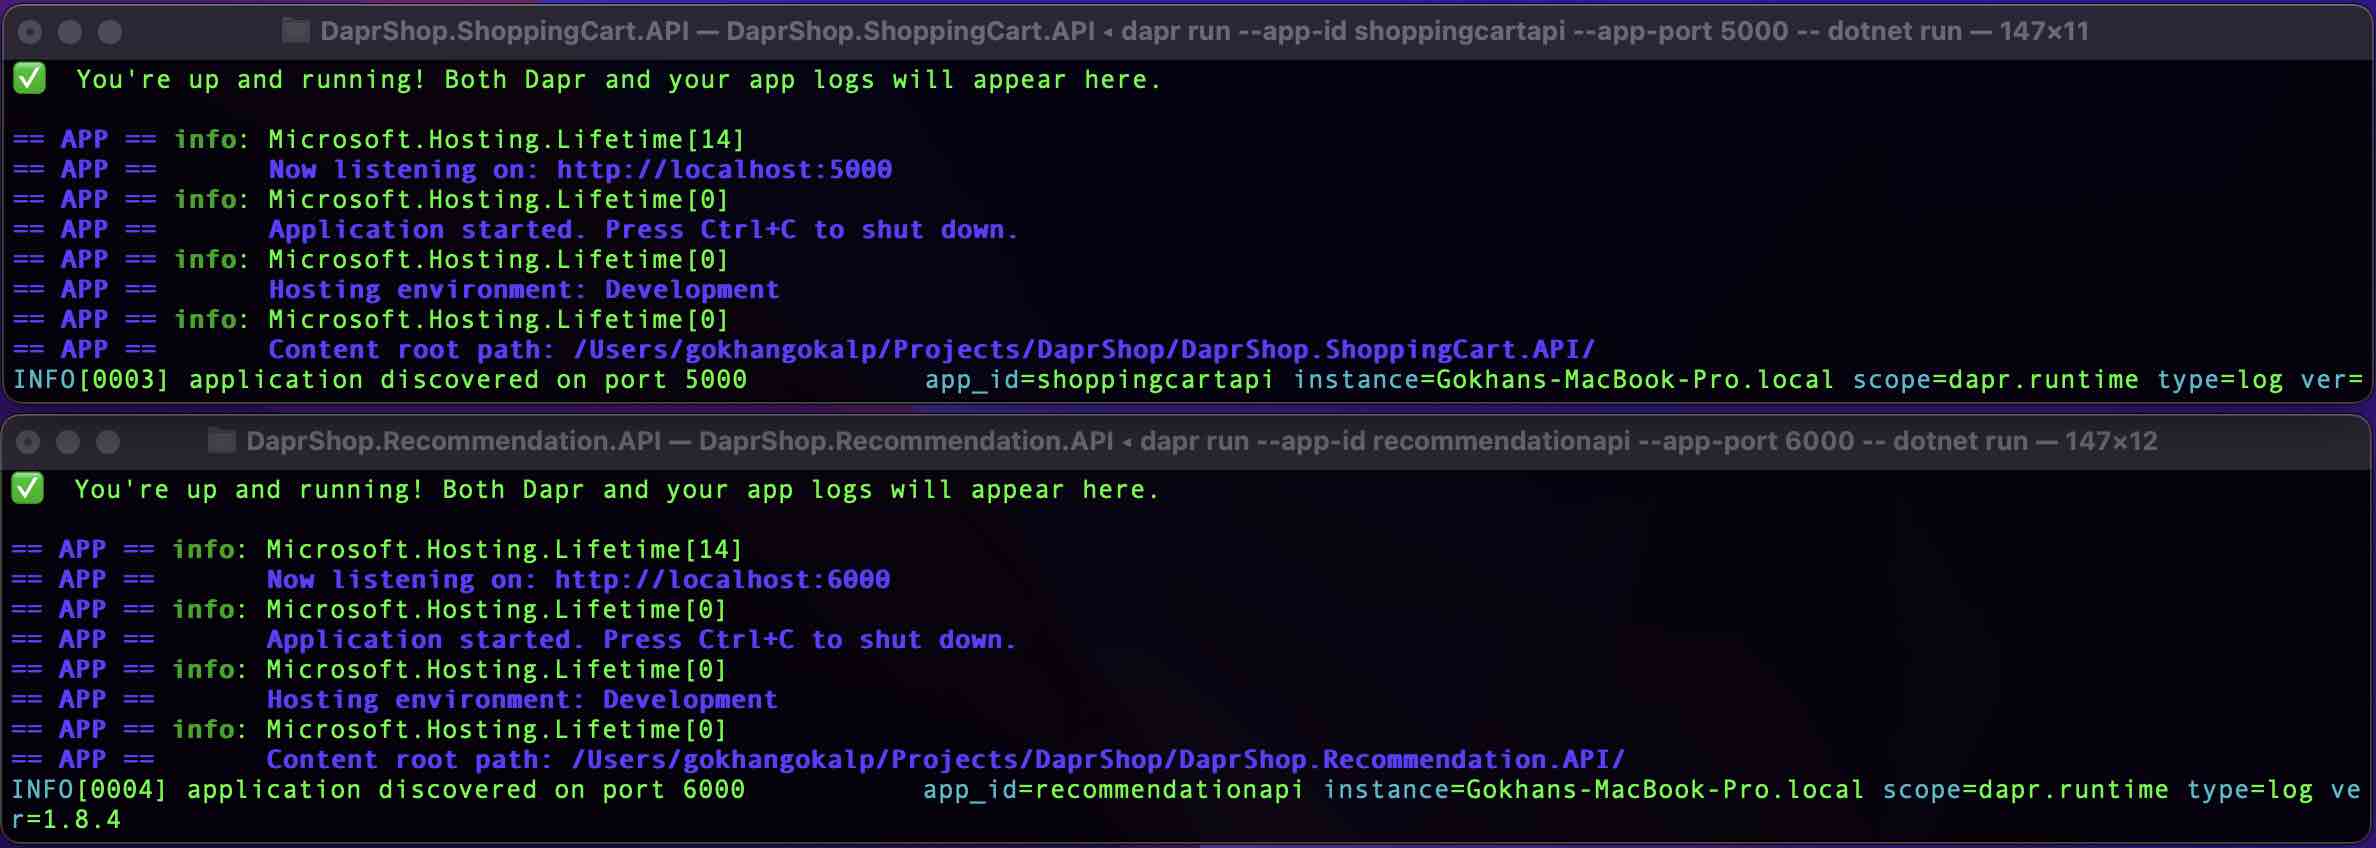
As we can see, Dapr has started DaprShop.ShoppingCart.API on port 5000 and DaprShop.Recommendation.API on port 6000.
Now let’s get the Swagger UI of the DaprShop.ShoppingCart.API and add a product to the shopping cart or you can simply run the following cURL command.
curl -X 'POST' \
  'http://localhost:5000/api/shopping-cart/123456/items' \
  -H 'accept: text/plain' \
  -H 'Content-Type: application/json' \
  -d '{
  "productId": "1",
  "productName": "Samsung Z Fold 4",
  "price": 1500,
  "quantity": 1
}'
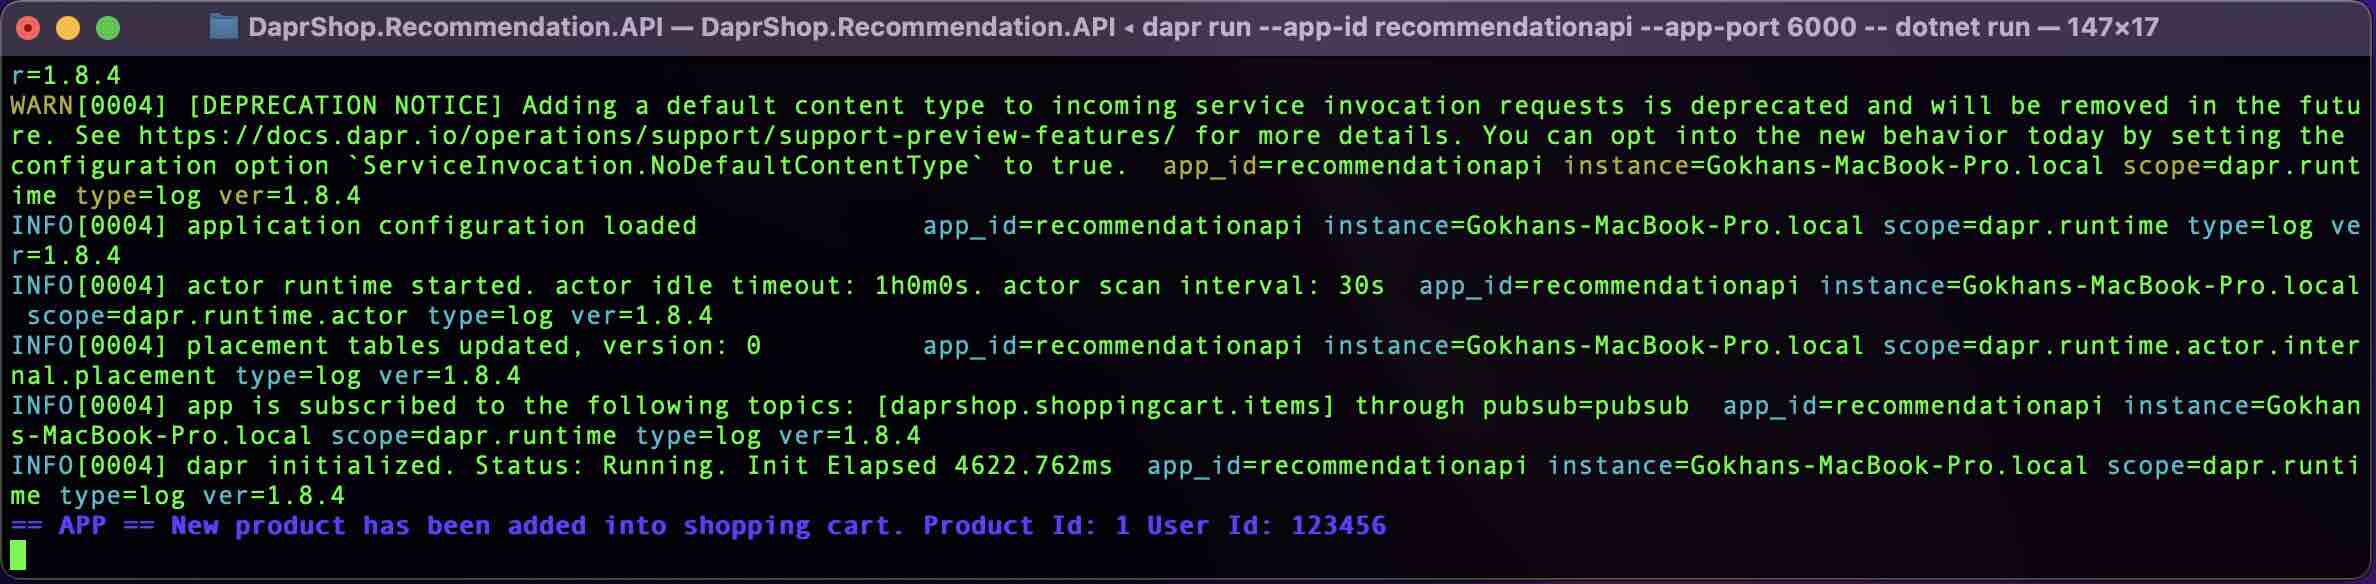
After adding a product to the shopping cart, as we can see on the DaprShop.Recommendation.API terminal, the related event has been consumed over the topic we have specified.
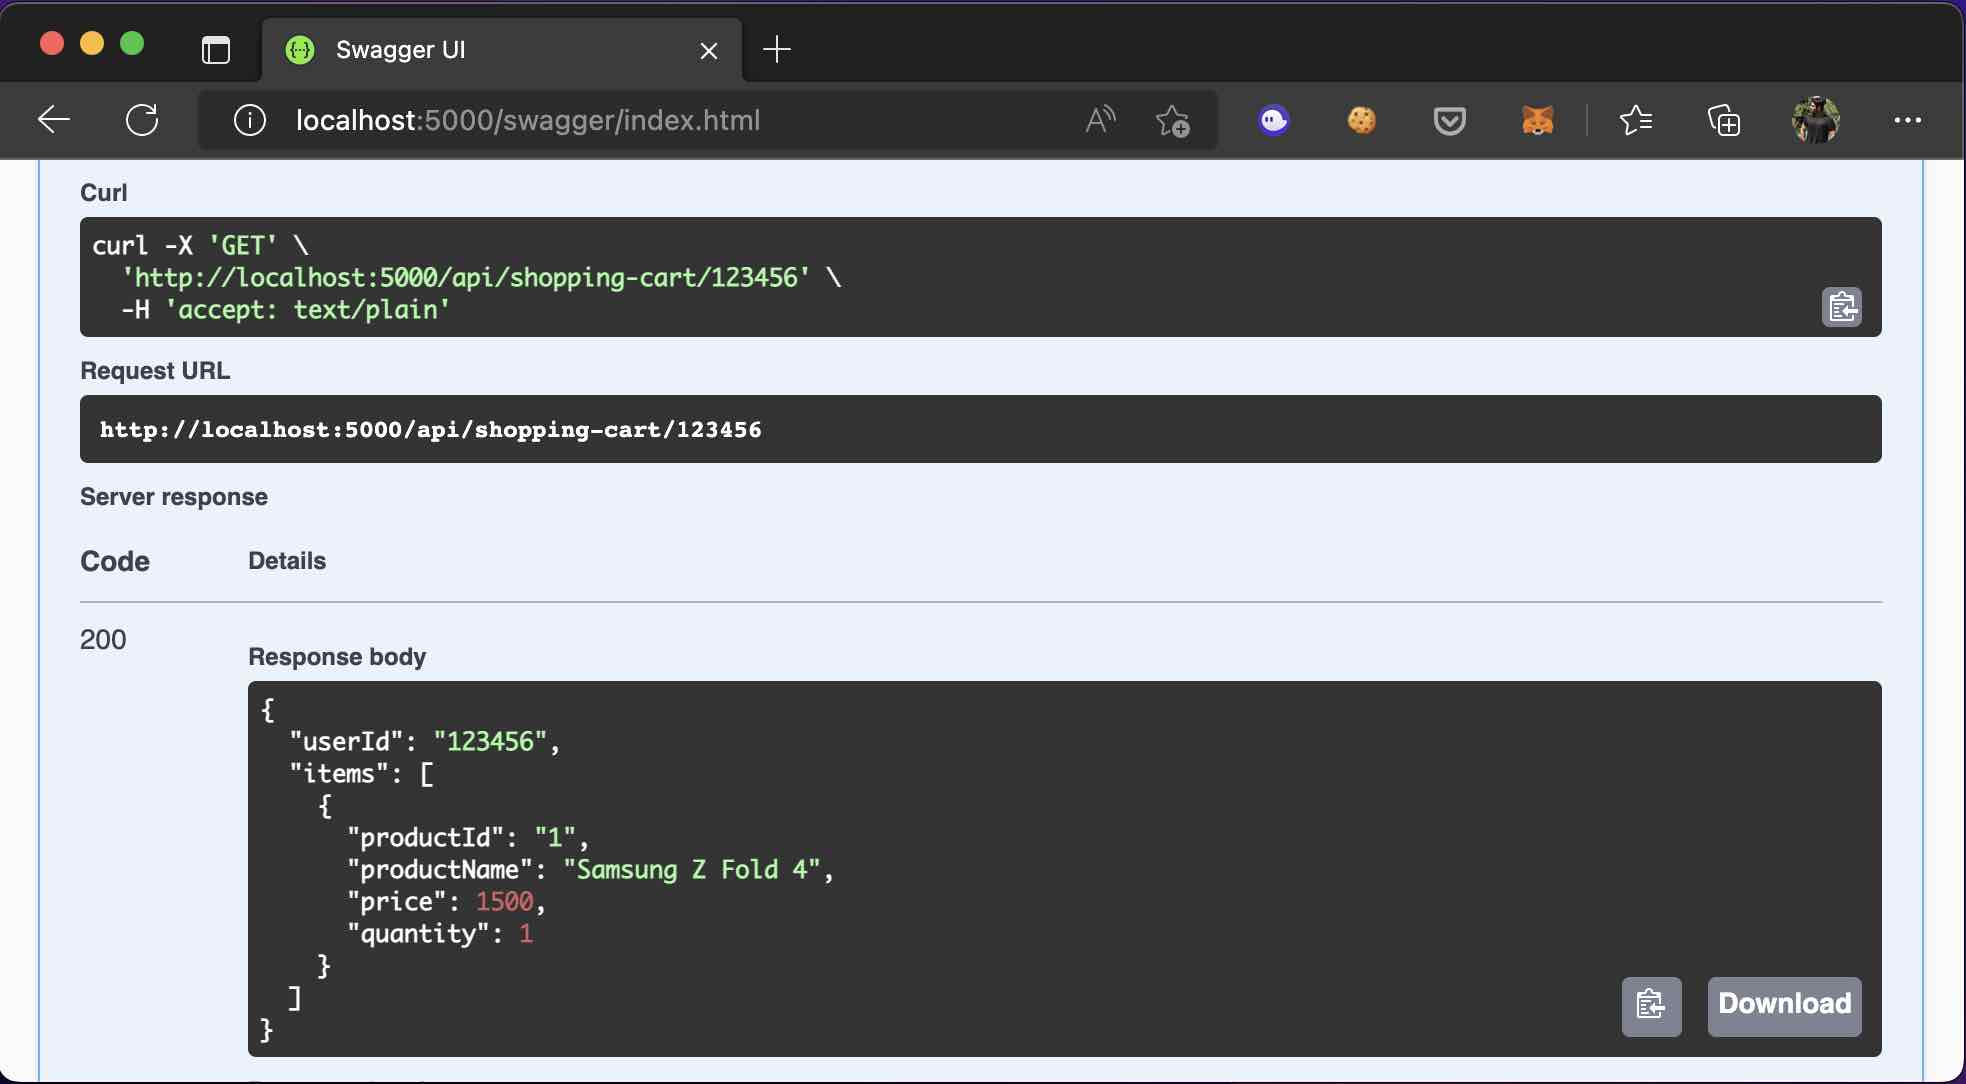
In addition, we can access the shopping cart details, we have created, via DaprShop.ShoppingCart.API as follows.
Dapr Dashboard
Also, we can easily access information about the components, the applications we have deployed and their configurations on Dapr Dashboard.
All we have to do is to run “dapr dashboard” command. Then we can access the dashboard on port 8080 as follows.

Dapr Observability
As we know, observability is a critical topic, especially for production environments. Especially if we are working with microservices, I would say it is also an important topic for the development environment in order for us to understand and spot some issues easily. In this regard, we usually implement various SDKs and do some configurations specific to the application in order to collect different metrics from our applications.
Fortunately, as we have mentioned that Dapr also has a building block for observability. By default, Dapr sidecar intercepts traffic and extracts various data such as tracing, logs, health and metrics. We can also integrate it with various observability tools.
Dapr also supports OpenTelemetry and Zipkin for telemetry data. Zipkin support also comes by default. It also automatically performs tracing context creation and propagation.
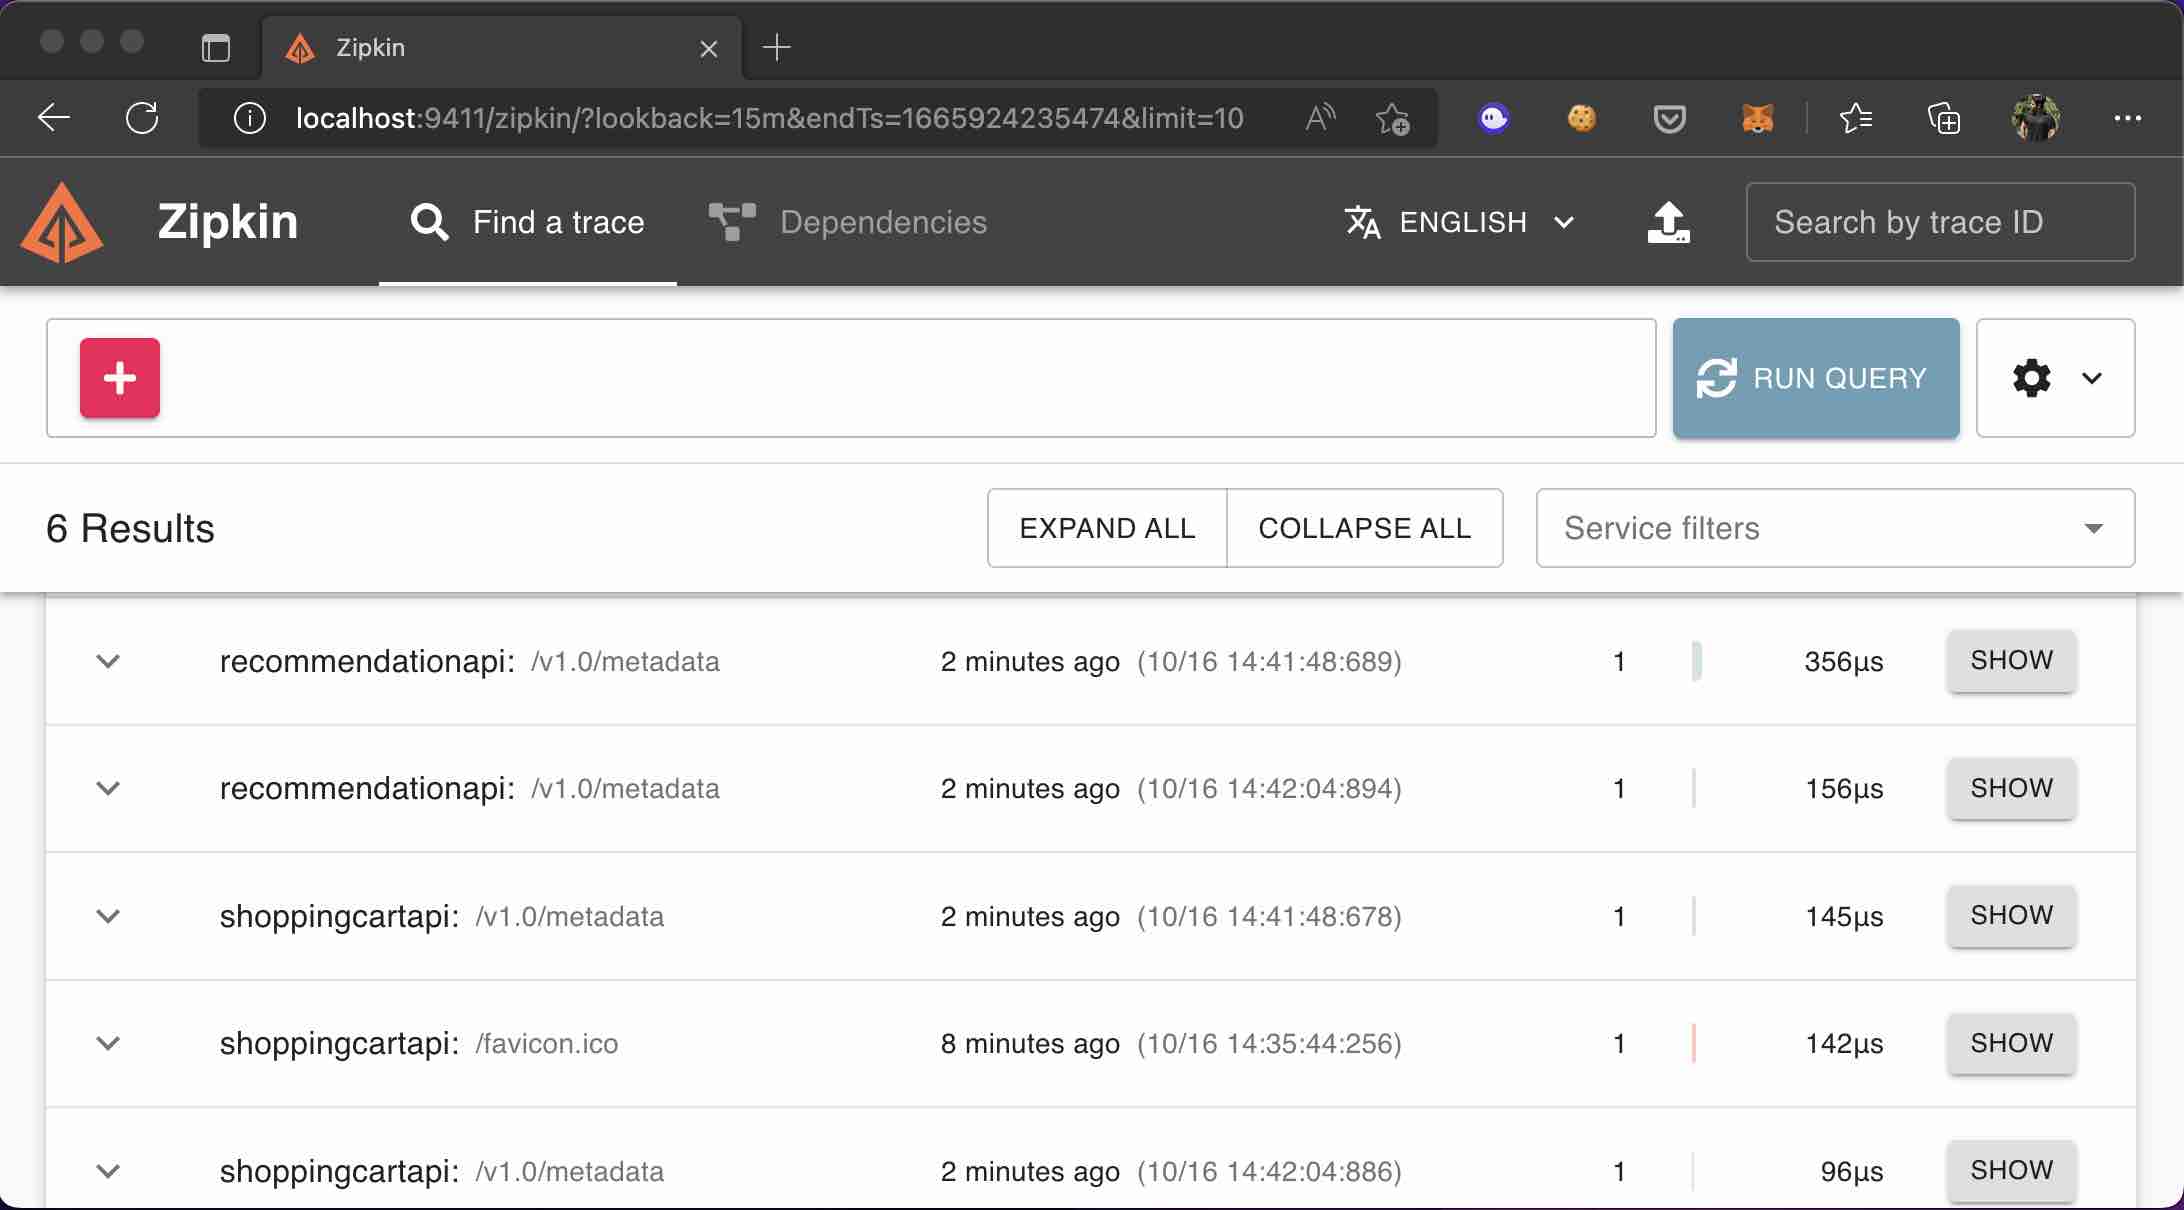
In short, we can access the tracing data via the Zipkin UI as follows.
http://localhost:9411
In addition, Dapr also uses Prometheus as a metric standard and provides performance and resource consumption metrics.
Briefly
Dapr always has been on my mind and among my interests since it was first announced. I have been developing a few applications by using Dapr for a while and I’m enjoying using the different building blocks it offers. As a developer, during the development process, it is a very nice and effective experience to work without thinking about any technology or libraries at first. Also, it is good that we can focus only on business functionalities without worrying about resiliency or observability concerns.
In addition to providing different building blocks for different business use-cases, thanks to its good abstraction, it also allows us to develop our microservices in a loosely coupled way.
In the next part, we will take a look at how we can deploy the APIs we have developed to Azure Container Apps by using different Azure services instead of default components.
References
https://learn.microsoft.com/en-us/dotnet/architecture/dapr-for-net-developers/
https://docs.dapr.io/concepts/overview/
thanks for sharing!
Interesting toy! Would be nice to try it on some real project.
[…] olarak .NET 6 ile iki adet örnek microservice geliştirmiştik. (Eğer ilk seriyi okumadı iseniz, buradan […]
[…] Dapr ve .NET Kullanarak Minimum Efor ile Microservice’ler Geliştirmek – 01 […]
Awesome, thanks
Hi gokhan,
This is Amit. Thanks for a pretty nice article. Its simple and easy . I have an issue where i just mocked up your steps and able to successfully build and executed both the api’s. I am using VS2022 Community edition. I ran it using multiple startup projects. I am able to see the consoles running and showing me ports 5000 and 6000 occupied, but if I try to open those url , i am getting HTTP connection refused error. Please help