Sanırım hepimiz günümüzde dijital dönüşümün öneminin ve dijitalleşme ile elde edebileceğimiz faydaların farkındayızdır. Bildiğimiz üzere bu kapsamda bir çok kuruluş da dijital dönüşüm yolunda farklı atılımlar gerçekleştirmektedirler.
Fakat bazen bu dönüşüm süreçleri içerisinde de farklı zorluklarla karşılaşabilmekteyiz. Örneğin data‘nın dijitalleştirilmesi süreçlerinde insan gücü gerektiren bazı durumların bulunması gibi. Örneğin tedarikçilerden aldığımız faturalar veya teknik bakım raporları gibi dokümanların/data’ların insan gücü gerektirerek dijitalleştirilebilmesini, bu kapsamda düşünebiliriz. Genel olarak bu gibi durumların minimize edilebilmesi, zaman ve maliyetin azaltılabilmesi için oldukça önem taşımaktadır. Neyseki bu tarz süreçler için, Optical Character Recognition (OCR) gibi teknolojilerden yararlanabilmekteyiz.
OCR, resim ve PDF gibi dokümanlar üzerindeki metin içeriklerini, bir insan tarafından tekrar yazılmasına gerek kalmadan dijital bir hale getirebilmemize olanak sağlayan bir teknolojidir.
Bu makale kapsamında ise Azure‘un bizlere sunmuş olduğu serverless ve managed hizmetlerinden yararlanarak, nasıl otomatikleştirilmiş bir OCR workflow‘u oluşturabileceğimize bir bakacağız.
Senaryo
Diyelim ki farklı domain’ler tarafından PDF formatında dokümanların gönderildiği ve yönetildiği bir doküman yönetim domain’i üzerinde çalışıyoruz. Bizden istenen geliştirmenin ise zaman ve insan gücünü en aza indirebilmek için PDF formatında gönderilen bu dokümanların, içerdikleri metinler ile birlikte otomatik olarak sistem içerisine aktarılabilmesi olduğunu düşünelim.
Ayrıca bizden istenen fonksiyonaliteyi hızlı bir şekilde teslim edebilmek ve herhangi bir server/infrastructure operasyonu ile de vakit kaybetmemek için, olabildiğince Azure‘un serverless ve managed teknolojilerinden yararlanmaya karar verdiğimizi de düşünelim.
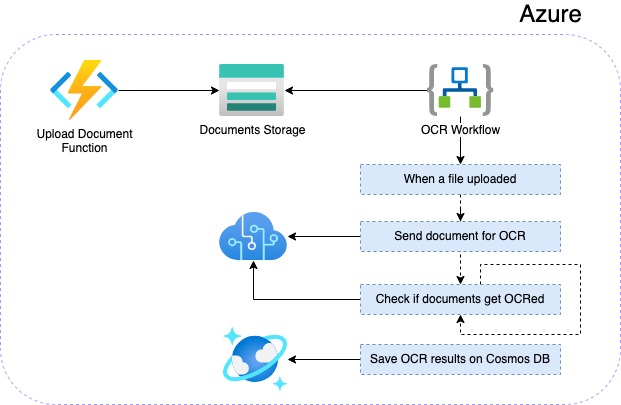
Bu kapsamda ilk olarak dokümanların Azure tarafında upload edilebileceği bir Azure Function geliştireceğiz. Bu function ile ise ilgili dokümanları bir Azure Blob Storage hizmeti üzerinde depolayacağız. Daha sonra ise ilgili dokümanlar için OCR işlemini otomatik olarak entegre bir hale getirebilmek için, Azure Logic Apps ile bir workflow oluşturacağız. Workflow içerisinde OCR işlemlerini gerçekleştirdikten sonra ise, ilgili dokümanların OCR sonuçlarını Cosmos DB hizmeti üzerinde kaydedeceğiz.
Özetle makalenin sonunda aşağıdaki gibi bir mimariye sahip olacağız.
İhtiyaçlar
- Visual Studio Code
- Azure Functions Extension
- .NET 6
- Azure Cosmos DB (SQL)
- Azure Storage Account
Azure Function ile Başlayalım
Azure Functions, domain spesifik business ihtiyaçlarımız için geliştirecek olduğumuz fonksiyonel çözümleri, serverless bir ortamda çalıştırabilmemizi sağlayan bir cloud hizmetidir. Böylece server/infrastructure gibi işlemleri düşünmekten ziyade geliştirmek istediğimiz business fonksiyonelitesine odaklanabilmemizi sağlayarak, daha hızlı çözümler üretebilmemizi ve teslim edebilmemizi kolaylaştırmaktadır.
Öncelikle Visual Studio Code üzerinden Azure Functions extension’ını kullanarak .NET 6 ve Azure Functions v4 runtime’ına sahip “UploadADocument” isimli bir HTTP Trigger Azure Function‘ı oluşturalım. “Authorization level” seçeneğini ise, örneği kolay gerçekleştirebilmek adına “Anonymous” olarak seçelim.
NOT: Production ortamları için ise bir güvenlik mekanizmasına sahip olabilmek adına, function-specific API key kullanmamız faydamıza olacaktır.
Function oluşturulduktan sonra ise, “UploadADocument” isimli class’ı aşağıdaki gibi düzenleyelim.
using System.Threading.Tasks;
using Microsoft.AspNetCore.Mvc;
using Microsoft.Azure.WebJobs;
using Microsoft.Azure.WebJobs.Extensions.Http;
using Microsoft.AspNetCore.Http;
using Microsoft.Extensions.Logging;
using Microsoft.Extensions.Configuration;
using Microsoft.WindowsAzure.Storage;
using Microsoft.WindowsAzure.Storage.Blob;

namespace Documents.Funcs
{
    public static class UploadADocument
    {
        private const string StorageConnectionString = "AZURE_STORAGE_CONNECTION_STRING";
        private const string DocumentsBaseFolder = "documents";

        [FunctionName("UploadADocument")]
        public static async Task<IActionResult> Run(
            [HttpTrigger(AuthorizationLevel.Anonymous, "post", Route = null)] HttpRequest req,
            ILogger log, ExecutionContext context)
        {
            IFormCollection data = await req.ReadFormAsync();
            var file = data.Files.GetFile("file");

            if (file == null)
            {
                return new BadRequestObjectResult("A file should be uploaded.");
            }

            CloudBlobContainer cloudBlobContainer = await GetCloudBlobContainer(context, log);

            if (cloudBlobContainer == null)
            {
                return new BadRequestObjectResult("An error occurred while processing your request.");
            }

            CloudBlockBlob blob = cloudBlobContainer.GetBlockBlobReference(file.FileName);

            await blob.UploadFromStreamAsync(file.OpenReadStream());

            return new OkResult();
        }

        private static async Task<CloudBlobContainer> GetCloudBlobContainer(ExecutionContext context, ILogger log)
        {
            try
            {
                CloudStorageAccount cloudStorageAccount = CloudStorageAccount.Parse(GetConfiguration(context)[StorageConnectionString]);
                CloudBlobClient cloudBlobClient = cloudStorageAccount.CreateCloudBlobClient();
                CloudBlobContainer cloudBlobContainer = cloudBlobClient.GetContainerReference(DocumentsBaseFolder);

                await cloudBlobContainer.CreateIfNotExistsAsync();

                return cloudBlobContainer;
            }
            catch (System.Exception ex)
            {
                log.LogError(ex, ex.Message);
            }

            return null;
        }

        public static IConfigurationRoot GetConfiguration(ExecutionContext context)
        {
            var config = new ConfigurationBuilder()
                .SetBasePath(context.FunctionAppDirectory)
                .AddJsonFile("local.settings.json", optional: true, reloadOnChange: true)
                .AddEnvironmentVariables()
                .Build();

            return config;
        }
    }
}
Bu function içerisinde basit olarak upload edilmek istenen doküman’ın, Azure Blob Storage üzerinde “documents” isimli bir container içerisine upload işlemini gerçekleştiriyoruz. Ayrıca doküman’ın id bilgisinin ise, dosya adı olarak gönderildiğini de varsayalım.
Local ortamda test işlemlerini gerçekleştirebilmek için ise, “local.settings.json” dosyası içerisine aşağıdaki gibi Azure Storage Account’un connection string bilgisini ekleyip, projeyi run etmemiz yeterli olacaktır.
{
  "IsEncrypted": false,
  "Values": {
    "AzureWebJobsStorage": "",
    "FUNCTIONS_WORKER_RUNTIME": "dotnet",
    "AZURE_STORAGE_CONNECTION_STRING": "DefaultEndpointsProtocol=https;AccountName=YOUR_ACCOUNT_NAME;AccountKey=YOUR_ACCOUNT_KEY;EndpointSuffix=core.windows.net"
  }
}
NOT: Azure Storage Account connection string bilgisini ise, Azure Portal üzerinden ilgili storage account’un “Access keys” sekmesine girerek ulaşabilirsiniz.
Şimdi oluşturmuş olduğumuz bu function’ın, Visual Studio Code kullanarak deployment işlemlerini gerçekleştirelim.
Bunun için Visual Studio Code üzerinden Azure Functions extension’ına geçelim ve ardından “Functions” başlığı altındaki “Deploy to Function App…” butonuna tıklayalım. Ardından karşımıza gelecek olan adımları takip etmemiz yeterli olacaktır. Adımları takip ederken “Select a runtime stack” seçeneğinde ise “.NET 6” ve “Functions v4” seçeneklerini seçtiğimizden emin olalım.
Bu deployment işlemi sonucunda ise OS sistemi “Windows“, hosting plan type’ı olarak ise “Consumption” olan bir function oluşturulacaktır. Dilersek farklı ihtiyaçlarımıza göre seçebileceğimiz “Premium” ve “Dedicated” olmak üzere 2 farklı hosting planı daha bulunmaktadır.
Örneğimiz gereği doküman domain’inin çok fazla yük’e ve sık kullanıma sahip olmayacağını varsayarsak, “Consumption” hosting plan’ının sunmuş olduğu auto scaling ve kullandığın kadar öde modeli gayet ihtiyacımıza yönelik yeterli olacaktır. Hosting plan’larının detaylarına ise, buradan ulaşabilirsiniz.
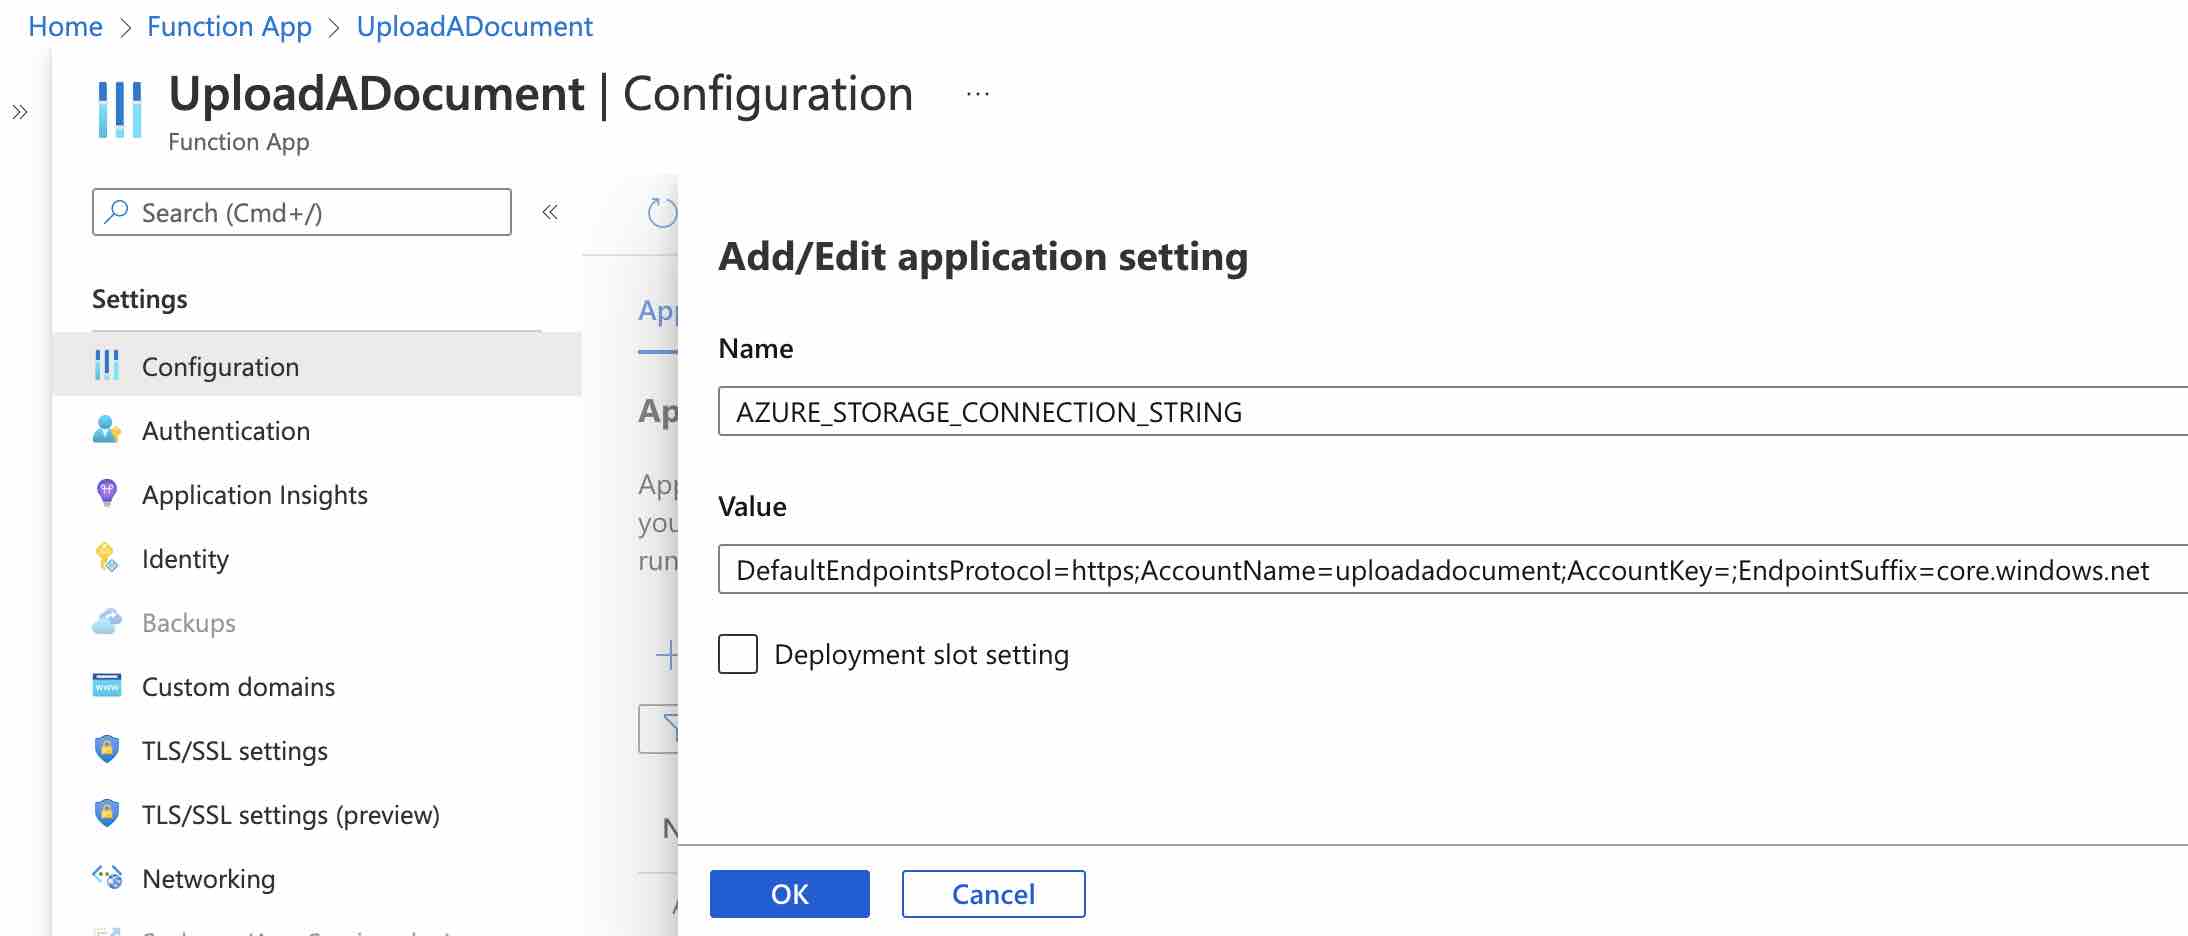
Deployment işlemi tamamlandıktan sonra ise şimdi Azure Storage Account‘un connection string bilgisini, uygulama runtime’ı için eklememiz gerekmektedir.
Bunun için Azure Portal üzerinden oluşturulan function app’in “Configuration” sekmesine girelim ve “AZURE_STORAGE_CONNECTION_STRING” bilgisini burada environment variable olarak aşağıdaki gibi tanımlayalım.
Artık business ihtiyacımıza yönelik function, hazır ve çalışır durumda.
Deploy ettiğimiz function’ın URL adresine erişebilmek için ise, yine portal üzerinden function app’in “Functions” sekmesi altından function’ın detay sayfasına erişerek, aşağıdaki gibi “Get Function Url” butonuna tıklamamız yeterli olacaktır.
Gördüğümüz gibi serverless yaklaşımı teknik açıdan bizi herhangi bir hosting/infra gibi işlemler ile uğraştırmadan, doğrudan business problemimize yönelik fonksiyonel çözüme odaklanabilmemize olanak sağlamıştır. Bu şekilde hızlı çözümler ve teslimat’lar gerçekleştirebilmek ve ayrıca serverless kullandıkça öde modeli sayesinde de operasyonel maliyetlerin azaltılabilmesi mümkün olabilmektedir.
Azure Computer Vision API ile OCR
Dokümanların dijitalleştirilmesindeki önemin artması ile beraber, günümüzde kullanabileceğimiz farklı OCR çözümleri de markette yer almaktadır. Dilersek open-source olan Tesseract OCR‘ı kullanabilir, dilersek de commercial olan ABBYY veya Azure Computer Vision gibi cloud çözümlerine yönelebiliriz. Ben bu makale kapsamında ise Azure tarafından fully managed OCR çözümü olarak sunulan, Computer Vision Read API‘ını kullanacağım.
Gelişmiş bir recognition model’ine sahip olan Read API, dokümanlar üzerindeki metinleri “164” farklı dil’e kadar dijital bir hale getirebilmektedir (02.2022 latest preview version). Ayrıca “9” dil’e kadar da el yazısı olan metin’leri ayrıştırabilmektedir. Bana göre en güzel tarafı ise, herhangi bir machine learning uzmanlığı gerektirmemesidir.
Desteklediği doküman formatları arasında JPEG, PNG, BMP, PDF, ve TIFF bulunmaktadır. Ayrıca PDF ve TIFF dokümanları için ise, “2000” sayfaya kadar bir destek sunmaktadır.
Sevdiğim özelliklerinden birisi ise OCR işlemi sırasında herhangi bir dil belirtmemize gerek olmamasıdır. Bu sayede doküman içerisinde bulunan birden çok dili de destekleyebilmektedir. Bir diğer güzel özelliği ise doküman üzerinde bulduğu metinleri, koordinatları ve “0” ile “100” arasında bir güven puanı ile birlikte bizlere sunabilmesidir. Bu güven puanı ile birlikte ise senaryolara göre kendi farklı stratejilerimizi belirleyerek, daha iyi sonuçlar elde edebilmeyi sağlayabiliriz. Örneğin güven puanı istediğimiz bir seviyenin altında ise, ilgili doküman’ı manuel bir işlem gerektiren bir sürece de sokabiliriz.
Kısa bir ön bilgiden sonra, artık uygulamaya geçebiliriz.
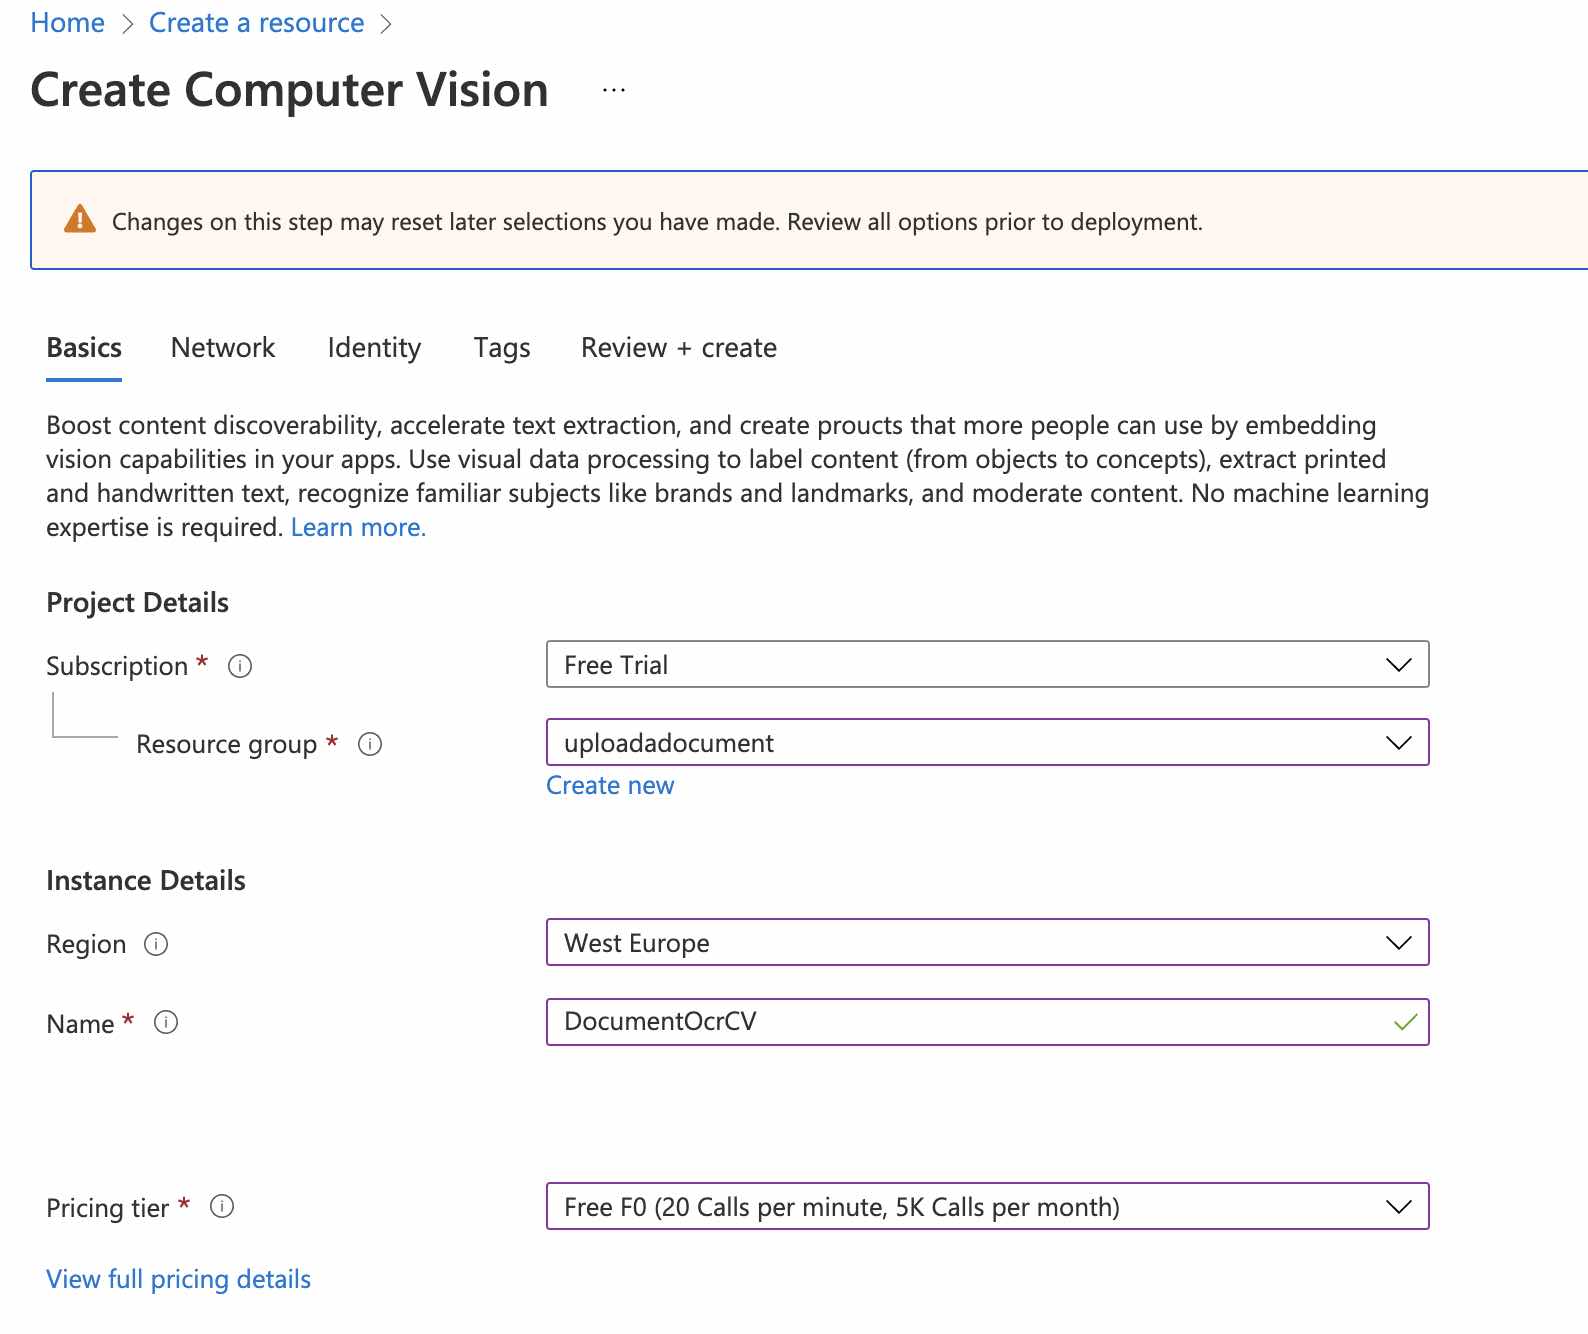
Öncelikle Azure Portal üzerinden aşağıdaki gibi bir Computer Vision kaynağı oluşturalım.
Ben bu kaynağı “DocumentOcrCV” adıyla oluşturdum. Oluşturma işleminden sonra bu kaynağın detay sayfasına gidelim ve “Keys and Endpoint” sekmesine geçelim. Burada bulunan “Key” ve “Endpoint” bilgilerini ise, ilerleyen aşamalarda kullanabilmek üzere bir kenarıya not edelim.
Logic Apps ile bir OCR Workflow’u Oluşturalım
OCR süreçlerini otomatikleştirebilmek için Azure Logic Apps‘den yararlanacağımızı söylemiştik. Logic Apps için çeşitli entegrasyon seçenekleri ile bize kolay ve highly scalable serverless workflow’lar oluşturabilmemize olanak sağlayan gelişmiş bir cloud hizmetidir diyebiliriz.
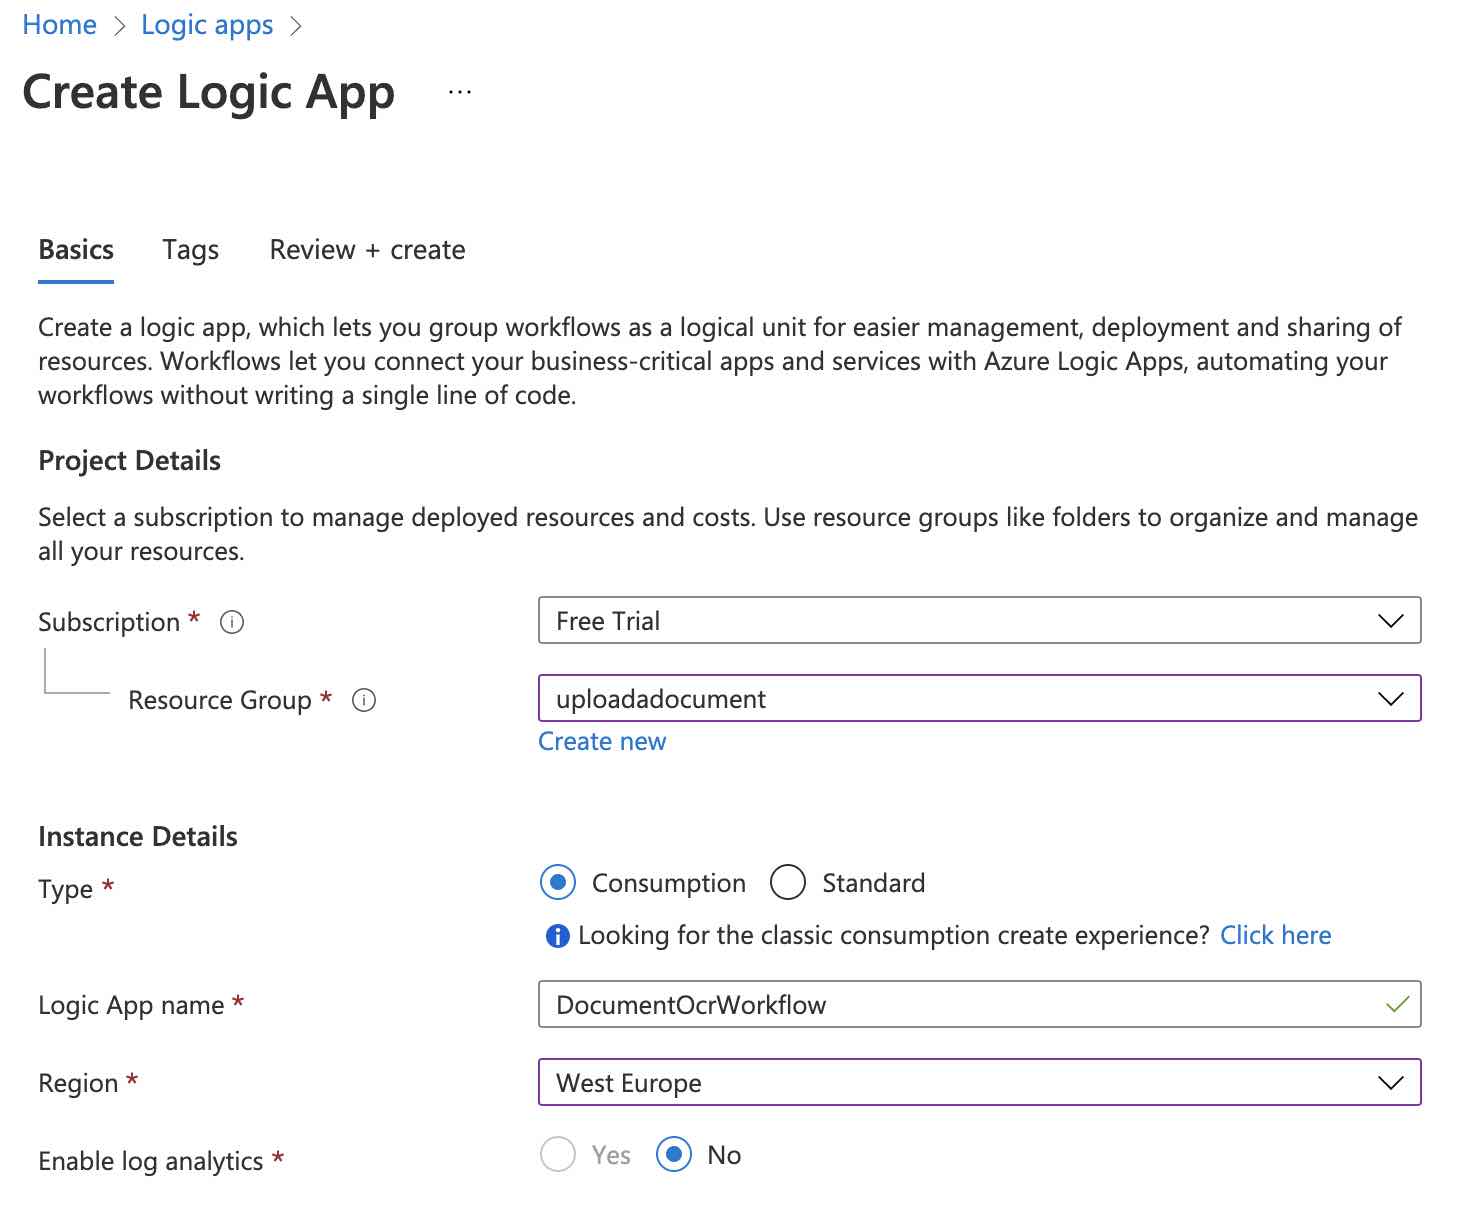
Şimdi ilk olarak Azure Portal üzerinden aşağıdaki gibi bir Logic App kaynağı oluşturalım.
Oluşturma işlemi tamamlandığında ise oluşturulan kaynağa gidelim ve workflow’u oluşturmaya başlayabilmek için, “Logic app designer” sekmesine geçelim. Ardından templates bölümünden “Blank Logic App” seçeneğini seçelim.
Logic Apps ile bir workflow oluştururken en önemli yapı taşlarından birisi, trigger’lar dır. Trigger’ı bir başlangıç noktası olarak da düşünebiliriz. Logic Apps içerisinde çeşitli API‘lar tarafından sunulan farklı trigger’lar bulunmaktadır. Birde trigger’lar devreye girdiğinde tanımlanan business işlemlerini gerçekleştiren action‘lar.
Örnek senaryomuza göre dokümanları, oluşturmuş olduğumuz Azure Function aracılığı ile Azure Blob Storage üzerinde “documents” isimli bir container’a upload edeceğiz. Yani workflow’un başlangıç noktası olarak, Azure Blob Storage‘ın trigger’ını kullanabiliriz.
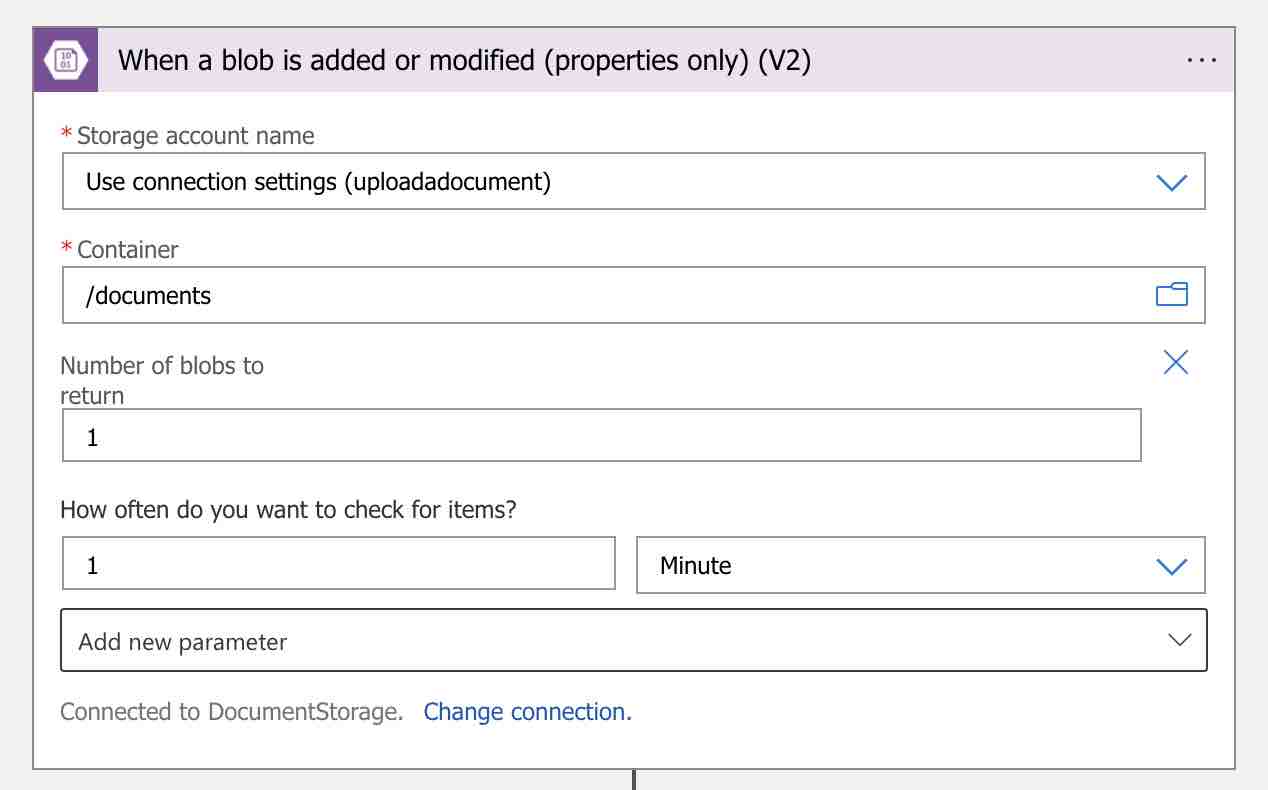
Şimdi designer üzerinden “Search connectors” arama kutusuna gelelim ve “Azure Blob Storage” yazalım. Gelen sonuçlardan connector olarak “Azure Blob Storage” ı, trigger olarak ise “When a blob is added or modified (properties only) (V2)” seçeneğini seçelim.
Şimdi açılacak olan pencereden aşağıdaki gibi ilgili storage account’un credential bilgilerini sağlamamız gerekmektedir.
Ardından trigger’ı aşağıdaki gibi oluşturalım.
Böylece “documents” container’ı içerisine yeni bir doküman upload edildiğinde, workflow trigger olacak ve birazdan tanımlayacağımız tüm adımları sırasıyla gerçekleştirecektir.
Şimdi ilerleyen aşamalarda kullanabilmek üzere upload edilen doküman’ın bilgilerine erişebileceğimiz yeni bir adım tanımlayalım. Bunun için yine arama kutusuna “Azure Blob Storage” yazalım ve bu sefer “Get blob content (V2)” action’ını seçelim.
Bu action içerisinde ise bilgilerine erişmek istediğimiz doküman’ın path’ini belirtiyoruz. Path’i belirtebilmek için ise, bir önceki trigger’a ait olan “List of Files Name” dynamic content’inden yararlanıyoruz. Expression olarak ise, “triggerBody()?[‘Name’]” şeklinde de kullanabilirdik. Artık ilgili doküman’ın bilgilerine erişebileceğimiz bir adım mevcut.
Doküman’ın id bilgisinin dosya adı olarak gönderileceğini söylemiştik. Bu adımdan sonra ilgili doküman’ın bilgilerine erişebileceğimiz için, doküman’ın id bilgisini explicit bir şekilde workflow üzerinde tutabileceğimiz bir variable oluşturalım. Bunun için yeni adım ekle butonuna tıklayalım ve “Variables” ı arayalım. Ardından action olarak “Initialize variable” ı seçelim ve “DocumentID” adında bir variable oluşturalım.
Variable’ın değer kısmına ise “split(triggerBody()?[‘Name’],’.’)[0]” şeklinde bir expression yazalım. Bu basit split expression’ı ile doküman’ın id bilgisini, dosya adı üzerinden elde etmiş olacağız.
Artık OCR işlemleri için gerekli workflow adımlarını tanımlamaya başlayabiliriz.
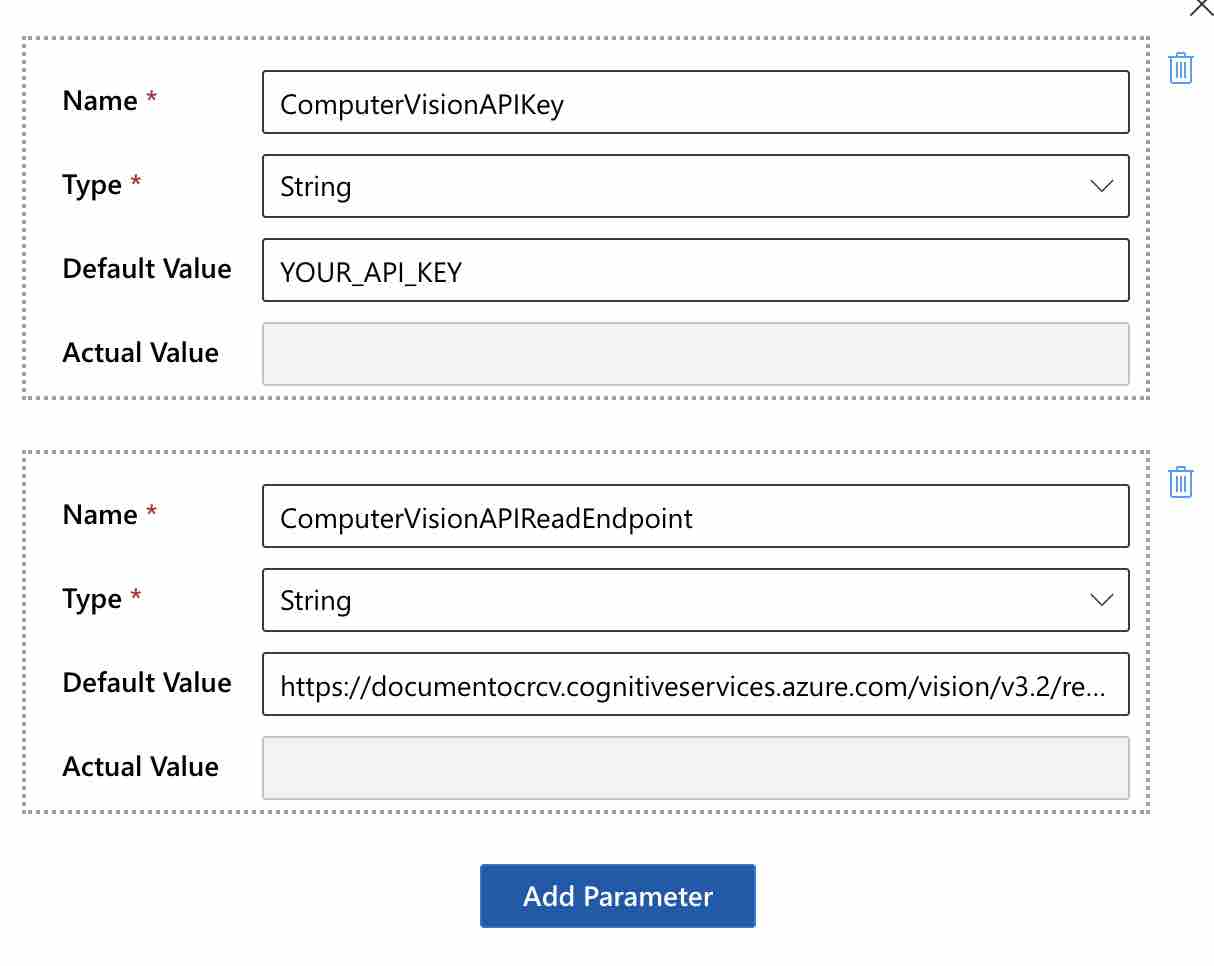
Öncelikle Computer Vision kaynağının “key” ve “endpoint” bilgilerini, workflow üzerinde “Parameters” butonuna basarak aşağıdaki gibi birer parametre olarak tanımlayalım.
“ComputerVisionAPIReadEndpoint” parametresinin değeri olarak ise, “https://{endpoint}/vision/v3.2/read/analyze” endpoint’ini kullanalım.
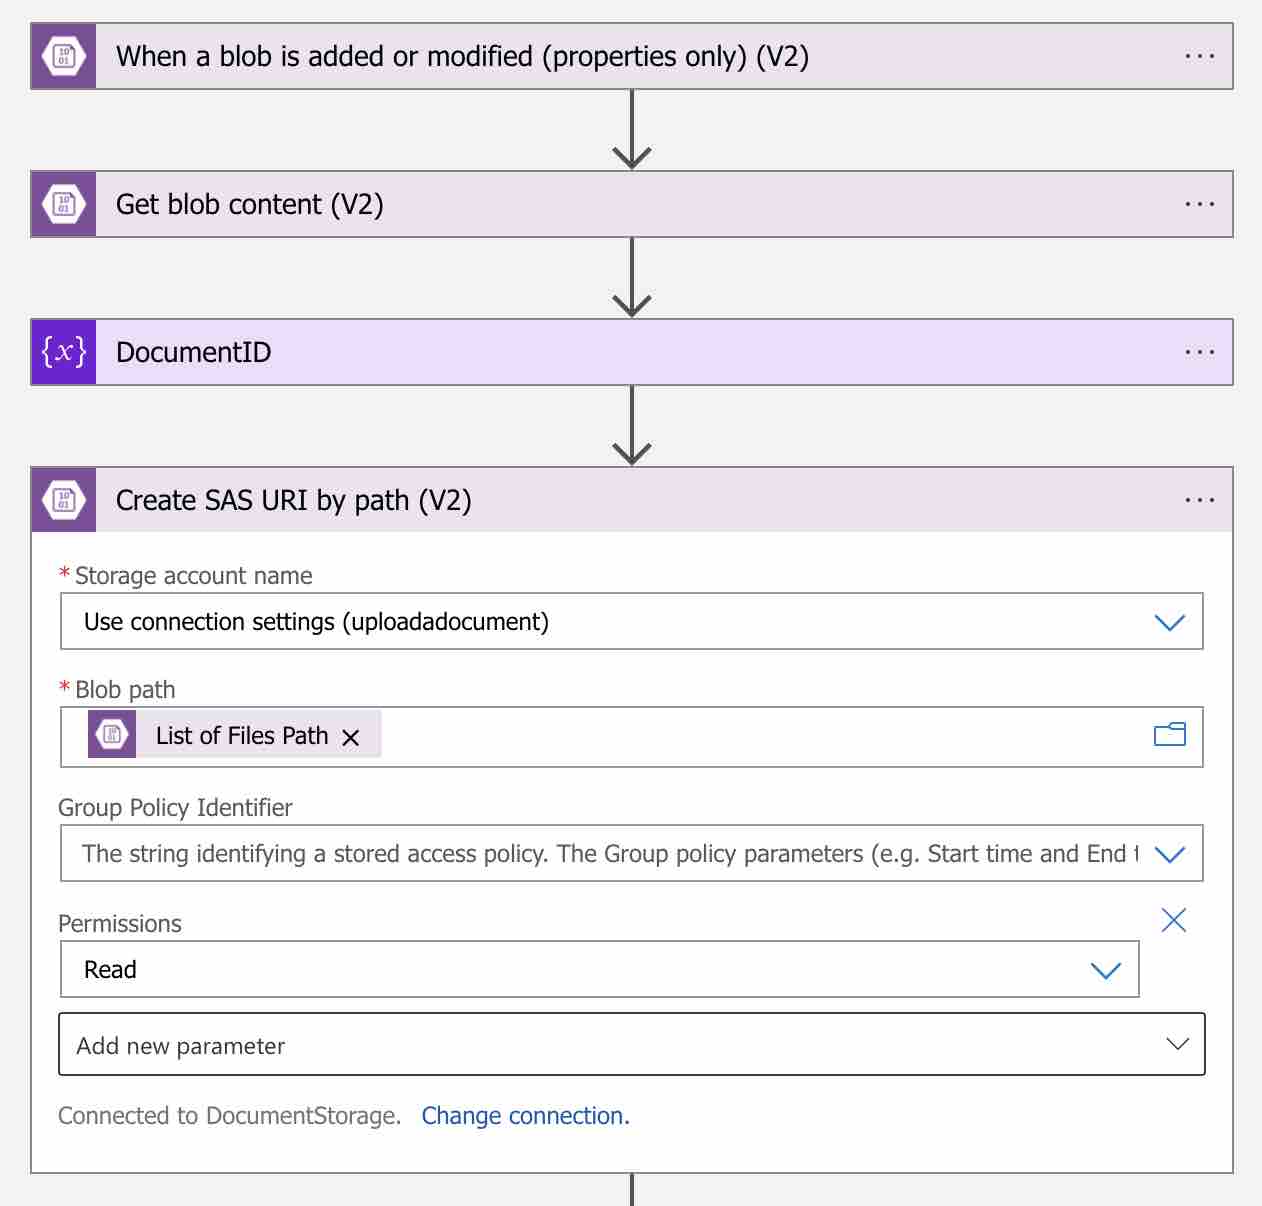
Şimdi ise Blob Storage üzerine yüklenecek olan doküman’ın Computer Vision tarafından erişilebilir olabilmesi için, ilgili doküman’a özel bir SAS link’i oluşturacağız. Elbette ilgili Blob Storage account’unuz public olarak erişime açık değilse.
Bu işlem için “Create SAS URI by path (V2)” action’ını aşağıdaki gibi workflow’a dahil edelim.
“Blob path” i olarak ise “List of Files Path” dynamic content’ini kullanalım. Böylece ilgili doküman için bir SAS link’i oluşturulmuş olacak.
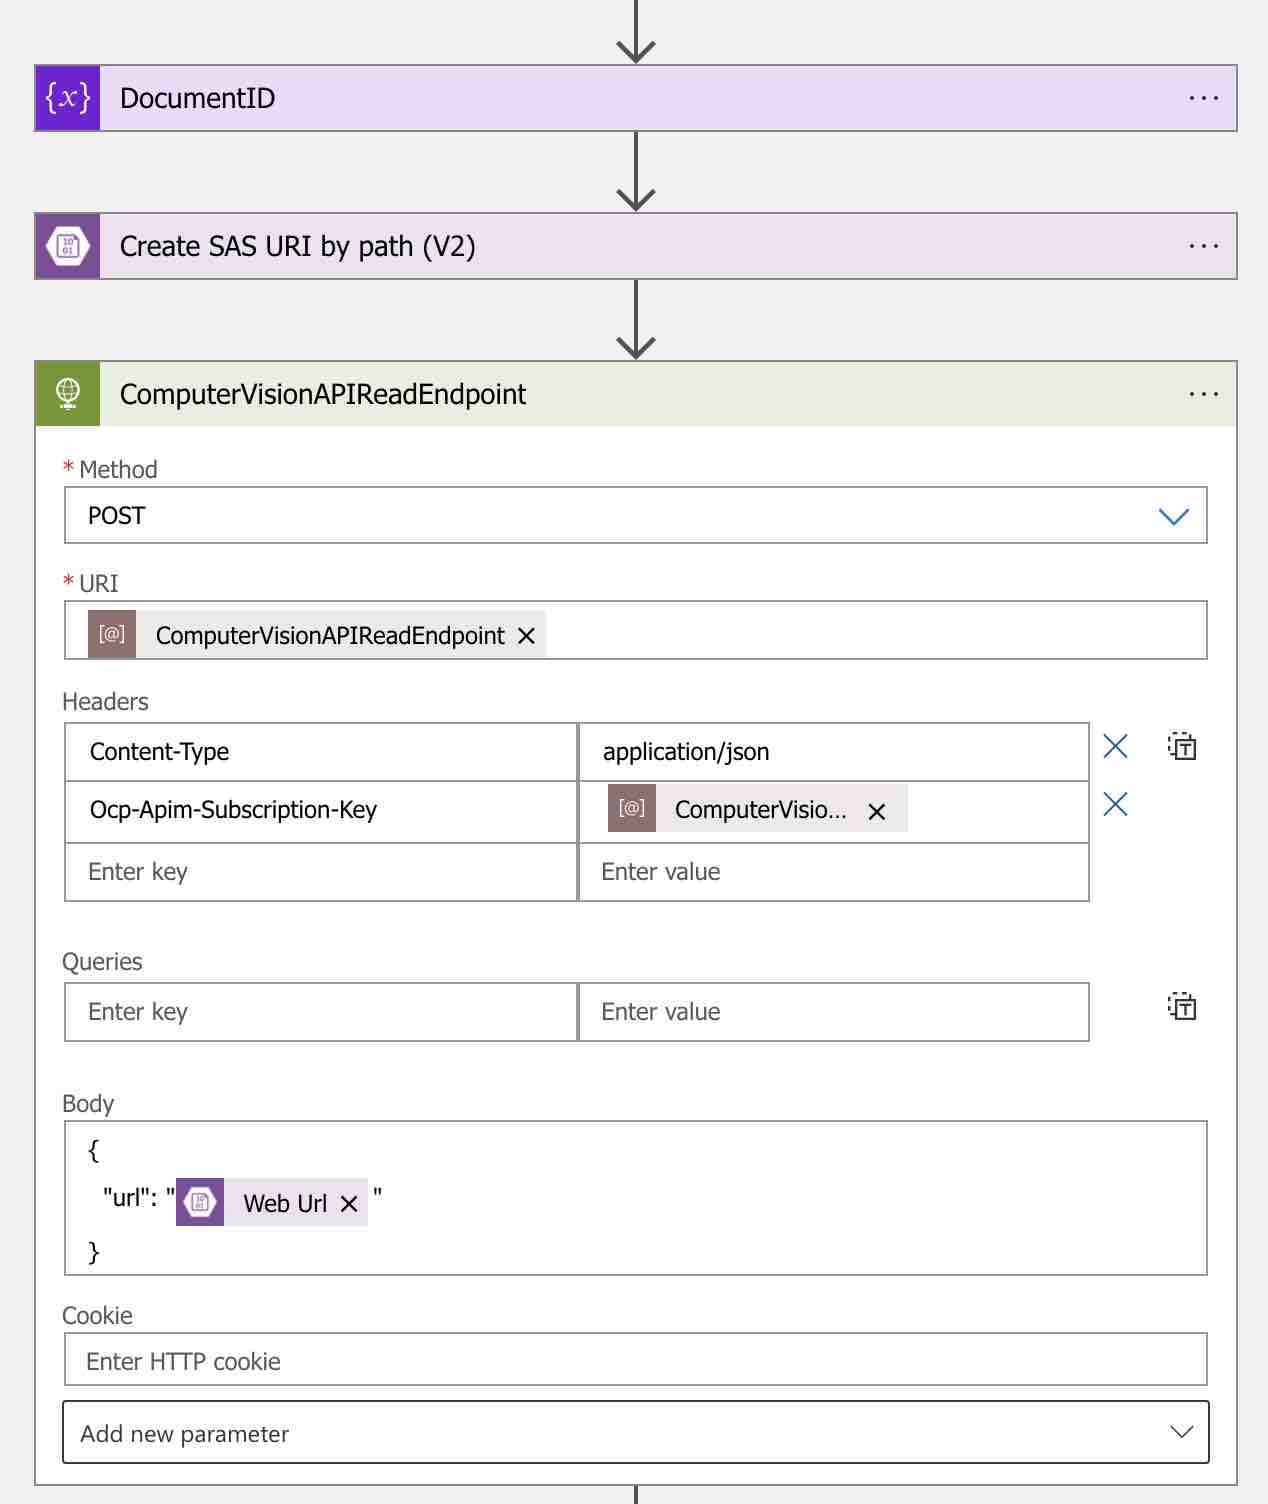
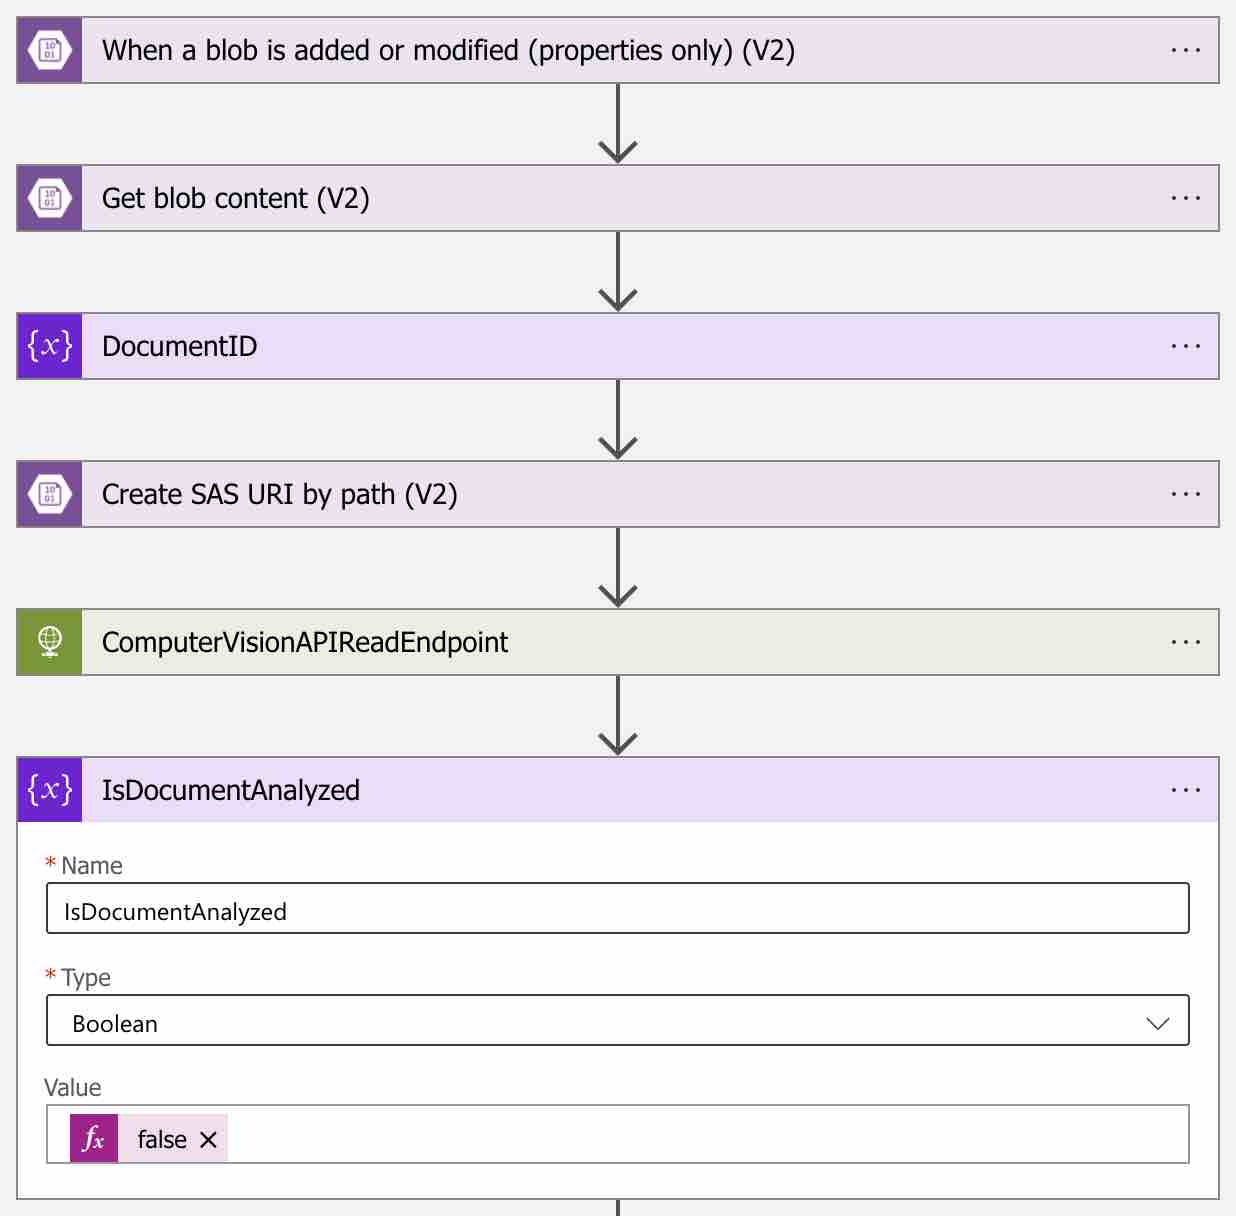
Şimdi ilgili doküman’ın OCR işlemlerini başlatabilmek için, aşağıdaki gibi bir HTTP action ekleyelim. Bu action’ı ise, “ComputerVisionAPIReadEndpoint” olarak adlandıralım. Böylece ilerleyen adımlarda bu action’ın output’una kolay bir şekilde erişim sağlayabiliriz.
Bu action ile basit bir şekilde ilgili doküman’ın URL bilgisini, Read API‘a göndereceğiz. Ayrıca Read API, “octet-stream” formatında binary data da kabul etmektedir. “URI” bilgisi için ise, “ComputerVisionAPIReadEndpoint” parametresini kullanalım.Bunlara ek olarak, “pages” request parametresini de kullanarak çoklu sayfalı PDF ve TIFF dokümanları için, sayfa seçim işlemleri gerçekleştirebilmekteyiz. Örneğin: “?pages=1,2,3” veya “?pages=1-3”
Bir diğer önemli nokta ise Computer Vision API key bilgisi. Bu bilgiyi ise “Ocp-Apim-Subscription-Key” header parametresi ile göndereceğiz.
Body içerisinde ise ilgili doküman’ın URL bilgisini, bir önceki aşamada ilgili doküman için üretmiş olduğumuz SAS link’ini kullanarak belirtiyoruz. İlgili SAS link’ine ise, dynamic content’ler içerisinden “Create SAS URI by path (V2)” başlığı altından erişebiliriz.
Artık OCR işlemlerini başlatabilmek için gereken HTTP request de hazır durumda. Şimdi OCR sonuçlarına nasıl ulaşabileceğimiz kısmına geçebiliriz.
Computer Vision Read API‘ı, OCR işlemlerini asynchronous bir şekilde gerçekleştirmektedir. Bu sebeple Read API, response olarak geriye OCR işleminin detaylarının sorgulanabileceği Get Read Result method’unun endpoint bilgisini dönmektedir. Kısacası OCR işlemi tamamlanana kadar, belirli aralıklarla Get Read Result endpoint’ini sorgulamamız gerekmektedir.
İlk olarak workflow üzerinde aşağıdaki gibi “IsDocumentAnalyzed” adında boolean bir variable tanımlayalım.
Bu variable false değerine sahip olduğu sürece, Get Read Result endpoint’ini bir döngü içerisinde sorguluyor olacağız.
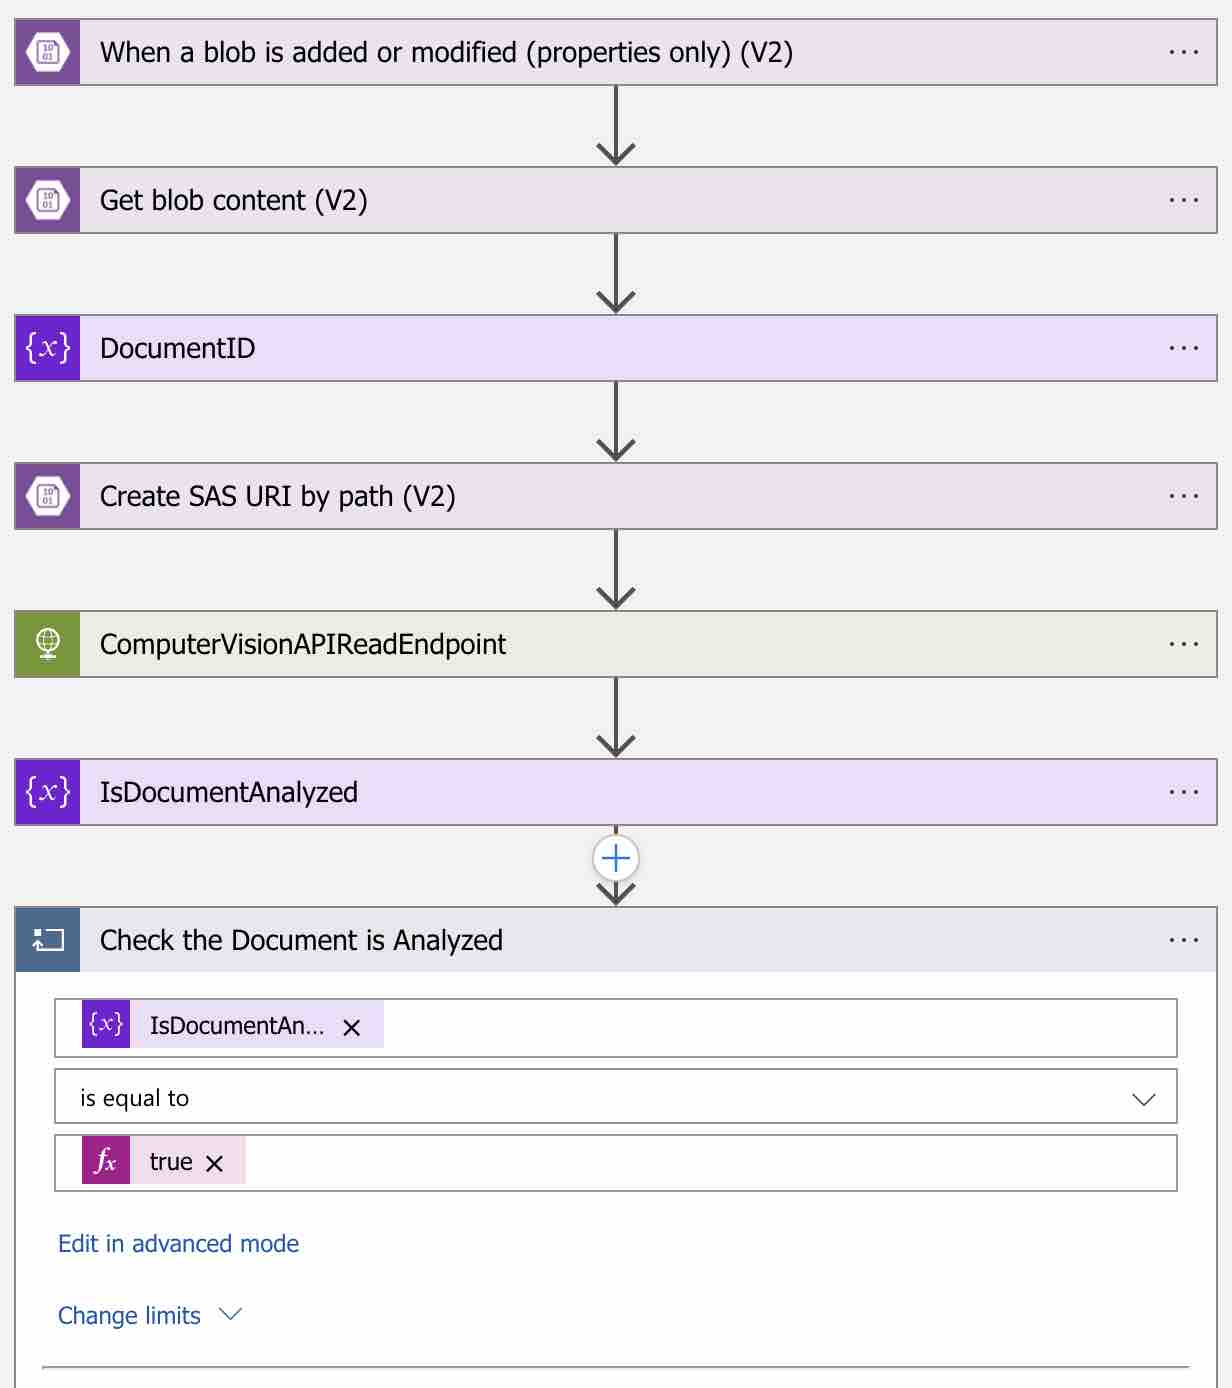
Workflow içerisine bir döngü ekleyebilmek için arama kutusuna “Control” yazalım ve ardından action olarak “Until” i seçelim.
Ben bu döngü adımını “Check the Document is Analyzed” olarak adlandırdım. Koşul olarak ise tanımlamış olduğumuz “IsDocumentAnalyzed” variable’ının “true” olmasını belirleyelim. Artık bu döngü scope’u içerisinde Get Read Result endpoint’ini sorgulamaya başlayabiliriz.
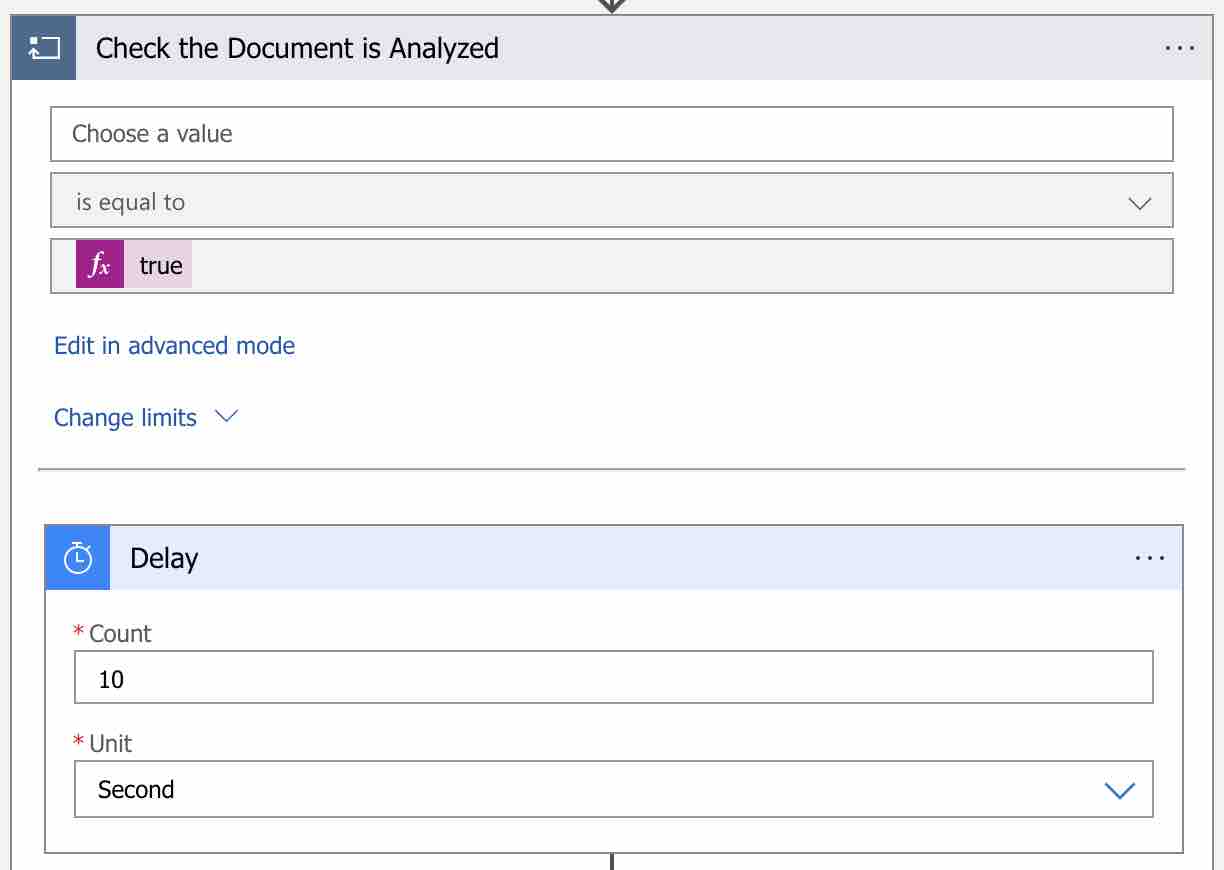
Öncelikle sorgulama işlemlerini belirli zaman aralıkları ile gerçekleştirebilmek adına, bu döngü scope’u içerisine aşağıdaki gibi bir “Delay” action’ı ekleyelim.
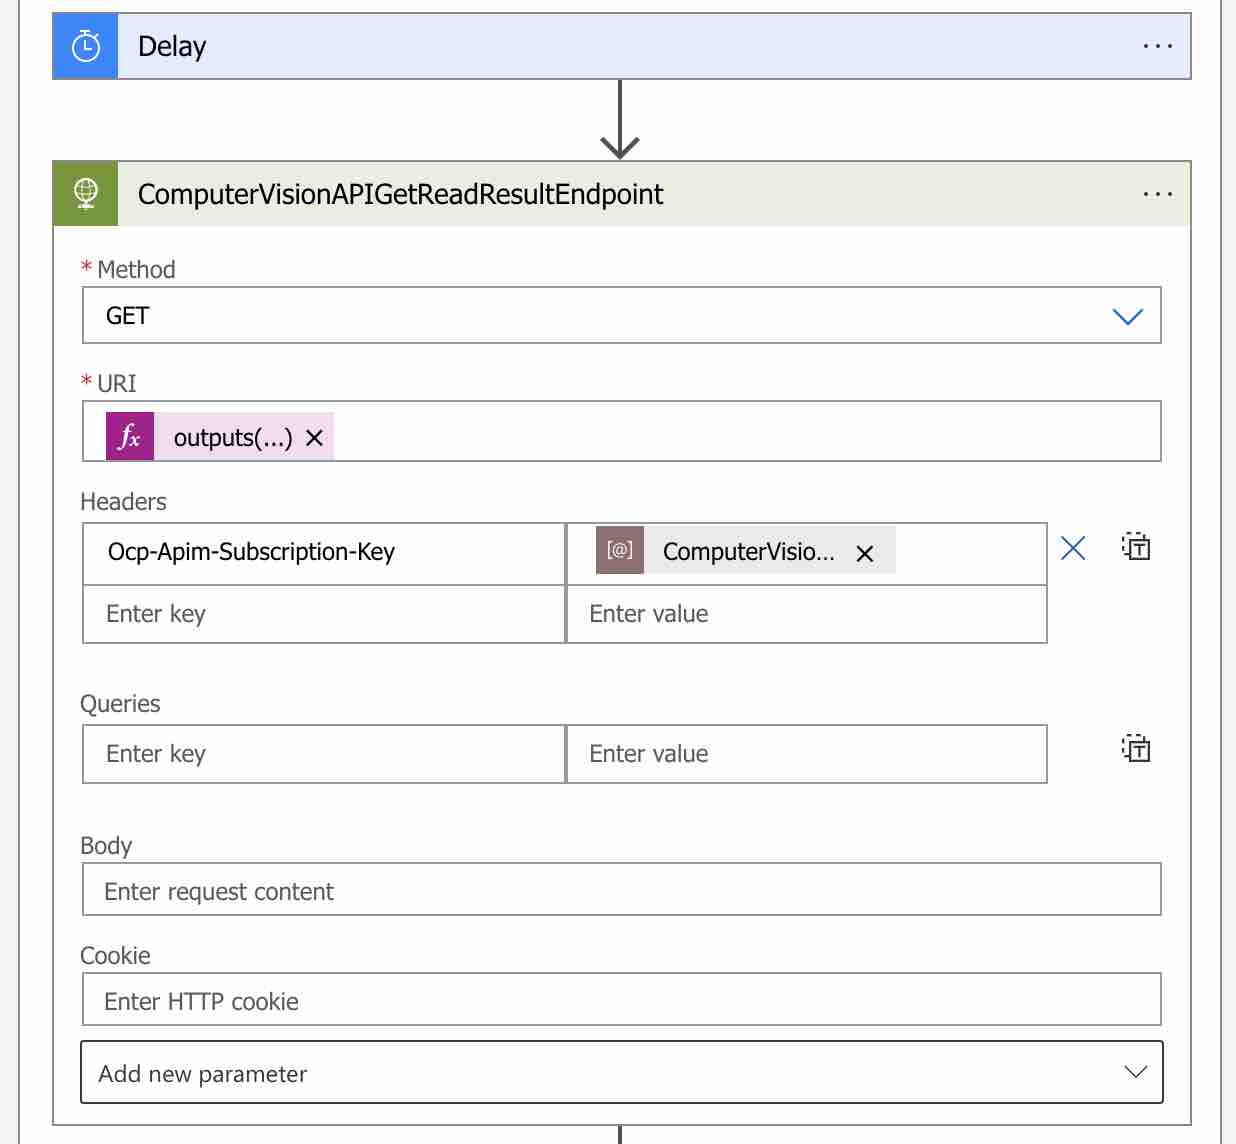
“Delay” action’ını tanımladıktan sonra ise, Get Read Result endpoint’ini sorgulayabilmek için yeni bir HTTP action ekleyelim. Bu action’ı ise “ComputerVisionAPIGetReadResultEndpoint” olarak adlandıralım.
“Method” olarak “GET” i, “URI” adresi olarak ise daha önce de bahsettiğimiz gibi Get Read Result endpoint’ini kullanalım. Bu endpoint bilgisine ise, eklemiş olduğumuz “ComputerVisionAPIReadEndpoint” HTTP action adımının “Operation-Location” adlı response header parametresi üzerinden erişim sağlayacağız.
Bunun için aşağıdaki gibi bir expression yazmamız yeterli olacaktır.
outputs('ComputerVisionAPIReadEndpoint')['headers']['Operation-Location']
Ayrıca Computer Vision API key bilgisini de, yine “Ocp-Apim-Subscription-Key” header parametresi üzerinden gönderiyor olacağız.
Artık OCR işleminin sonuçlarını sorgulayabileceğimiz HTTP request adımı da hazır durumda. Şimdi ise geriye bu request’in response sonucunu kontrol etmek ve OCR sonuçlarını Cosmos DB üzerine kaydetmek kaldı.
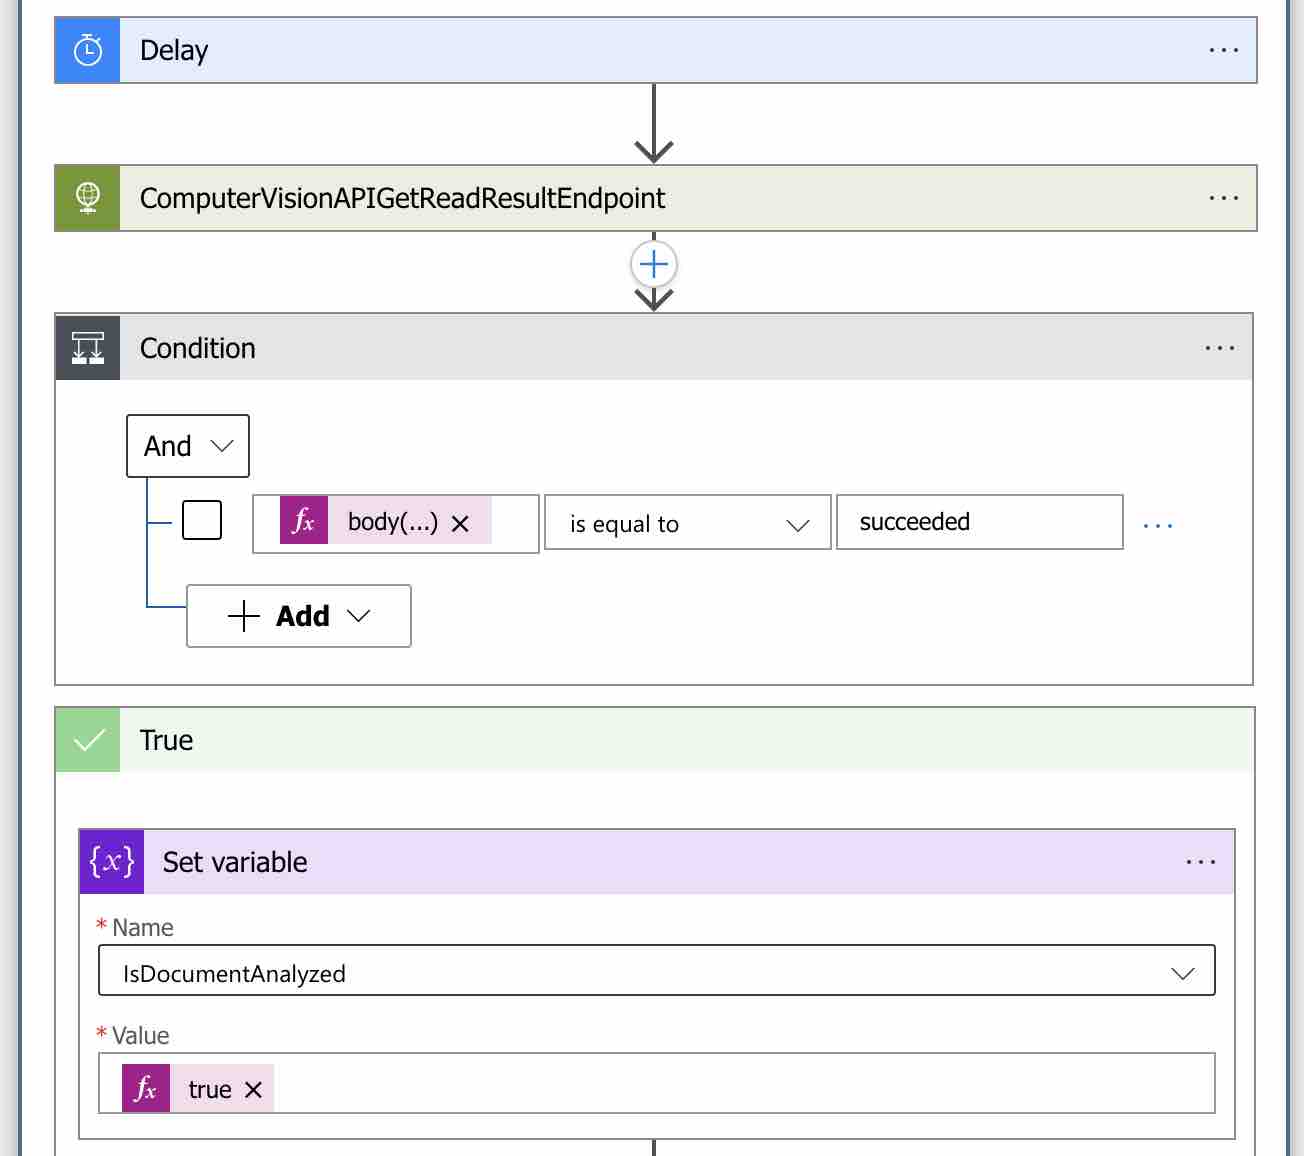
Bu adımları gerçekleştirebilmek için ise yine aynı “Check the Document is Analyzed” döngü scope’u içerisine yeni bir koşul adımı eklememiz gerekmektedir. Bunun için arama kutusuna “Control” yazalım ve bu sefer action olarak “Condition” ı seçelim.
Bu noktada işlemin başarıyla tamamlanıp tamamlanmadığını kontrol edebilmek için, Get Read Result endpoint’inin response body’si içerisinde alacak olduğumuz “status” property’sini kontrol etmemiz gerekmektedir. Eğer “succeeded” değerini alırsak, OCR işlemi başarıyla tamamlanmış demektir.
Bu kontrol işlemini gerçekleştirebilmek için, koşul değeri olarak aşağıdaki gibi bir expression yazalım.
body('ComputerVisionAPIGetReadResultEndpoint')['status']
Koşul olarak “is equal to” seçerek değerini ise “succeeded” olarak belirleyelim.
Bu noktadan sonra eğer belirlediğimiz koşul başarıyla gerçekleşir ve “True” bloğuna girerse, ilk olarak “Check the Document is Analyzed” döngüsünü sonlandırabilmek için “IsDocumentAnalyzed” variable’ının değerini “true” olarak güncellememiz gerekmektedir. Bunun için yukarıdaki görselde olduğu gibi “True” bloğu içerisine “Set variable” actıon’ını ekleyelim ve “IsDocumentAnalyzed” variable’ının değerini “true” olarak güncelleyelim.
Ben örnek gereği happy-path senaryodan ilerlediğim için, başarısız olduğu durumları ele almayacağım. Başarısız durumlarda ise kendi hata yönetim stratejilerinizi, workflow üzerinde tasarlamanız gerekmektedir.
Bu noktadan sonra artık ilgili OCR sonuçlarına erişim sağlayabilir ve Cosmos DB üzerine kayıt edebiliriz. Bunun için “Set variable” action’ından sonra yeni adım ekle butonuna basalım ve arama kutusuna “Azure Cosmos DB” yazalım. Ardından action olarak “Create or update document (V3) 2” seçeneğini seçelim.
Öncelikle açılacak olan ilk ekranda ilgili Cosmos DB account’una ait “Access Key” ve “Account ID” gibi bilgileri sağlayarak, yeni bir connection oluşturmamız gerekmektedir. Ardından açılacak olan ikinci ekranı, aşağıdaki gibi dolduralım.
Bu adımda Cosmos DB üzerinde oluşturacağımız dokümanı tanımlayacağız. İlk olarak “Account name” seçeneğinde, bir önceki adımda oluşturmuş olduğumuz connection bilgisini seçelim. Ardından ilgili OCR sonuçlarını tutmak istediğimiz “Database” ve “Collection” bilgilerini sağlamamız gerekmektedir. Ben ilgili sonuçları daha önceden oluşturmuş olduğum “DocumentOCRDB” database’inde bulunan “Documents” collection’ı içerisinde saklayacağım.
“Document” kısmında ise OCR sonuçlarını collection içerisinde nasıl saklayacağımızı tanımlıyoruz. Bu kısımda ise doküman model’ini, istediğiniz gibi tasarlayabilirsiniz. Ben örnek olması açısından OCR sonuçlarını Get Read Result endpoint’inden response olarak geldiği gibi saklayacağım. OCR sonuçları ise aşağıdaki gibi bir formatta gelmektedir.
{
  "status": "",
  "analyzeResult": {
      "readResults": [
          {
            ...
          }
        ]
    }
}
Bu sonuçlara erişebilmek için ise, aşağıdaki gibi bir expression yazmamız yeterli olacaktır.
body('ComputerVisionAPIGetReadResultEndpoint')['analyzeResult']['readResults']
Get Read Result endpoint’inin response model detaylarına ise, buradan ulaşabilirsiniz.
Böylece Azure‘un serverless ve managed hizmetlerden yararlanarak, otomatikleştirilmiş bir OCR workflow’u oluşturmuş olduk. Artık Blob Storage üzerine yeni bir doküman upload edildiğinde, bu workflow çalışacak ve ilgili doküman için OCR işlemlerini otomatik bir şekilde gerçekleştirecektir.
Test Edelim
Hızlı bir test işlemi gerçekleştirebilmek için, aşağıdaki gibi ilgili Azure Function adresine bir PDF dokümanı upload isteği gönderelim. Benim upload edeceğim örnek PDF dokümanı, içerisinde sadece “Hello, how are you” şeklinde basit bir metin içermektedir.
curl --location --request POST 'https://YOUR_FUNCTION_URL/api/UploadADocument' --form 'file=@"/YOUR_PATH/977ab862-e432-4bf6-83ee-94453bfb6768.pdf"'
Upload işlemi tamamlandıktan sonra ise oluşturmuş olduğumuz “DocumentOcrWorkflow” isimli Logic App kaynağının “Overview” sayfasına giderek, “Run History” sekmesine geçelim.
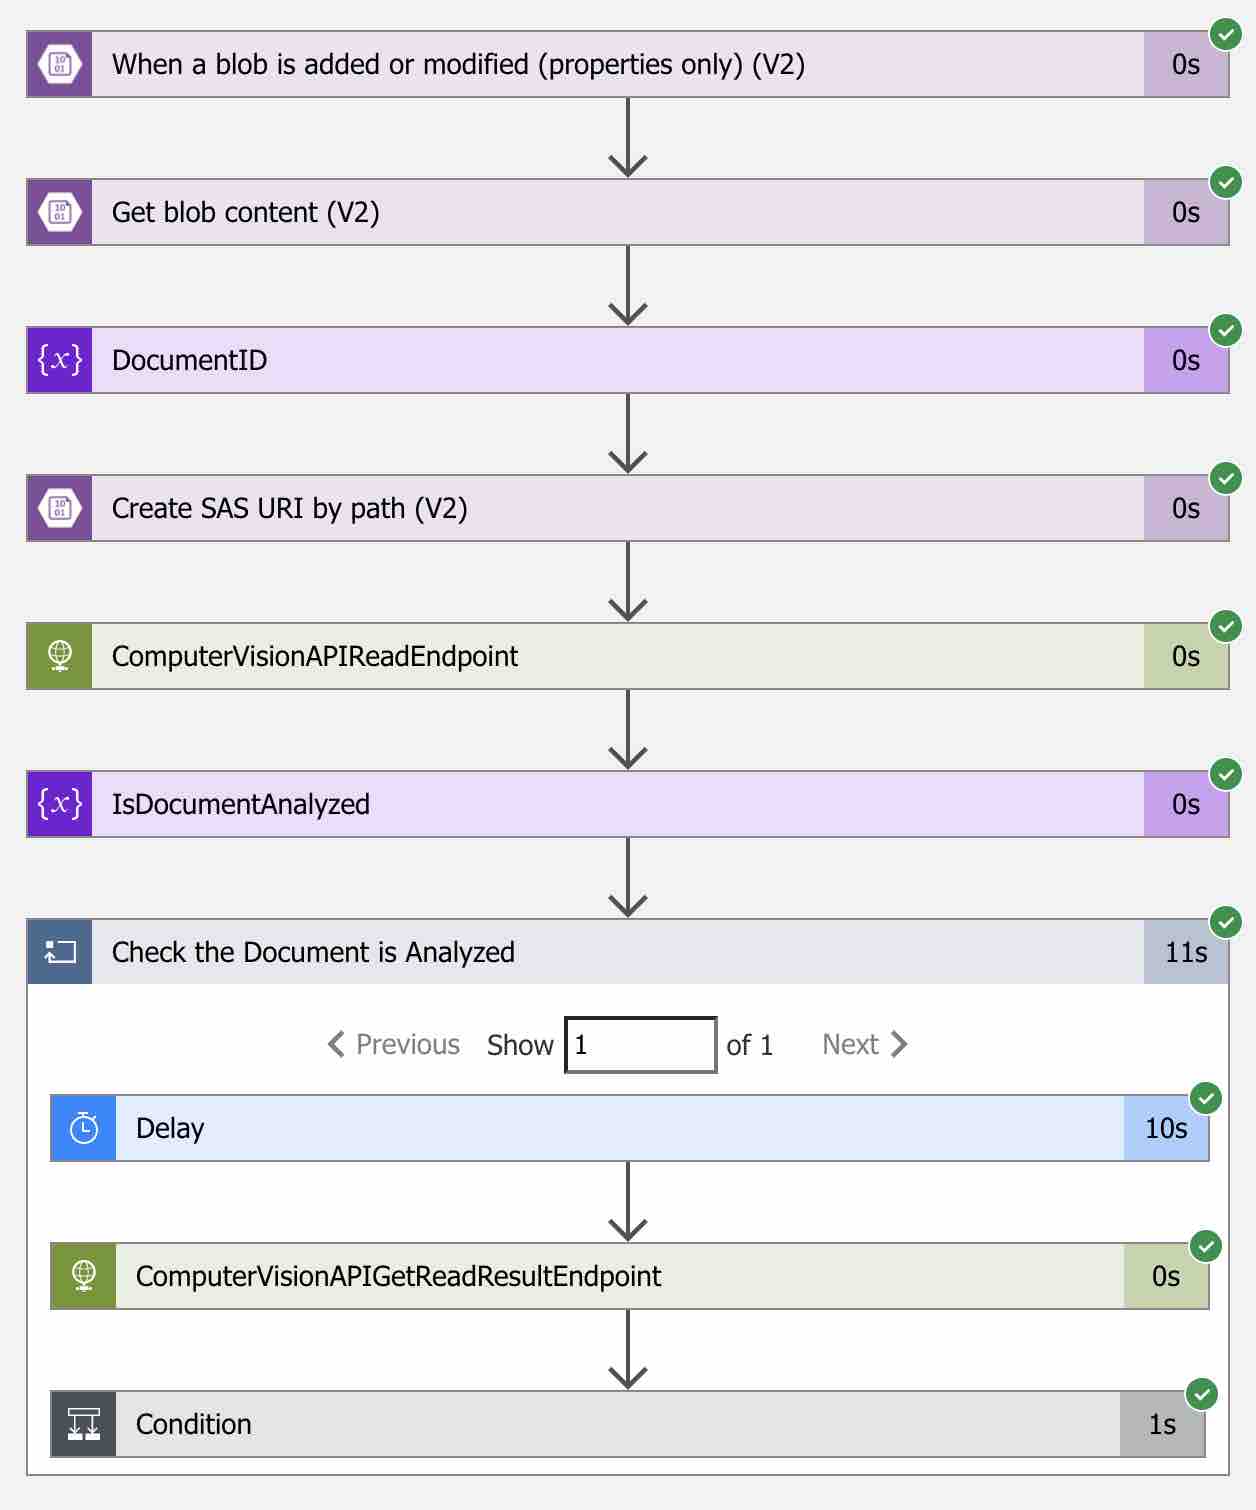
Bu sekmeden ilgili Logic App‘in çalışma geçmişine ulaşabiliriz. Eğer upload işlemi sonrasında ilgili Logic App başarılı bir şekilde çalıştı ise, aşağıdaki gibi bir ekran görüyor olmamız gerekmektedir.
Daha sonra ilgili workflow’un çalışma detayına ulaşabilmek için ise, görmüş olduğumuz sonucun üzerine tıklamamız yeterli olacaktır.
Görmüş olduğumuz gibi ilgili doküman’ın Blob Storage üzerine upload edilmesinden sonra, tanımlamış olduğumuz Blob Storage trigger’ı başarıyla tetiklenmiş ve tüm adımlar workflow tarafından sırasıyla çalıştırılmıştır. Dilerseniz bu adımların da üzerlerine tıklayarak, o anki detaylarına erişebilirsiniz.
Ayrıca Cosmos DB‘ye baktığımızda ise, ilgili doküman’ın id bilgisi kullanılarak “Documents” collection’ı içerisinde aşağıdaki gibi bir kayıt oluşturulduğunu da görebiliriz.
Bu OCR sonuçları içerisinde ise doküman’ın metadata bilgilerinden, bulunan metin’lerin doğruluk puanları ile birlikte koordinatlarına kadar bilgiler yer almaktadır.
Benim örneğim için JSON response’u ise aşağıdaki gibidir.
{
    "id": "977ab862-e432-4bf6-83ee-94453bfb6768",
    "readResults": [
        {
            "page": 1,
            "angle": 0,
            "width": 8.2639,
            "height": 11.6806,
            "unit": "inch",
            "lines": [
                {
                    "boundingBox": [
                        1.0132,
                        1.028,
                        2.1575,
                        1.028,
                        2.1575,
                        1.1594,
                        1.0132,
                        1.1594
                    ],
                    "text": "Hello, how are you",
                    "appearance": {
                        "style": {
                            "name": "other",
                            "confidence": 1
                        }
                    },
                    "words": [
                        {
                            "boundingBox": [
                                1.0132,
                                1.028,
                                1.3514,
                                1.028,
                                1.3514,
                                1.1538,
                                1.0132,
                                1.1538
                            ],
                            "text": "Hello,",
                            "confidence": 1
                        },
                        {
                            "boundingBox": [
                                1.4082,
                                1.028,
                                1.6625,
                                1.028,
                                1.6625,
                                1.1334,
                                1.4082,
                                1.1334
                            ],
                            "text": "how",
                            "confidence": 1
                        },
                        {
                            "boundingBox": [
                                1.7072,
                                1.0595,
                                1.8962,
                                1.0595,
                                1.8962,
                                1.1334,
                                1.7072,
                                1.1334
                            ],
                            "text": "are",
                            "confidence": 1
                        },
                        {
                            "boundingBox": [
                                1.9395,
                                1.0595,
                                2.1575,
                                1.0595,
                                2.1575,
                                1.1594,
                                1.9395,
                                1.1594
                            ],
                            "text": "you",
                            "confidence": 1
                        }
                    ]
                }
            ]
        }
    ],
}
Artık yukarıdaki OCR sonuçlarını kullanarak, ilgili doküman’ın içerdiği metinler ile birlikte sistem içerisine otomatik olarak aktarılabilmesini sağlayabiliriz.
Referanslar
https://docs.microsoft.com/en-us/azure/azure-functions/functions-scale#overview-of-plans
https://docs.microsoft.com/en-us/azure/cognitive-services/computer-vision/overview-ocr
https://docs.microsoft.com/en-us/azure/cognitive-services/computer-vision/vision-api-how-to-topics/call-read-api#determine-how-to-process-the-data-optional









İlk Yorumu Siz Yapın