Hi, guys.
Actually, I was thinking about writing some articles about ASP.NET Core, but I couldn’t find enough time. These days, I’m working on ASP.NET Core for certain uses, for example how to easily do dockerizing. Therefore, I will write some articles on ASP.NET Core.
In this article, we will build a lightweight RESTful API with ASP.NET Core. We will use Dapper and the Repository pattern for data operations and we will handle global exceptions with Serilog. At the end of the development, we will add Swagger UI, and then deploy the project to Azure App Services.
Creating Project Structure
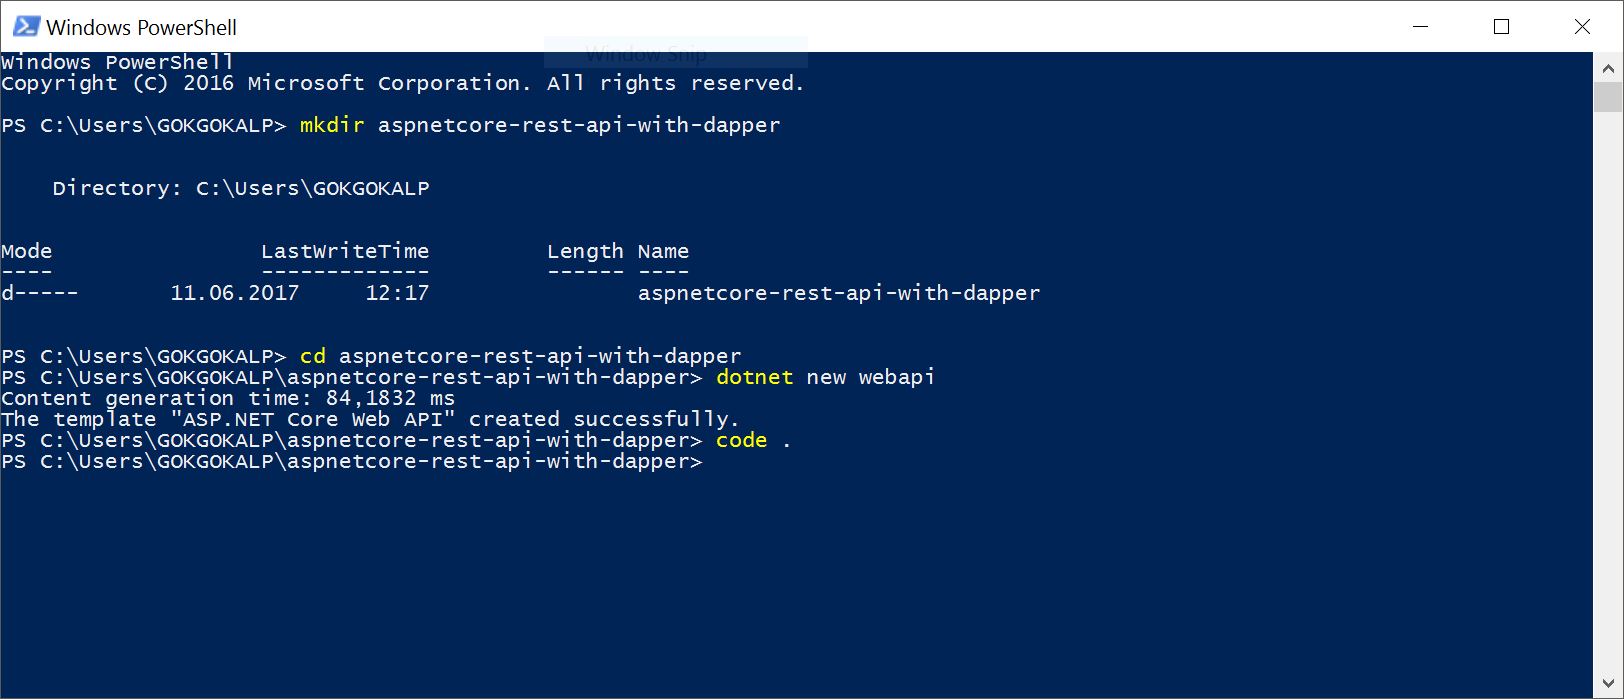
Firstly, we will create an ASP.NET Core Web API project using PowerShell commands. Let’s create a new folder called “aspnetcore-rest-api-with-dapper“, then we can create an ASP.NET Core Web API project with using the “dotnet new webapi” command as shown below.
Now, we have to open the project in Visual Studio Code with using “code .” command. After that, the project template will open in Visual Studio Code.
Now, let’s start some coding!
Model Declaration
Let’s assume we are developing an e-commerce website and we need a RESTful API to manage our product resources. Let’s create a “Models” folder in the project and add a new class called “Product“.
using System;

namespace aspnetcore_rest_api_with_dapper.Models
{
    public class Product
    {
        public long Id { get; set; }
        public long CategoryId { get; set; }

        public string Name { get; set; }
        public string Description { get; set; }
        public double Price { get; set; }
        public DateTime CreatedDate { get; set; }
    }
}
created SQL script looks like:
USE [RESTfulSampleDb]
GO

CREATE TABLE [dbo].[Products](
	[Id] [bigint] IDENTITY(1,1) NOT NULL,
	[CategoryId] [bigint] NULL,
	[Name] [nvarchar](50) NOT NULL,
	[Description] [nvarchar](max) NOT NULL,
	[Price] [decimal](18, 2) NOT NULL,
	[CreatedDate] [datetime2] NOT NULL,
 CONSTRAINT [PK_Products] PRIMARY KEY CLUSTERED
(
	[Id] ASC
)WITH (PAD_INDEX = OFF, STATISTICS_NORECOMPUTE = OFF, IGNORE_DUP_KEY = OFF, ALLOW_ROW_LOCKS = ON, ALLOW_PAGE_LOCKS = ON) ON [PRIMARY]
) ON [PRIMARY] TEXTIMAGE_ON [PRIMARY]
Contract Declaration
First, we will declare Request and Response objects. Let’s create a new folder called “Contracts” then add a “ProductRequest” class inside the “Contracts” folder as shown below.
using System;
using System.Collections.Generic;

namespace aspnetcore_rest_api_with_dapper.Contracts
{
    public class ProductRequest
    {
        public long CategoryId { get; set; }

        public string Name { get; set; }
        public string Description { get; set; }
        public double Price { get; set; }
    }
}
Now, add a “ProductResponse” class.
using System;
using System.Collections.Generic;
using aspnetcore_rest_api_with_dapper.Models;
using Newtonsoft.Json;

namespace aspnetcore_rest_api_with_dapper.Contracts
{
    public class ProductResponse
    {
        public ProductResponse()
        {
             Products = new List<Product>();
        }

        [JsonProperty(NullValueHandling = NullValueHandling.Ignore)]
        public string Message { get; set; }

        public List<Product> Products { get; set; }
    }
}
We will use the “Message” property to give information to clients when requested products not found. If the “Message” property is null, it will be ignored when returning a response to clients.
Create a Controller
So far, we created common objects. Now we can start coding and implementation in the following order: “Controller > Business > Data“. First we need to create a “ProductsController” class inside “Controllers” folder, and code as shown below.
using System;
using System.Collections.Generic;
using System.Linq;
using System.Threading.Tasks;
using aspnetcore_rest_api_with_dapper.Business;
using aspnetcore_rest_api_with_dapper.Contracts;
using aspnetcore_rest_api_with_dapper.Data;
using aspnetcore_rest_api_with_dapper.Models;
using Microsoft.AspNetCore.Mvc;

namespace aspnetcore_rest_api_with_dapper.Controllers
{
    [Route("api/v1/[controller]")]
    public class ProductsController : Controller
    {
        private readonly IProductBusiness _productBusiness;

        public ProductsController(IProductBusiness productBusiness)
        {
            _productBusiness = productBusiness;
        }

        // GET api/v1/products/{id}
        [HttpGet("{id}")]
        public async Task<ProductResponse> Get(long id)
        {
            return await _productBusiness.GetAsync(id);
        }

        // GET api/v1/products
        [HttpGet]
        public async Task<ProductResponse> Get()
        {
            return await _productBusiness.GetAllAsync();
        }

        // POST api/v1/products
        [ProducesResponseType(201)]
        [HttpPost]
        public async Task Post([FromBody]ProductRequest productRequest)
        {
            await _productBusiness.AddAsync(productRequest);
        }
    }
}
We injected “IProductBusiness” interface from the constructor then used the “GetAsync“, “GetAllAsync” and “AddAsync” methods in the controller. At this point, we have to be careful to be task-based to gain a little performance to the system.
Also, we defined the URL path as “api/v1/products“. This operation is important for version management.
Building Business
We used “IProductBusiness” interface while we were coding the controller. Now, let’s create a “Business” folder and add an interface called “IProductBusiness“.
using System;
using System.Collections.Generic;
using System.Threading.Tasks;
using aspnetcore_rest_api_with_dapper.Contracts;
using aspnetcore_rest_api_with_dapper.Models;

namespace aspnetcore_rest_api_with_dapper.Business
{
    public interface IProductBusiness
    {
        Task<ProductResponse> GetAsync(long id);
        Task<ProductResponse> GetAllAsync();
        Task AddAsync(ProductRequest productRequest);
    }
}
We can implement now “IProductBusiness” interface as shown below:
using System;
using System.Collections.Generic;
using System.Linq;
using System.Threading.Tasks;
using aspnetcore_rest_api_with_dapper.Contracts;
using aspnetcore_rest_api_with_dapper.Data;
using aspnetcore_rest_api_with_dapper.Models;

namespace aspnetcore_rest_api_with_dapper.Business
{
    public class ProductBusiness : IProductBusiness
    {
        private readonly IProductRepository _productRepository;

        public ProductBusiness(IProductRepository productRepository)
        {
            _productRepository = productRepository;
        }

        public async Task<ProductResponse> GetAsync(long id)
        {
            ProductResponse productResponse = new ProductResponse();
            var product = await _productRepository.GetAsync(id);

            if(product == null)
            {
                productResponse.Message = "Product not found.";
            }
            else
            {
                productResponse.Products.Add(product);
            }

            return productResponse;
        }

        public async Task<ProductResponse> GetAllAsync()
        {
            //TODO: Paging...

            ProductResponse productResponse = new ProductResponse();
            IEnumerable<Product> products = await _productRepository.GetAllAsync();

            if(products.ToList().Count == 0)
            {
                productResponse.Message = "Products not found.";
            }
            else
            {
                productResponse.Products.AddRange(products);
            }

            return productResponse;
        }

        public async Task AddAsync(ProductRequest productRequest)
        {
            Product product = new Product(){
                CategoryId = productRequest.CategoryId,
                Name = productRequest.Name,
                Description = productRequest.Description,
                Price = productRequest.Price
            };

            await _productRepository.AddAsync(product);
        }
    }
}
This time, we injected the “IProductRepository” from the constructor and used the “GetAsync“, “GetAllAsync” and “AddAsync” methods.
NOTE: We did not apply pagination operation in “GetAllAsync” method. You should not forget to apply that.
Data Access Operations
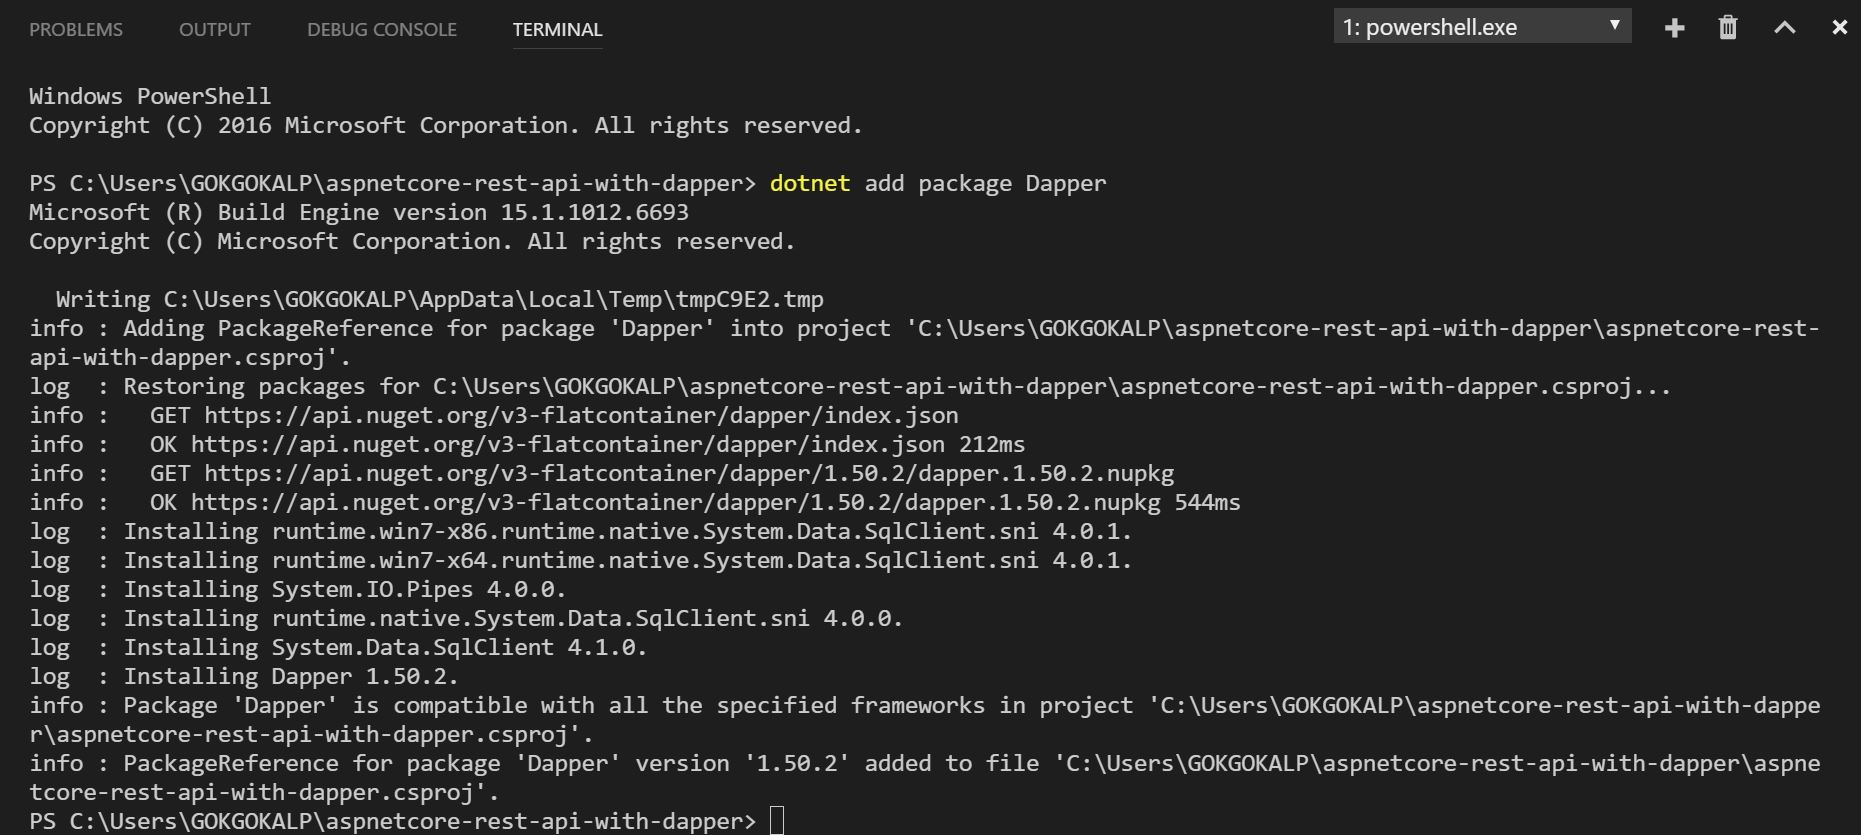
We will use the Repository pattern and Dapper here to supporting data operations. Therefore we have to include Dapper to the project, brought over from NuGet as like below.
dotnet add package Dapper
After including Dapper from NuGet, we will create a new folder called “Data“, and let’s define “IProductRepository” interface inside that as shown below.
using System;
using System.Collections.Generic;
using System.Threading.Tasks;
using aspnetcore_rest_api_with_dapper.Models;

namespace aspnetcore_rest_api_with_dapper.Data
{
    public interface IProductRepository
    {
        Task<Product> GetAsync(long id);
        Task<IEnumerable<Product>> GetAllAsync();
        Task AddAsync(Product product);
    }
}
Here, we will just define some methods. These are the “GetAsync“, “GetAllAsync” and “AddAsync” methods. Let’s add a “ProductRepository” class then implement the “IProductRepository” interface.
using System;
using System.Collections.Generic;
using System.Data;
using System.Data.SqlClient;
using System.Threading.Tasks;
using aspnetcore_rest_api_with_dapper.Models;
using Dapper;

namespace aspnetcore_rest_api_with_dapper.Data
{
    public class ProductRepository : IProductRepository
    {
        private readonly string _connectionString;
        private  IDbConnection _connection { get { return new SqlConnection(_connectionString); }}

        public ProductRepository()
        {
            // TODO: It will be refactored...
            _connectionString = "Server=DESKTOP-85SV1TI\\SQLEXPRESS;Database=RESTfulSampleDb;Trusted_Connection=True;MultipleActiveResultSets=true";
        }

        public async Task<Product> GetAsync(long id)
        {
            using (IDbConnection dbConnection = _connection)
            {
                string query = @"SELECT [Id] ,[CategoryId]
                                ,[Name]
                                ,[Description]
                                ,[Price]
                                ,[CreatedDate]
                                FROM [dbo].[Products]
                                WHERE [Id] = @Id";

                var product = await dbConnection.QueryFirstOrDefaultAsync<Product>(query, new{ @Id = id });

                return product;
            }
        }
        public async Task<IEnumerable<Product>> GetAllAsync()
        {
            //TODO: Paging...
            using (IDbConnection dbConnection = _connection)
            {
                string query = @"SELECT [Id] ,[CategoryId]
                                ,[Name]
                                ,[Description]
                                ,[Price]
                                ,[CreatedDate]
                                FROM [dbo].[Products]";

                var product = await dbConnection.QueryAsync<Product>(query);

                return product;
            }
        }

        public async Task AddAsync(Product product)
        {
            using (IDbConnection dbConnection = _connection)
            {
                string query = @"INSERT INTO [dbo].[Products] (
                                [Id],
                                [CategoryId],
                                [Name],
                                [Description],
                                [Price],
                                [CreatedDate]) VALUES (
                                @Id,
                                @CategoryId,
                                @Name,
                                @Description,
                                @Price,
                                @CreatedDate)";

                await dbConnection.ExecuteAsync(query, product);
            }
        }
    }
}
If you look at the above code block, you can see that we just used Dapper’ async methods. Now we have completed the “Controller“, “Business” and “Data” operations.
Global Exception Handling with Serilog
There are a few ways to manage exception handling in ASP.NET Core. We can choose middleware or MVC exception filters. At this point, I prefer to handle exceptions in middleware, because I saw a tip in Microsoft’s documentation: MVC exception filters are not as flexible as error handling middleware.
Firstly, we have to include Serilog’s file logger to the project from NuGet as shown below.
dotnet add package Serilog.Extensions.Logging.File
After this, create a new folder called “Middlewares” and add a “GlobalExceptionMiddleware” class inside the “Middlewares” folder.
using System;
using System.Threading.Tasks;
using Microsoft.AspNetCore.Http;
using Microsoft.Extensions.Logging;

namespace aspnetcore_rest_api_with_dapper.Middlewares
{
    public class GlobalExceptionMiddleware
    {
        private readonly ILogger _logger;
        private readonly RequestDelegate _next;

        public GlobalExceptionMiddleware(RequestDelegate next, ILoggerFactory logger)
        {
            _next = next;
            _logger = logger.CreateLogger("GlobalExceptionMiddleware");
        }

        public async Task Invoke(HttpContext context)
        {
            try
            {
                await _next(context);
            }
            catch (Exception ex)
            {
                 _logger.LogError(0, ex, ex.Message);
            }
        }
    }
}
We handled exceptions in middleware in a straightforward way. Now, we should do two things. On the one hand, we have to add a “GlobalExceptionMiddleware” class to ASP.NET Core middleware in “Startup.cs” and on the other hand we have to define a log file path.
public void Configure(IApplicationBuilder app, IHostingEnvironment env, ILoggerFactory loggerFactory)
{
    loggerFactory.AddFile("C:/@Logs/aspnetcore-rest-api-with-dapper-{Date}.txt");

    app.UseMiddleware(typeof(GlobalExceptionMiddleware));
    app.UseMvc();
}
Swagger Implementation
Swagger is a really great tool, especially for developers when using API. Let’s add Swagger to the project from the NuGet server as shown below.
dotnet add package Swashbuckle.AspNetCore
Now, we have to enable Swagger in “Startup.cs“.
public void ConfigureServices(IServiceCollection services)
{
    // Register the Swagger generator, defining one or more Swagger documents
    services.AddSwaggerGen(c =>
    {
        c.SwaggerDoc("v1", new Info { Title = "ASP.NET Core RESTful API", Version = "v1" });
    });
}

public void Configure(IApplicationBuilder app, IHostingEnvironment env, ILoggerFactory loggerFactory)
{
    loggerFactory.AddFile("C:/@Logs/aspnetcore-rest-api-with-dapper-{Date}.txt");

    app.UseMiddleware(typeof(GlobalExceptionMiddleware));
    app.UseMvc();

    // Enable middleware to serve generated Swagger as a JSON endpoint.
    app.UseSwagger();

    // Enable middleware to serve swagger-ui (HTML, JS, CSS etc.), specifying the Swagger JSON endpoint.
    app.UseSwaggerUI(c =>
    {
        c.SwaggerEndpoint("/swagger/v1/swagger.json", "ASP.NET Core RESTful API v1");
    });
}
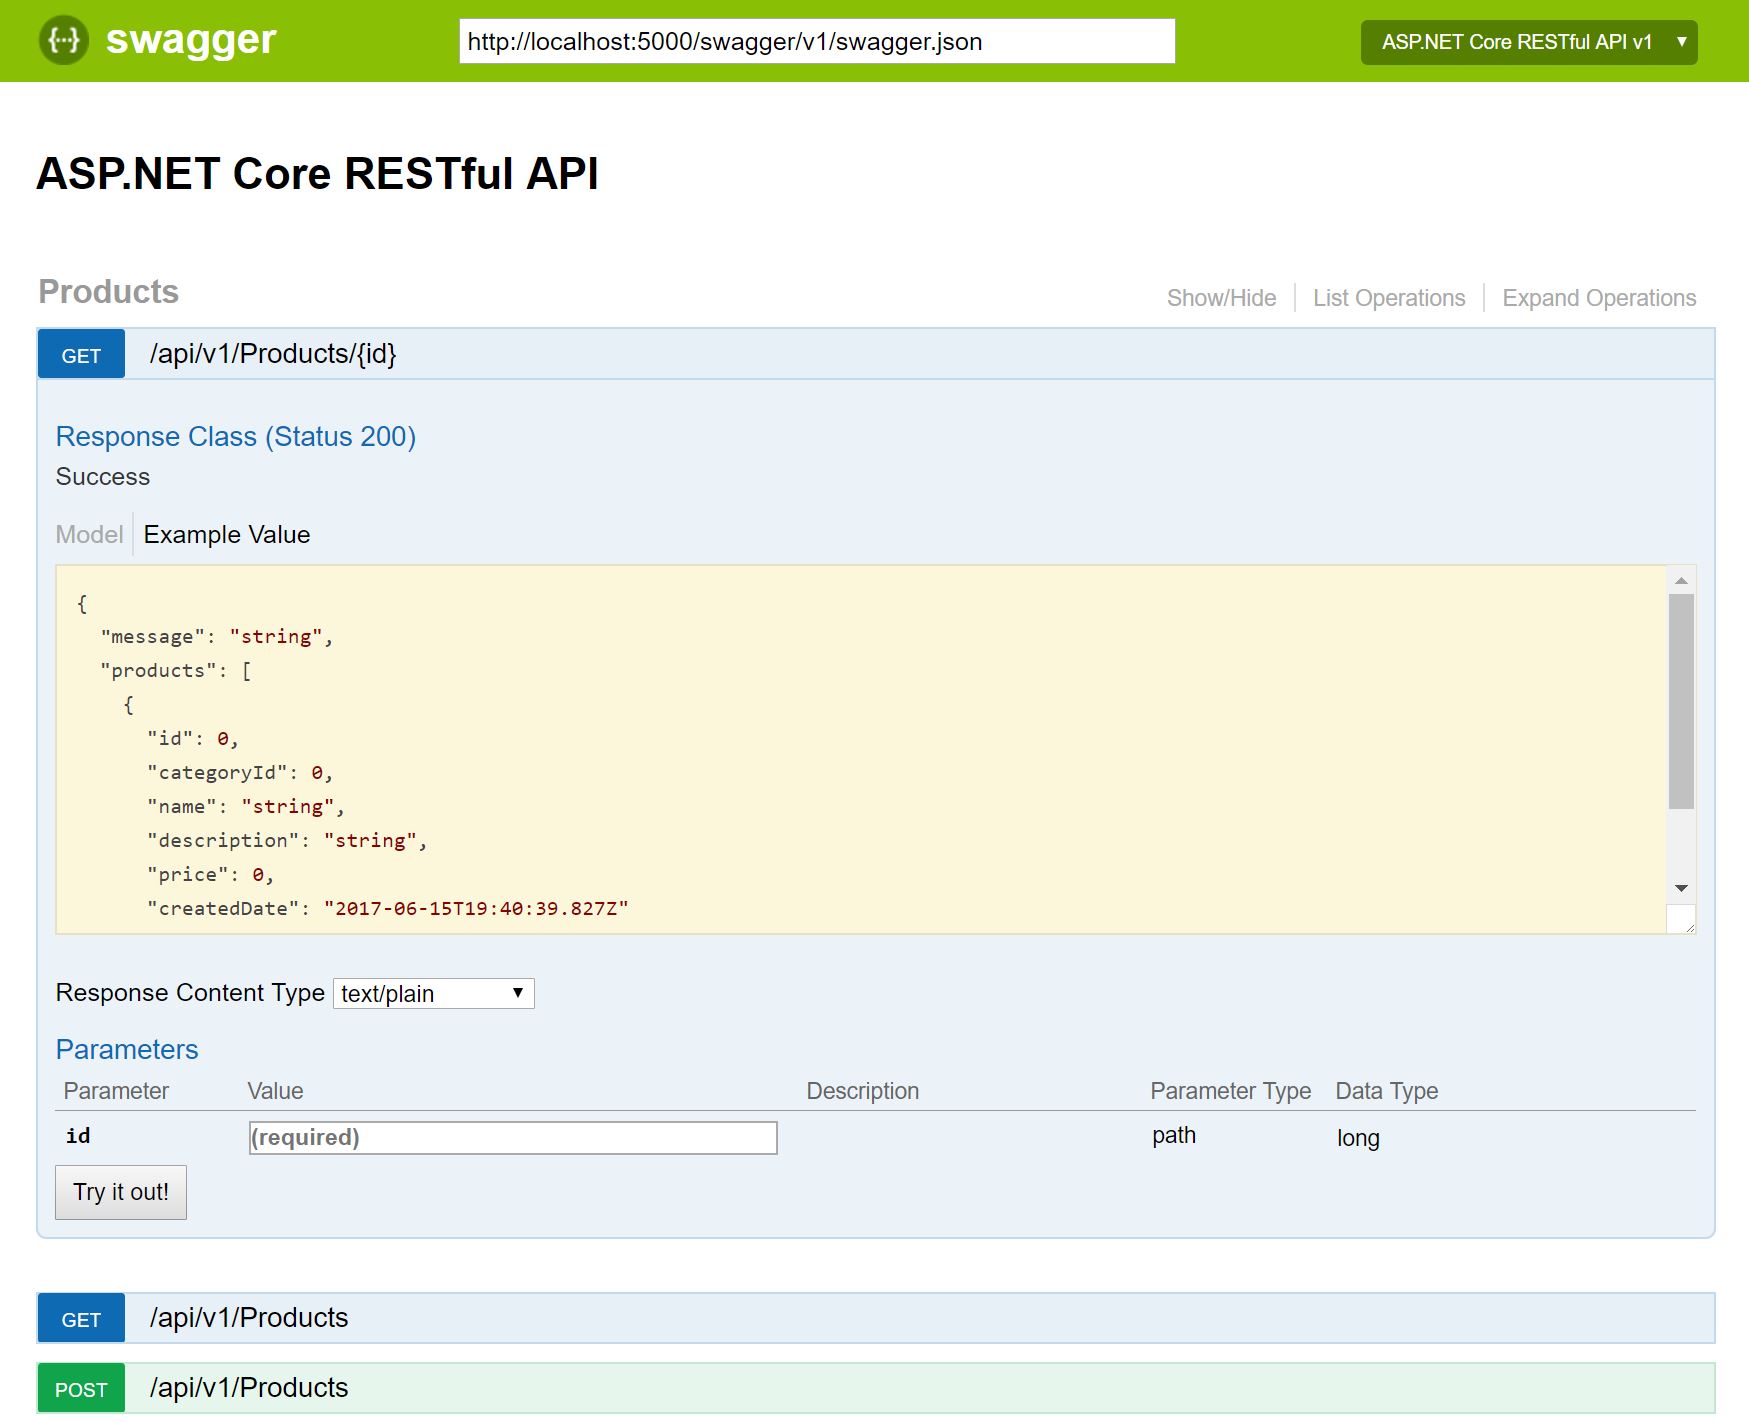
That’s all. If you run the project, you can reach the Swagger UI on “http://localhost:5000/swagger” URL.
Injection of Application Services
We used “IProductBusiness” and “IProductRepository” interfaces at the beginning of this article. Now, we have to define concrete classes in “Startup.cs” to injection operations.
As follows:
public void ConfigureServices(IServiceCollection services)
{
    // Add framework services.
    services.AddMvc();

    // Add application services.
    services.AddTransient<IProductBusiness, ProductBusiness>();
    services.AddTransient<IProductRepository, ProductRepository>();

    // Register the Swagger generator, defining one or more Swagger documents
    services.AddSwaggerGen(c =>
    {
        c.SwaggerDoc("v1", new Info { Title = "ASP.NET Core RESTful API", Version = "v1" });
    });
}
We are completely ready!
Let’s build the project with using the “dotnet build” command on the terminal, and after that, we will run the project with the using the “dotnet run” command. Now, we can reach the Swagger from “http://localhost:5000/swagger” URL.
Deploy to Azure App Services
Firstly, we have to do the following steps in the Azure Portal:
- Log in to the Azure Portal.
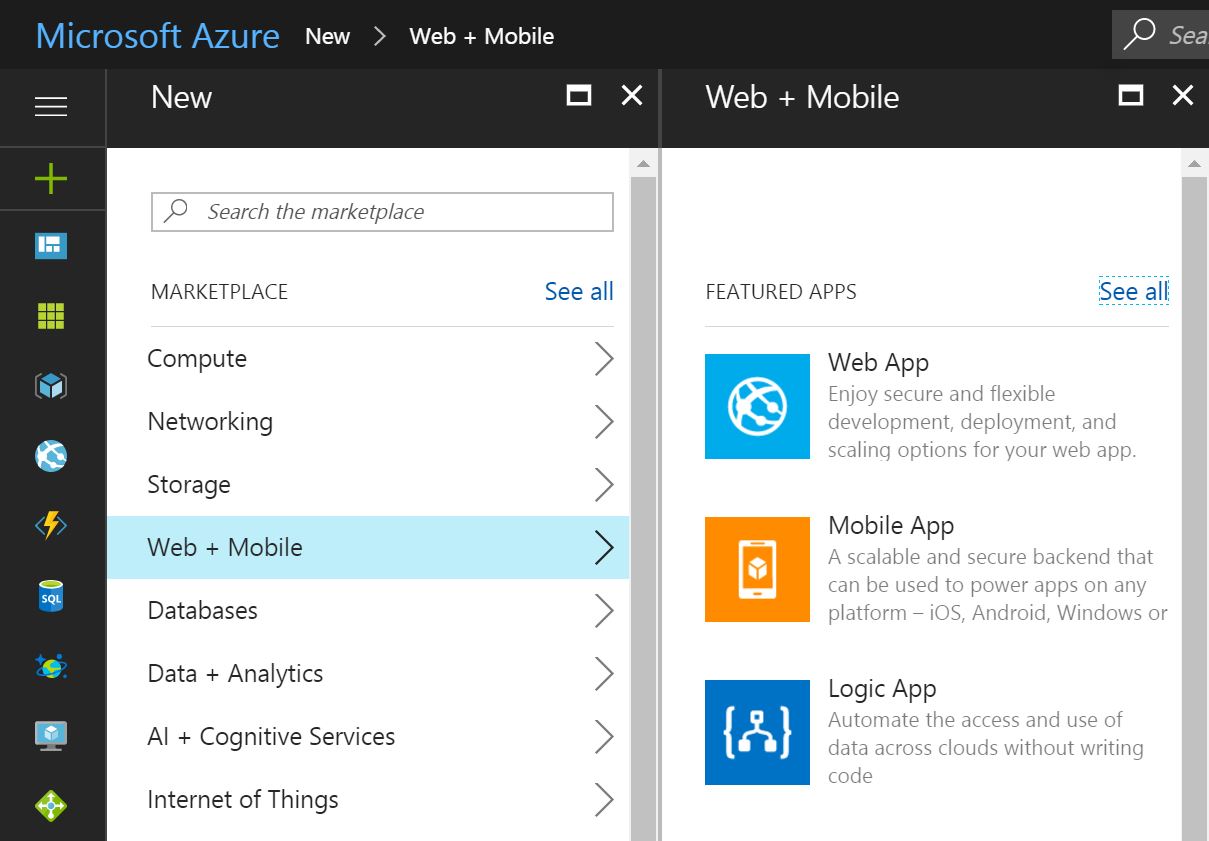
- Click “New” button at the top left of the Portal.
- Select “Web + Mobile > Web App” section as shown below from the drop-down menu.

- If you have not any subscription, you have to click “Sign up for a new subscription“, then you can get a one-month free subscription.
- We have to specify “App name” field uniquely. I specified “AspNetCoreRestfulApiSampleGokhanGokalp” as “App name“, and then click to create. (this operation could take little times)

- After clicked to create, we will get a notification something like “Deployments succeeded” as shown below:

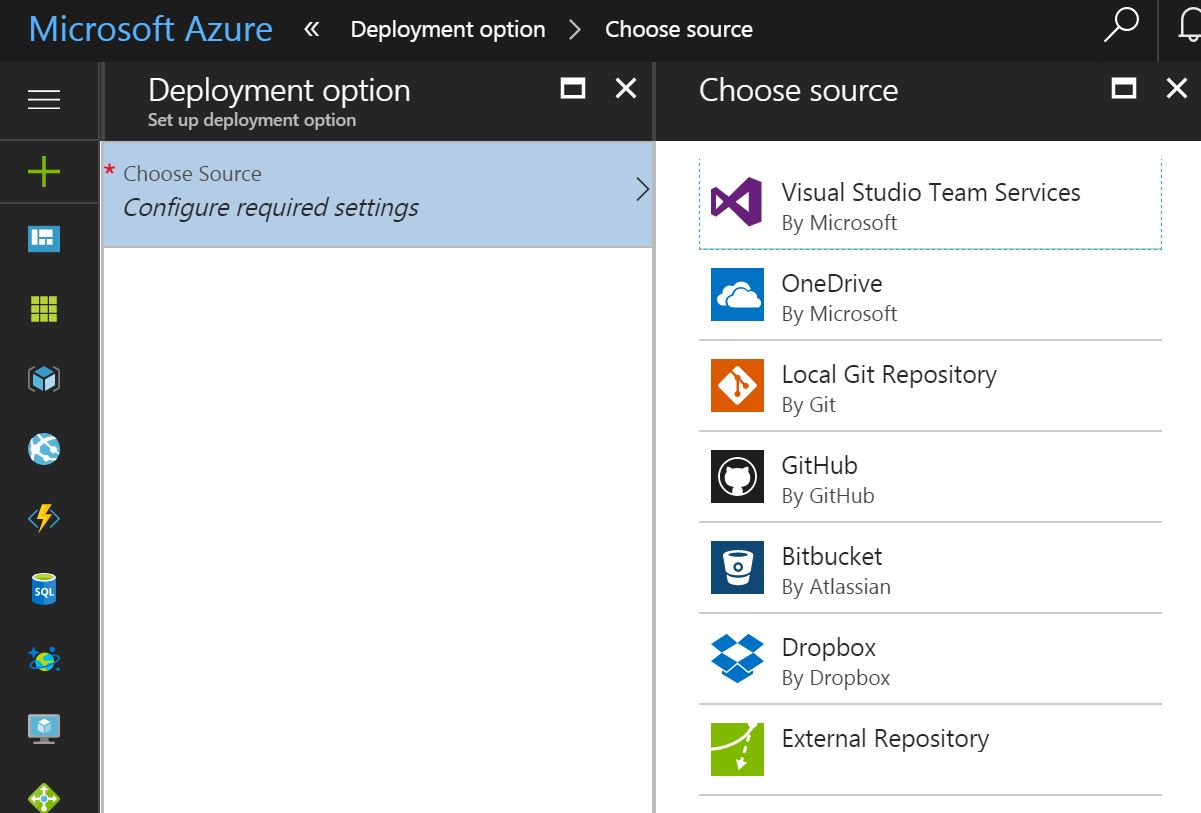
- Now let’s open “Deployment options” section at the top left of the Menu, then click to “Local Git Repository“.

- And now, we have to specify “Deployment user name” and “Password” fields for basic authentication operation.
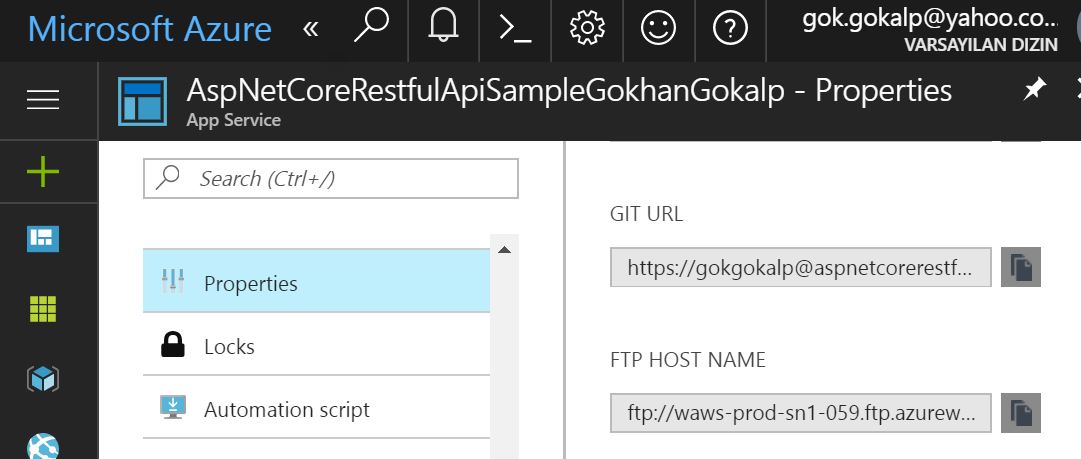
- We can get the “GIT URL” now. Open “Settings > Properties” section at the left of the Menu.

We are ready for publishing the project to Azure App Service. We need to create a local Git repository in Visual Studio Code. Open “Source Control” section at the left of the Menu, then click to “Initialize git repository” button.![]()
After that, click the “Commit All” check icon. Let’s create a remote reference for pushing updates to the web app with using the following command.
git remote add azure [URL for remote repository]
Now we have to run the following command, so the credential information can be added automatically in push operations.
git config credential.helper store
We need to push the changes to Azure with the following command:
git push -u azure master
When operations are finished, we can see a few line commands as shown below:
remote: Finished successfully.
remote: Running post deployment command(s)...
remote: Deployment successful.
To https://aspnetcorerestfulapisamplegokhangokalp.scm.azurewebsites.net:443/AspNetCoreRestfulApiSampleGokhanGokalp.git
 * [new branch]      master -> master
That’s it. Now, we can reach the project from here “http://aspnetcorerestfulapisamplegokhangokalp.azurewebsites.net/swagger/“.
I hope this article would help who needs any information about building ASP.NET Core RESTful API with some awesome 3rd libraries. Currently, I’m working on the ASP.NET Core for the Linux platform. See you in the next ASP.NET Core article series.
https://github.com/GokGokalp/aspnetcore-rest-api-with-dapper
Some references:
https://github.com/Microsoft/azure-docs/blob/master/articles/app-service-web/web-sites-create-web-app-using-vscode.md
https://docs.microsoft.com/en-us/aspnet/core/tutorials/web-api-help-pages-using-swagger








Hocam şu ProdcutResponse oluşturulurken
public ProductResponse()
{
Products = new List();
}
ve
public List Products { get; set; }
kısımlarında List’ler kızarıyor sebebi nedir?
Merhaba, kodları şekillendirmek için kullandığım plugin den kaynaklı sanırım type’lar gitmiş. Farketmemiştim. Düzelteceğim, teşekkürler.
“public List Products” şeklinde olacaktı.
Hocam peki dapper referance nasıl ekleyeceğiz arama kısmına yazdığımda bulamadım
Merhaba, “dotnet add package Dapper” komutunu çalıştırıp, ardından “dotnet restore” yapmanız gerekmektedir.
her şey iyi hoş lakin neyi neden yaptığımızı hiç anlamadım keşke yeni başlayanların da anlayabileceği bir dilden anlatsaydınız
Yazdığım bazı makaleler, genelde bu teknolojileri .NET Framework’de kullanan kitleye hitap etmektedir. Amacı ise başlığında olduğu gibidir aslında. Dapper kullanarak RESTful bir API tasarlama ve biraz da Azure App Servis’i göstermek. Yorumun için teşekkürler.
Hocam merhaba,
Since ‘ProductsController.Get()’ is an async method that returns ‘Task’, a return keyword must not be followed by an object expression. Did you intend to return ‘Task’? [aspnetcore-rest-api-with-dapper]
şeklinde bir hata alıyorum çözümü nedir acaba?
Hocam biraz çaba sarfettikten sonra daha da iyi oturdu her şey. Teşekkürler ekstradan verdiğiniz cevaplar için
Teşekkür ederim.
DI için Autofac imi tercih edersiniz yoksa .net core la gelen DI yımı.
Merhaba, genelde benim tercihim .NET Core içerisinde build-in olarak gelen DI’ı kullanmak. Bazı makalelerde ise autofac gibi library’lerin dependency load işlemlerinin bir tık daha hızlı olduğu söyleniyor, ama ne derecede ne farkeder bilemiyorum.
Merhaba, test işlemlerini yaptığımda Post metodu olumlu yanıt veriyor fakat tabloya veriyi eklemiyor. Sebebini anlayamadım. Post etmeye çalıştıgım veri aşağıdaki gibi. Olası nedenleri ne dir?
{
“CategoryId”:”5″,
“Name”: “Seker”,
“Description”: “Tatli”,
“Price”:”250″
}
Merhaba, kusura bakmayın geç cevap için.
Create için ilgili örneği boş bıraktığım için geriye herhangi bir status code dönmediği için olumlu yanıt veriyordur. Debug ettiğinizde gönderdiğiniz parametreler ProductRequest e bind oluyor mu? Bir diğeride ProductRepository içerisindeki AddAsync method’undaki query’den [Id] kısmını çıkartıp bir deneyebilir misiniz?
Teşekkürler.
Dapper için güzel bir kaynak oldu çok teşekkürler. Performans için oldukça önemli bir ORM aracı haline geldi Dapper. Türkiye’dede kullanımı daha da yaygınlacak.
Ben teşekkür ederim. Kesinlikle katılıyorum.